If you ever receive this error on #Windows 11, it means the XBox gaming services are toasted and you need to reinstall them. Usually after a fresh installation of Windows10/11, I always removed the bundled apps using PowerShell & later installed only the software that I need. I did install XBox and associated last time, as I constantly use XBox gaming bar screen recording. Looks like the Gaming Services were not fixed by re-installing XBox and components.
I landed on a working solution that is Microsoft answers thread. The working solution is copied below.
Open Terminal as Administrator & enter the below commands one after another
The second command “start…” will open a fresh instance of Microsoft Store app and you can install the gaming services. Restart the box and you are all set to go.
Today I managed to narrow down the issues to Intel driver specific. AX201 Wi-Fi module driver 22.160 and above breaks the mobile hotspot on both Windows 10 & Windows 11. The only possible solution is to rollback to driver version 22.150.x.x & stay there until Intel identifies and fixes this issue. I have opened a thread with Intel and the representative is investigating this issue. If you are interested, follow the thread here
We’ve poor cellular coverage by the datacenter area from the service provider & most of the times I use my work laptop as Mobile hotspot & it did work. Well, minimum until recent days.
I started seeing my mobile phone showing “Connected without internet” once in few minutes times & I had to reconnect which was a recent development. Unfortunately, I couldn’t land upon any relevant solutions after spending almost two working days searching for solutions & executing my own logic with resetting network/Winsock etcetera.
As I use Samsung Galaxy A71 5G Android phone, I thought of giving another attempt by searching for “Galaxy a71 5g connected without internet” & one of the first search results was:
Samsung Galaxy Phones “Connected without Internet”
Here, the vlogger talks about “Randomized MAC” Galaxy phones use when connecting to Wi-Fi networks. Although the vlogger suggests Static IP address & other changes to resolve this issue, I only changed the connection property from “Random MAC” to “Phone MAC” & days long frustrations were over.
I wanted to figure out why all of a sudden this issue started. I remember using the Mobile Hotspot without any issues, had a PowerShell script to start the mobile hotspot startup automatically whenever I am connected to work network for months & couldn’t just give up because I found a solution. Hence, I continued to find more answers.
There were more videos discussing the same issue about Samsung Galaxy phones & subsequently I landed on a Samsung community discussion here
My mobile is paired over Bluetooth to my laptop & it connects every time laptop restarts. One of the initial settings I checked was to ensure Mobile Hotspot was not setup for 2.4GHz, that causes issues for Bluetooth which uses 2.4GHz by default.
In my case, at work I am not connected to Wi-Fi networks & mobile hotspot is configured to share internet from my domain network connection. By default, as the 5GHz is not consumed by Wi-Fi connections, mobile hotspot utilizes that frequency and leaves a notification, asking to switch the frequency if devices fail to connect.
Hence, it could be one of the many elements as discussed in the Samsung community thread. All you need is to try and find out one that suits your situation. Regardless, if it is a Samsung Galaxy phone, the first solution you could try is to setup Phone MAC instead of Randomized MAC for the specific Wi-Fi connection that you have issues with. If that didn’t resolve, try others.
If you have already installed Oracle 19c following instructions available here, installing Oracle database 21c is not much different. Basically 21c is “Innovation Release” & 19c is going to be the long supported version as on date. It plainly means, there is no need to hurry to upgrade your 19c to 21c as next release will be the next long supported version.
Let us see how to install Oracle 21c on Windows (Installed on Windows 10 21H1) & the instructions are same for Windows 11 also.
Extract the .zip and change the root folder to something like “Oracle12c” (or a name that prefer. Please avoid using spaces with the folder name, example: “Oracle 21c”)
I used a virtual machine with single drive, hence the zip file was extracted and I renamed the extracted folder root to “Oracle21c”
Once the folder is renamed to your choice, open the folder and execute the “setup.exe” as administrator. Please note, you must start the setup as administrator, regardless whether your Windows user account has administrator privileges on the system.
This will kick start the installation process and depending upon the resources available it could take minutes before the installation GUI appears for you.
Choose “Server class” regardless whether you are installing it on a Server OS or client OS. It’s all about managing the resources.
Now, this is a very interesting perspective. “The software directory is the Oracle Database home directory” & the path that you will mention in the edit box is going to be the Oracle base. I hope, now you understood why renaming the media extracted folder to a very meaningful name is important. As usual Oracle suggests you the defaults, however I recommend you to follow a pattern that you can feel comfortable with.
As you could see, the default installation sets up one pdb. You may rename the default PDB at this level.
Here I left everything to defaults as my intentions were pretty limited to installation. Unless you have a reason to set up Automatic Memory management, go ahead with the well trusted manual management, that gives you granular level control on how the memory is utilized by the database.
You can change the database character set to another from the “Choose from the following list of character sets” (Specifically for Arabic and other left to right languages)
You may choose a different location for the database data files. Just make sure that the current user has full access to the path.
Use the same password for a TEST installation & follow the Oracle recommendations for PRODUCTION environments. Please note, it’s better to use the complex passwords with expiry disabled for the default profile.
That’s all folks. It’s not like the earlier times when one had to hack the installation files to install Oracle database on newer Windows OS. Starting from 11g, Oracle database gets installed on Windows 7 and later OS without complaining as long as the OS is fully patched with updates and .NET components.
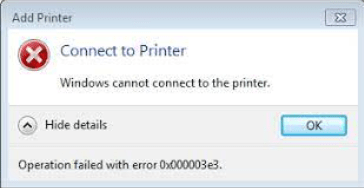
There are times when you come across the error “Windows cannot connect to the printer” (error 0x000003e3) while trying to connect to a “shared“ printer that is connected to another Windows 10 computer.
Quite possible that the drivers installed on the source machine is either not compatible with the client/target machine or not getting copied to the target machine. Now, install the correct version of printer driver to the target machine and try to connect again. There could be few other items you must check and insure for a successful connection.
Make sure both the computers network property shows the connection as either domain or private.
Make sure you have File & Printer sharing enabled for the network
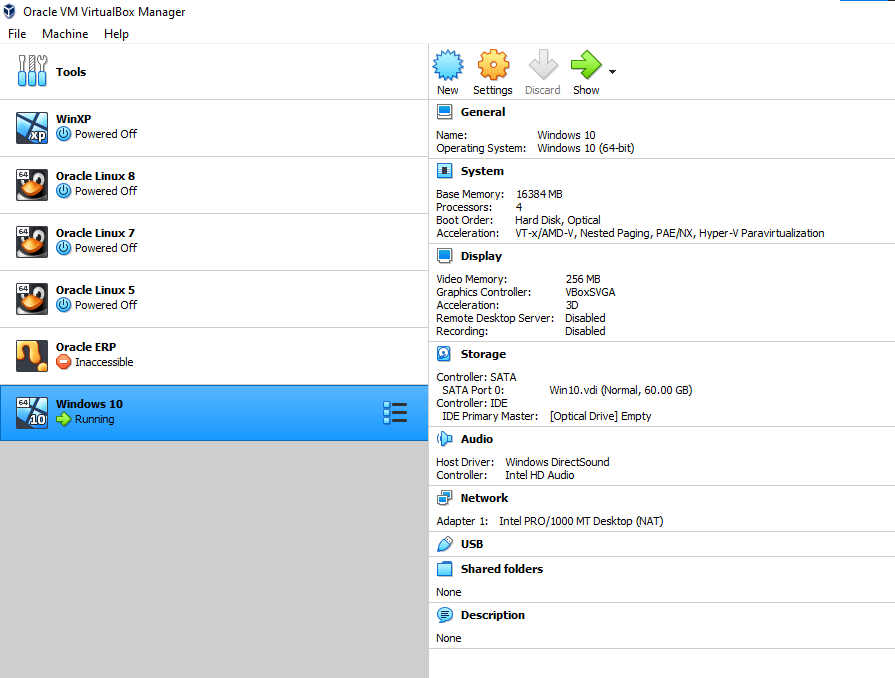
I’m a huge fan of Oracle VirtualBox. Actually I have almost 10 different VMs (many of them were never used over years) scattered everywhere within my home network. Then I had this Windows 10 VM, that always had troubles.
Environment: HOST (HP PROBOOK 440 G7
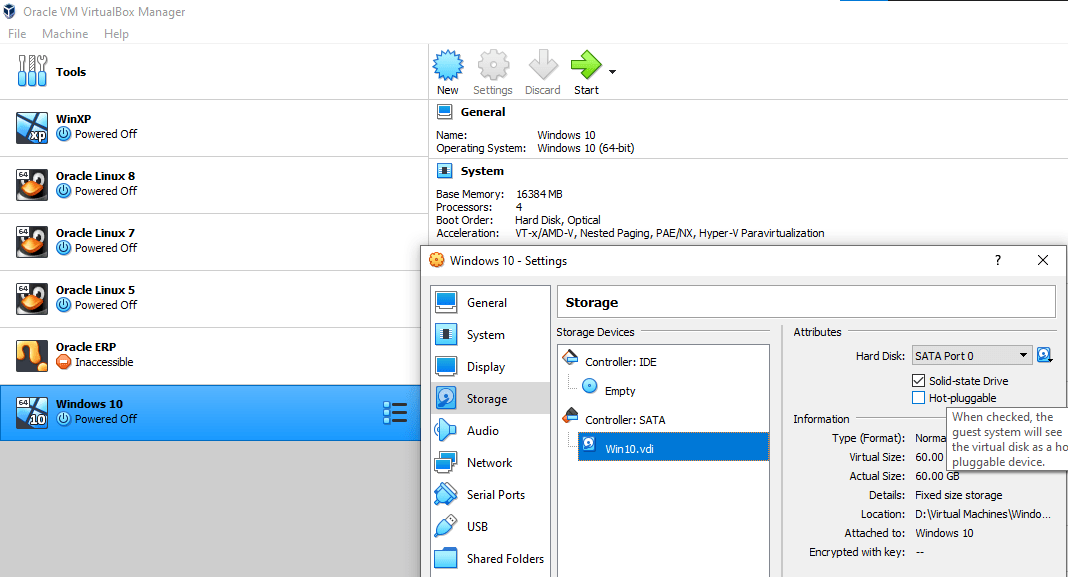
Windows 10 Pro 64Bit, i7-10th Generation Processor with 8 CPUs, 32GB RAM, NVMe disk for OS and Crucial MX500 series 1TB SSD for data/Virtual Machines & Windows 10 guest has the configurations as seen with the image.
In addition to, for the VDI with fixed size, I have exclusively set “Solid-state Drive” flag. If you have a keen observation, I have selected “Hyper-V Paravirtualization” for “Acceleration” and I don’t have Hyper-V enabled :). Well, I didn’t hear any complaints (yet)!
After reviewing many posts and answers over VirtualBox forum, I have made few changes those I felt could make some differences, and I feel my VM responds much better after those changes.
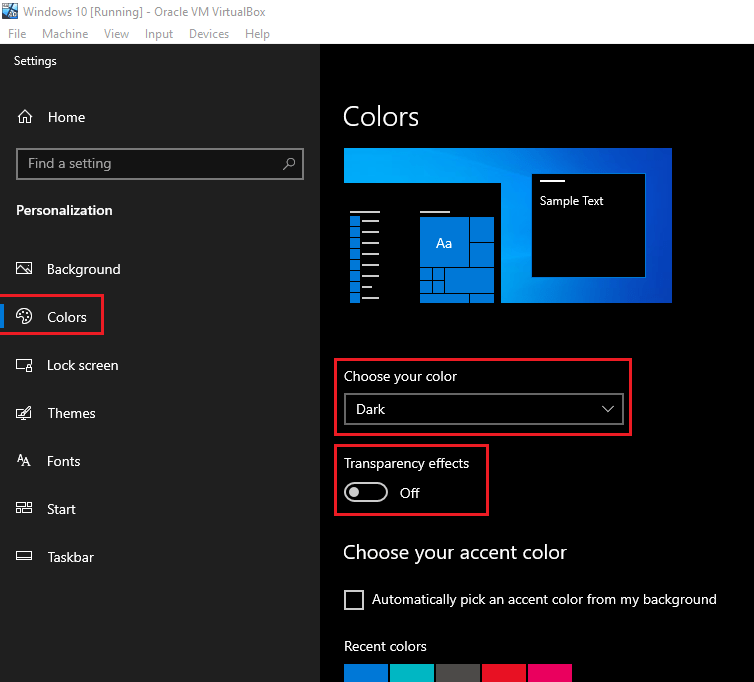
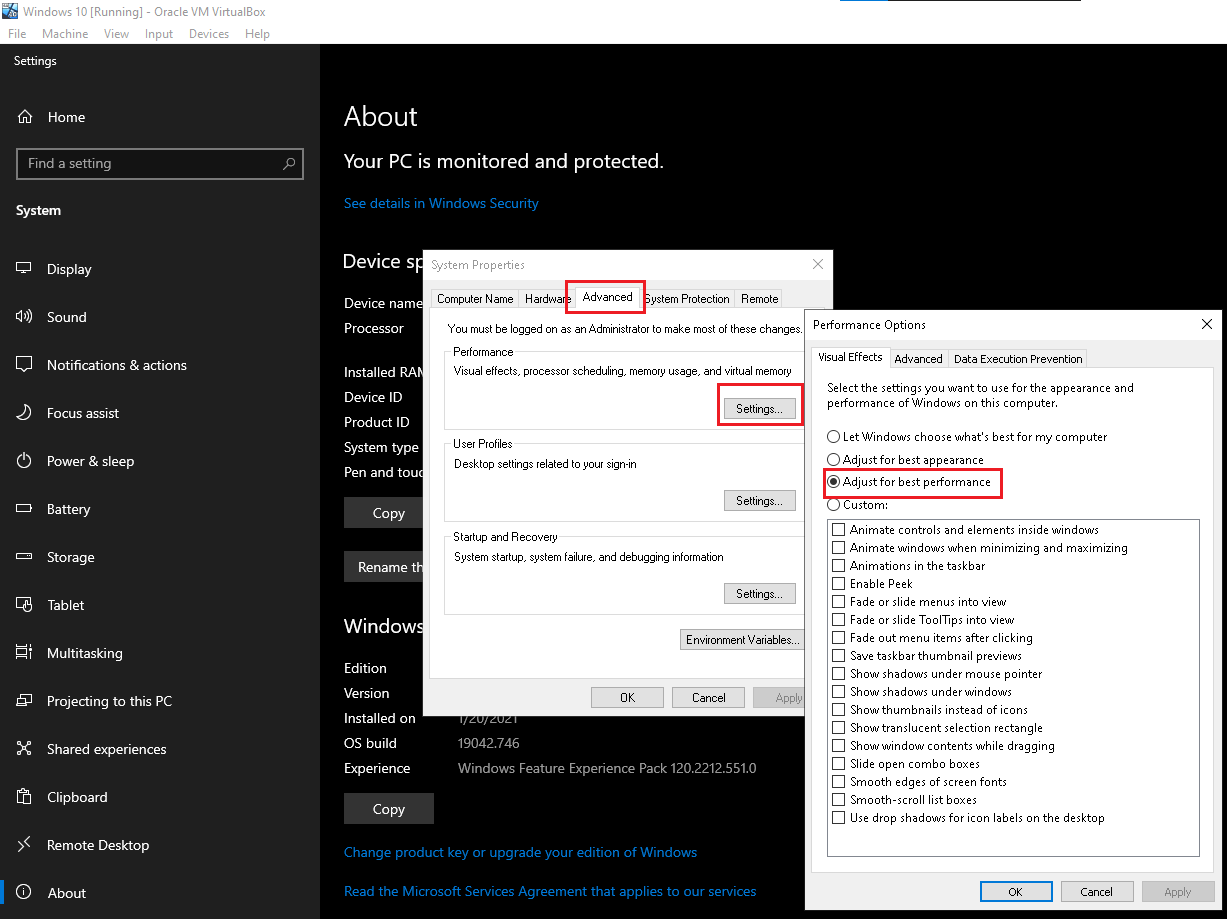
Disable Transparency. This makes your Windows 10 VM respond much faster (not just “seems faster®” ;) )
Setup your box for best performance.
Reboot the Virtual Machine. I have seen slight gains with the booting time, however once logged in the VM is snappier than ever. I cannot help you, if you are using VM for something fancy that depends upon the Graphic processing. For a server side software like Oracle database where the performance matters, I think this is the only one go with current VirtualBox/Windows 10 setup.
If you are interested to see how long it takes for my VM to finally let me log in, watch the below video.
Hope you and your loved ones are safe and secure during this tough period. I am home stuck from almost 3 months and hoping that the normality will resume very soon.
So, during the lockdown I’ve decided to take some “risks” by upgrading my production computers/laptop with the forthcoming version of Windows 10 2004 for Windows Subsystem for Linux aka WSL2 using Windows Insider preview ISO.
I work with real Linux enterprise servers at work & throughout last 10 years got myself accustomed with writing simple shell scripts and other Linux specific activities, so that I can handle them as comfortable as I interact with Windows Servers. I usually don’t get in to the silly arguments like which OS is better by comparing the features & other aspects. We never had issues with Windows Servers, neither had issues with Linux servers as we maintained them meticulously.
So, why subsystem for linux is important? Well, not many have the luxury of working with Linux servers. Especially students and developers from small business which depend completely on Windows environments. Subsystem for Linux on Windows opens doors for those who desperately need Linux environment & WSL is their friend. Unlike a virtual machine hosted on Oracle VirtualBox or VMWare, the user don’t have to dedicate hardware resources specifically for WSL & environment is always available. The only feature you may lack should be the ability to start the services automatically. Well, I am sure within a short time Microsoft will figureout a way to.
Okay, let us see how we can start availing WSL2 on Windows 10 already!
Please note, if you are not ready to take the responsibility of what you are going to do, please don’t attempt the below instructions which includes upgrading your Windows 10 version with yet to be officially released version of the same OS.
Once you upgraded your Windows 10 to version 2004
You are all ready to go. Please make sure that you have all the cumulative updates applied before proceeding.
Please note, if you are using Oracle VirtualBox on regular basis, I will suggest that you reconsider proceeding further. Enabling few of the Windows 10 features for WSL2 will completely compromise/degrade the performance of the Virtualizer and you will not even able to start your virtual machines (at times)
In order to avail the WSL2 functionality, you will have to enable few additional features of Windows 10.
I am upgrading my existing WSL to WSL2. If you are trying to configure WSL for the first time, Please refer documents explaining how to thoroughly (I have few posts towards enabling WSL with my blog, you may refer them)
You need to enable “Virtual Machine Platform” and restart the computer before upgrading WSL to WSL2.
Alternatively, you may use powershell as administrator to enable these features.
Please note, if you are using PowerShell, make sure that after enabling the features, you will restart the computer as both shell commands have /norestart switch
Once you restart the computer, you can try to upgrade your existing WSL to WSL2
Either from elevated PowerShell or CMD issue the following command
wsl --set-default-version 2
This is going to take a while, to complete. Once the upgrade has been completed you can start upgrading your existing WSL distros.
Before upgrading your WSL distros, you need to update the existing WSL kernel. Currently, you need to download and manually install the upgraded kernel, and let us hope Microsoft will include the kernel updates for WSL within their update packages.
Open a command prompt as administrator and issue the following command
wsl --list --verbos
This should list all the distros you already have on your system and the corrsponding WSL version numbers associated
So, my work laptop has 2 distros and both are already upgraded to WSL2. Regardless, let us see how we can upgrade an existing WSL1 distro to WSL2
Consider my distro listing was showing VERSION information as “1” instead of “2”, then I would have issued the following command to upgrade my Ubuntu-18.04 distro
wsl --set-version Ubuntu-18.04 2
That’s all. Your distro will be upgraded to version 2.
My personal takes on WSL2
Well, my interest towards new features are limited to getting them installed and configured. I’ve had very limited handson with the upgraded Ubuntu distro and I was able to have a buttery smooth experiece with XRDP this time. To my utter surprise, Mozilla Firefox loaded without crashing & I felt I was truly interacting with a real Linux machine.
Please refer my previous posts towards WSL about installing XRDP, MySQL and other software those are usually configured on Linux environments.
Guys, almost every other tip and tricks I have listed are coming from many sites and I encourage you to visit those sites for further reading. All I have done was to put them in single place and to post this consolidated thread.
I will be investing more time for WSL2 once after I get back to Office & hoping to post more interesting stuffs based on my findings. Until then, please stay safe and healthy.
Okay, so you switched to Oracle SQL Developer for the main reason that the suite is from Oracle & it is absolutely free and putting loads of efforts to get accustomed with certain “JAVA” platform limitations (as per developers).
Everything is fine until you start getting “ORA-20001: Oracle error -6502: ORA-06502: PL/SQL: numeric or value error: character string buffer too small has been detected in fnd_global.set_nls” or errors those WERE never happening while you were trying to execute years old PL/SQL blocks which were always completing successfully using Quest TOAD or at SQL prompt itself.
Before scavenging through your archives to find the Toad Installer for a re-installation, give the following exercise a try.
Applicable to Windows ONLY!
Go to user specific “AppData\Roaming” folder, eg: C:\Users\rajesh\AppData\Roaming
and delete both the folders, “SQL Developer” & “sqldeveloper”
Usually whenever you download and start the latest version of SQL Developer, the new version checks for the older versions under Roaming profile & if found, prompts the user asking whether the existing preferences should be copied (that includes already saved connections and other setting you may have made), which may cause errors like the ONE I have had once after migrating 19.2.x to 19.4.x
Regardless whether you were using previous versions or NOT, deleting all folders for “SQL Developer” under the roaming profile will force the latest version of Oracle SQL Developer to start afresh & most probably will take care of unreliable error messages (Confirmed by running the PL/SQL blocks without outputting the same errors using Quest TOAD)
One of the most complicated “problems” I have had with Windows 10 was, using built-in “Movies & TV” instead of my favorite VLC Player, just because the later “fails” to play 5.1 surround sound, which I love
It looks like Microsoft Windows “Movies & TV” by default enables HDMI audio passthrough, thus surround sound is channeled rightfully.
Let us see a typical scenario:
Your PC is connected to a SmartTV that has Android TV (on HDMI Port 2)
Your TV is connected to AVR on ARC using HDMI (on HDMI Port 3)
Your PC shows your TV as your default “Speaker”
You setup 5.1 surround sound (unfortunately, you cannot test the setup us Windows doesn’t do the HDMI audio passthrough, instead the applications those are equipped with HDMI audio passthrough)
You try to play your video clip that has AC-3 6 channel audio, using VLC. What you hear is stereo only & toggling through the AVR’s different Audio formats do not do anything.
Now, here is the catch. By default VLC doesn’t enable HDMI passthrough. If you are using VLC 3.x.x versions, you can easily turn on the HDMI audio passthrough from Tools ->Preferences -> Audio
Select either “Enabled (AC3/DTS only) or Enabled. Switch to the one works for you.
Added on 20th January 2025 once after realizing my fine setup has stopped playing 5.1 channel sound! The AVR’s mode was changed by kids from “Direct” to something else. Please make sure your receiver has the “Direct” mode set to let the above settings work.
Try to play the video again. One of the interesting factor I recognized that, once the HDMI/SPDIF audio passthrough enabled, VLC doesn’t care whether your speaker setup is surround (5.1, 7.1, x.x) or not. It just does the audio channel routing.
Please do not try to install Weblogic 14.1.1.0, that supports only JAVA deployments as on date. Oracle says they are committed to release a version that supports Oracle Forms and Reports & the stack is under development.
Last reviewed on: 24th December 2020
Few days back I received an interesting message from one of the visitors, having troubles with their WebLogic installation, inquiring about the frequent crashes. My visitor Mr. Rabin Mitra later figured out it was due to using 32Bit JDK with 64Bit WebLogic infrastructure.
After successfully executing "startnodemanger.cmd" and "startWeblogic.cmd", I am able to start the Weblogic Console UI. However, any action (such as clicking on Server button) within the UI crashes Weblogic! The error is as follows:

# There is insufficient memory for the Java Runtime Environment to continue.
# Native memory allocation (malloc) failed to allocate 1210952 bytes for Chunk::new
Mr. Rabin has confirmed that he had to uninstall the complete WebLogic installation & redo as replacing 32Bit JDK with 64Bit was not sufficient enough to address the continued issues with installation. Please go through the below text and links, incase if you are in the same “soup” ;)
I am happy to report that the 32-bit version of JDK on my 64-bit machine was indeed the problem. However, merely replacing the JDK does not solve the problem. The reason for this is that the jar file for WebLogic was extracted using the 32-bit JDK. This implies that the WebLogic must as well be reinstalled. This again in turn means that the Domain must be re-created and since the domain is associated with a repository, the repository must also be reinstalled. So, it turns out that one must dismantle each piece and reinstall it from scratch!


Installing the JDK is the #1 instruction. So, an incorrect choice here pretty much sets you back completely. You may want to provide this as a caution to your readers.

So here briefly is the sequence of events one must follow if they chose an incorrect version of JDK.
This time we are going to see how we could install and configure Oracle forms & reports 12.2.1.4, the latest version using WebLogic Server 12c 12.2.1.4
The Visual C++ requirements mentioned MUST be met, without which you will NOT able to startup OHS instance.
Prior Installing Oracle Server Software on your computer, please make sure that your computer has a proper name (hostname) like “JOHN-PC, RAJESH-PC, ORACLE-SERVER” etc instead of defaults like ‘DESKTOP-jyyytyuukkyjj’ after an installation of Windows. In addition, please make sure that your laptop/Desktop machine has a Static IP address.
As a rule of thumb, regardless whether you are going to install and configure Oracle software on LINUX or Windows operating systems, always update the OS to latest patch levels, prior you start with the Oracle software installation(s). I strongly recommend using Oracle VirtualBox based Virtual Machines for the lab & later you may move the tried out solution to your preferred environments (TEST, Development). I don’t recommend any of the suggestions I make through my blog posts to be applied to PRODUCTION environments without consulting a Professional support entity.
As per Mr. Rabin Mitra’s suggestion, I am adding a clause. “Please double check whether all the software you have downloaded for the installation is of same architecture. The below instructions are for 64Bit Weblogic installation & starting from JDK all the software downloaded must be 64Bit”
I prefer installing JDK on C: drive & Usually my JDK is installed on C:\Java\JDK folder. The shortest name, the best to handle it later. Once the 64Bit JDK is installed, you need to setup either JAVA_HOME environment variable or add a new entry in to the system path. I prefer a system path modification than user path modification.
Okay, there are hell loads of Oracle software installed on my system. Don’t worry, I manage them. Just make sure the JDK installation path is on top of the list and you are good to go
Install Weblogic Server 12.2.1.4
It may take a while for the jar file to extract and start the installer. Please wait patiently. I was setting up the entire infrastructure using Windows 10 VM & due to the limited resources, hence the entire ordeal was kind of time taking this time for me.
You can safely skip the Auto Update
Naming Oracle installation folders is an art. The complex the folder structures, the complex later configurations would be. I usually prefer to install all my Oracle software on D: drive. Please feel comfortable to format the Oracle home as per your requirements. Maintaining the same format helps me to locate and sometimes replace files from previous installations.
Select “Fusion Middleware Infrastructure”
WebLogic or Middleware installation is NOT complex anymore on Windows 10 OS. There are no special hacks needs to complete the installation.
Install forms & reports 12.2.1.4
Extract the downloaded zip file & you MUST start the installer as “Administrator”.
We’ve to install the Forms and Reports stack on an existing Oracle Home. So please select the Oracle Home where you have installed “WebLogic” Server. Alternatively you can always install the stack on a different Oracle Home, which I never tried earlier.
Select “Forms and Reports Deployment”, as the last two versions of Forms & Reports allow you to install a Standalone Forms Builder.
Select the correct JDK Home
Please make sure that you have Visual C++ libraries pre-installed prior proceeding. If you don’t have the VC++ libraries installed, the OHS instance will not start & you might experience additional problems during installation also.
That completes the Forms & Reports 12.2.1.4 installation.
Create a REPO for the Classic Domain
To create a classic domain, you must have a repository available with the database. Weblogic 12c supports Oracle 11G 11.2.0.4 or later database for the repositories & my pick will be always 12c Database as the 11.2.0.4 is only accessible for customers with valid Oracle support. You may refer this document for a detailed “how to” towards installing Oracle 12c database.
From an elevated command prompt, switch to Oracle Home\oracle_common\bin folder & execute “rcu.bat”
Check the below image for details
Choose the defaults
Provide the connection parameters. If the database is on another server, you don’t have to install additional clients, connection parameters will take care of the connection. Refer the below image for details (Adjust according to your database setup)
My 12c Database already has a repository for Forms & Reports 12c 12.2.1.3, hence I created a new prefix “DEV1”. If you are creating a repo for the first time, you can use “DEV” or any other 3 letter combination (make sure you will able to remember it laters).
Select all the components as seen with the below image. The selected are mandatory, especially the Metadata Services.
Use the same password everywhere! Unless you are setting up a production instance, use the same password everywhere. Example, I use “Abc1234” for the schemas, Weblogic Admin account, node manager etc, which makes the administration much easier. For production, follow the Oracle standards.
That completes the repository creation for a Classic domain.
Create a Classic Domain for deploying forms & reports application
From an elevated command prompt, switch to Oracle Home\oracle_common\common\bin (eg: D:\Weblogic\Middleware\Oracle_Home\oracle_common\common\bin) & execute config.cmd, that will kick start the classic domain configuration wizard.
Select the defaults, unless you have specifics. We will be creating a new domain with the following example.
Refer the below images and select the same components for a successful domain creation for forms and reports.
As I mentioned earlier, use the same password here, so that you don’t have to worry about forgetting & recovering it at later stages.
We will setup the domain for production (never tried Development, so don’t know how exactly both differ from each other). Leave the JDK selection as it is.
Now, your earlier created repository will come in act. Refer the below image(s) and adjust as per your environment
Make sure all the Schema validations are successful. Next step select components as per the below image
Make sure the Server Group is filled the value as seen with the below image. Don’t miss it!
We’ll add an instance OHS now. Click on the add button and refer the below images for more details
Fill in the Listen Address with “localhost” and leave rest to defaults
That finishes the creation of your classic domain.
I’m hurrying to publish the POST without further delays, as I am once again caught up with multiple assignments & keeping up with promises are NOT something I look up to at this time. However, I will add up the missing configurations for OHS and setting up the Forms and reports very soon an an annexure as early as possible!
19th June 2020
Today I installed & configured another Weblogic Server environment & realized that I was supposed to amend this post with more details, is a long due!
I chose a Container+PDB 12c database instance for my Weblogic Server this time. It was fun, finally learning few things about Container and pluggable databases & I am hoping to write another post about setting up Weblogic, Forms and Reports with such a setup in near future.
Now without wasting more time, let us see how to finalize the freshly configured classic domain for Oracle Forms and Reports deployment.
Switch to the your newly created domain’s bin folder from an elevated command prompt. Eg:
“D:\Weblogic\Middleware\Oracle_Home\user_projects\domains\base_domain\bin”. Usually I always installed Oracle software on D: drive & follow the same naming structure for the folders. It helps me to backup and restore configuration & other files that help me to finish setting up the environments faster.
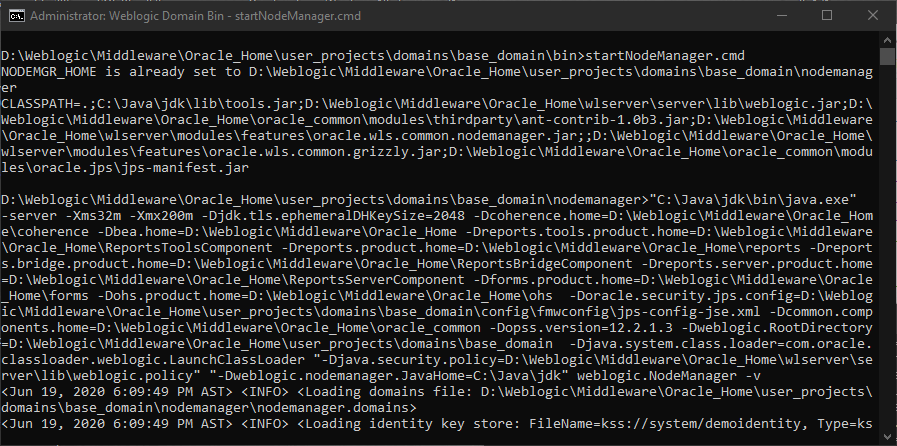
Start the nodemanger now by issuing the command by executing the command “startnodemanger.cmd”
It may take few seconds to minutes until the node manager starts for the first time. Please remember, you shouldn’t close this command window, which will automatically stop the node manager.
Open another elevated command prompt window and switch to your classic domain’s bin folder. Start the Weblogic admin server by issuing the command “startWeblogic.cmd”
Okay, with node manager, 99.9% chances that you may not bite bullet. With Weblogic Admin server, this is not the case. For number reasons, the Server will try to start and give up in the middle. So don’t panic. If the Weblogic Admin Server is not coming up to a “RUNNING” status after extended period of waiting, go ahead and restart your computer. Start node manager and then try to start the weblogic admin server once again.
The initial startup could take up to 5-6 minutes (depending upon your hardware, this time could vary) & you should see a status like below
Remember not to close the window, which will immediately stop the Weblogic Admin Server. The status of the window will keep on updated against the activities happening at the server side. Once started, you can safely keep both node manager and Weblogic Admin Server CMD windows minimized.
Once after successfully logging in, this is the window you are presented with. We’ve to configure both Forms & Report servers now, by trying to start them. This process will keep on adding many elements to your start menu. Let us see we can start Forms (WLS_FORMS) & Reports (WLS_REPORTS) servers now
Click on the “Control” tab, select both “WLS_FORMS” & “WLS_REPORTS” from servers and press the “Start” button. Once start button clicked, you can press the refresh button to monitor the status of the Servers. Do not forget to click the refresh button again to stop refreshing once after the servers show the status “Running”
It could take minutes for both the servers to reach the “Running” stage. Keep watching the Admin Server command window for unexpected errors. If you have followed all the steps as I’ve instructed throughout my thread, I can confidently say that you shouldn’t have a single hick up until this moment.
Once both servers are running, we can complete the OHS setup finally. Open another elevated command prompt. Switch to Oracle_Common\common\bin folder
Eg: D:\Weblogic\Middleware\Oracle_Home\oracle_common\common\bin and start Weblogic Scripting Tool (wlst)
Now you can issue the command “ohs_updateInstances()” at the wlst prompt & once the configuration completed, exit wlst by issuing “exit()”
You can try to logon to Weblogic Enterprise Manager console and start the newly setup OHS instance now.
Logon to Weblogic Enterprise Manager from http://localhost:7001/em & click the carousal menu by the left hand side
and expand HTTP Server to view your newly created OHS instance. In our case “ohs1”. Click on “ohs1” to open the control panel for the instance
Click the Start up button to start the OHS instance & after showing you message window stating you cannot stop the starting/stopping process, OHS will start. It could take few seconds to minutes depending upon your hardware and available resources.
Give special attention to “Machine Name”.
Now we will see how to bring OHS instance in action by setting up the few other factors like node manager security, configuration files.
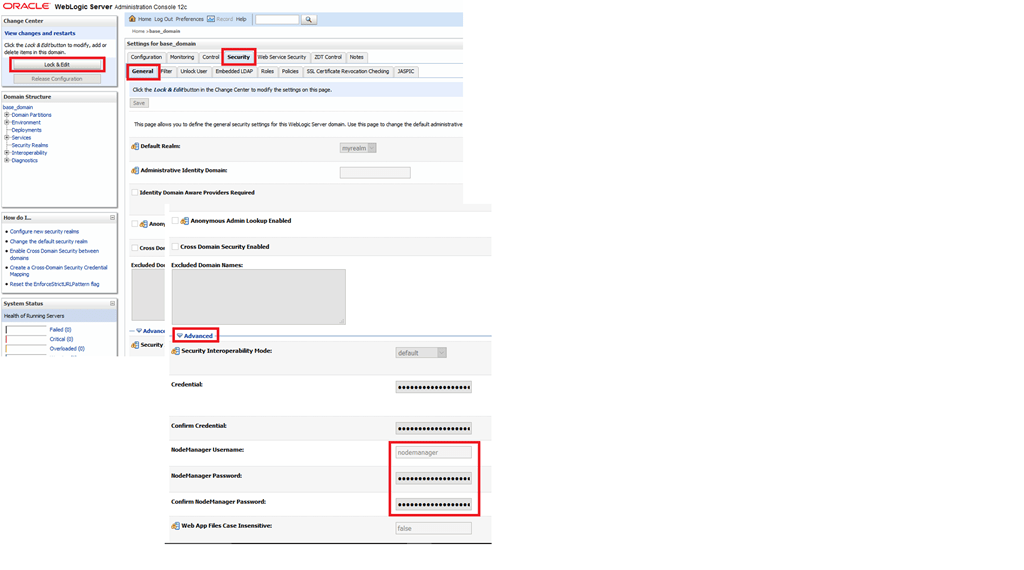
Lock & Edit the domain security values, please refer the image below for details
Provide a meaningful name for the node manager account and supply a password. I used the same password for the total 12c deployment, unless you are setting up a PRODUCTION instance, you may use the common password across the 12c instances for easy administration of objects when required. Shutdown the services (better). Once the node manager properties are changed, restart the WLS admin server. Please note, always stop all running servers (forms & reports) services prior shutting down the Admin server & I suggest you gracefully shutdown the Admin server by running “StopWeblogic.cmd” instead of using the Weblogic console.
Move to your Oracle Home folder. I have installed Weblogic server in D:\Weblogic\Middleware folder, hence my Oracle home folder is
D:\Weblogic\Middleware\Oracle_Home\
(Adjust your paths accordingly)
Edit forms.conf file in the folder D:\Weblogic\Middleware\Oracle_Home\forms\templates\config\
By default this template file comes with commented examples, like following
You need to uncomment one of the blocks starting from <Location /forms> until </Location> & add properties specific to your deployment, for example, my computer’s name is “RAJESH-PC” and I am using default ports for both forms and reports applications, hence I have the properties set like following
Now we will edit the configuration file for reports
Switch to “D:\Weblogic\Middleware\Oracle_Home\reports\conf” folder & edit “reports_ohs.conf” and add a block like following (alter according to your setup)
Now the OHS instance know about the deployments and once after restarted, you can try to start the forms based application through the OHS instance, rather than calling it against the default port (9001)
Once the OHS instance is updated with the new information, try to start the OHS instance from a command prompt using storeUserConfig parameter
1st run, you will be prompted for node manager password, supply the password you have setup earlier and OHS instance should start without creating a fuzz in usual scenarios
In future if you want to start the OHS instance, unless made changes to the configurations, just run
Above concludes the 1st of level of configurations for Oracle forms based application. You can use Weblogic 12c Enterprise Manager to configure most of the forms environment related parameters like forms path and other, while I am yet to find out relevant configuration areas for reports.
You can manually modify the formsweb.cfg & default.env files to start with as well
Regardless whether you are going to use the in-process report server or a stand alone instance of the reports, many changes should be made to the configuration files, so that you can call the reports server from a Forms module
Generally we will be modifying multiple configuration files, I will try my level best to provide the exact locations for the files which you should change according to your installation preferences
Configuration files path (Please note, through versions, there are minor changes happened to these configuration files. The images below were copied from my previous post about configuring for deployment, however the settings remain the same for 12.2.1.4 (as tested on 19th June 2020))
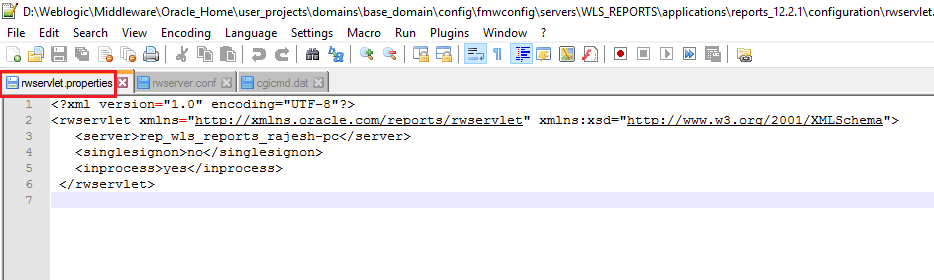
rwservlet.properties – Servlet specific properties
rwserver.conf – Server properties
cgicmd.dat – key mapping file
1. As far you are using in-process reports server, nothing much to alter with “rwservlet.properties” file. Basically you should see entries like following in the opened file:
2. rwserver.conf (Please check the below image)
3. cgicmd.dat: Many values we supply to call a report using Web.Show_Document method could potentially expose vital information like the database details & many other. “cgicmd.dat” file helps us to map such values to keys and later use them wherever applicable. With this example, I will demonstrate, how the database username, password and service name are mapped using a key. Please check the image attached below
Once these configurations files are altered, we need to create a report instance for the WLS_REPORT server. Open an elevated command prompt and switch to “D:\Weblogic\Middleware\Oracle_Home\oracle_common\common\bin”. Start wlst & connect to the server.
Note, you can choose your own name for the report instance. Once the report instance created, exit wlst and you can try to start the WLS_REPORT server from the weblogic console.
This comprehensive note should help you to quickly start with Oracle Forms & Reports 12c (12.2.1.4)
I am avoiding few elements like publishing a Forms based application for now. If you feel, should be added, please let me know through the comments section.
WSL 2 is almost here! and if you are here, reading this post. Please consider reading about WSL 2
During one of the recent chit-chats, few of my contacts were asking me about the “real” business sense behind Linux on Windows. It is simple. Microsoft is:
Going to integrate LINUX so deep within Windows that, in the very near future, one don’t have to run a separate LINUX Server. Simple like that.
After experimenting with KALI Linux WSL, I managed to install Xfce & XRDP on Ubuntu 18.04 WSL & the only few things I couldn’t do with the WSL was starting services automatically when the subsystem starts. There are hacks, well, I don’t think they really worth a try soon as Microsoft will BE bringing it on to WSL pretty soon.
Now, let us get back to the topic. I’ve installed Ubuntu 18.04 WSL nothing less than half dozen times. Every time something goes wrong & I am forced to uninstall and re-install the WSL to continue with additional experiments. My last attempt was to install Kubuntu desktop, that screwed my Xfce & after 2 days of continuous efforts to “fix” few “unknown” things, I had to uninstall one Ubuntu WSL that had a fully functional WordPress instance :(
So, I decided to learn how to backup a functional WSL, so that if something goes wrong, I can restore & continue
I’ve ready at few places that Windows 10 version 1903 comes with WSL backup functionality out of the box. Until you decide to upgrade your box to 1903, you may use the below for backing up your dear WSL instance.
I came across a pretty decent thread here & a user Jaime’s answer is the apt ONE, missing only few details like /tmp folder.
Where /mnt/c is C:\> drive of your Windows Machine. You may change /mnt/c/ to /mnt/d/ or /mnt/e/, based on how your partitions are laid. Closely watch the excluded directories. You MUST exclude them.
My tar ball was around 1.5GB in size & I moved the tar ball to another machine which didn’t have WSL activated.
First you have to enable Window Subsystem for linux from Turn Windows Features on or off (If you are not restoring the backup to same Windows Machine). This will ask you to restart your Windows Machine.
If you are going to restore a Ubuntu 18.04 WSL rename launcher.exe to Ubuntu1804.exe & rename your tar ball to rootfs.tar.gz
Open an elevated command prompt & switch to D:\wsl
and just execute, for example “Ubuntu1804.exe”
It will take a while for the installation to complete. As the superuser thread states, it installs and opens the WSL for you. From next time, all you need to do is to start Ubuntu1804.exe & your WSL instance is up and running!
However, I had an issue with the restored instance. It was related to missing /tmp folder. I found a solution for it with nixcraft article.