Windows robocopy | Using volume ids instead of a drive letter.

You connect a removable disk to your Windows box, immediately the drive is assigned a letter. If you have multiple partitions on the disk, each partition will get a drive letter, and it’s how Windows work. This could cause some kind of annoyance when these disks are constantly disconnected for others and reconnected. One tricky solution to this is, assigning a drive letter like W,X,Y as Windows assigns the first free drive letter to the newly connected disk which is in the alphabetical order. Lack of functionality to reserve a drive letter for a particular device could add more troubles when batch files or PowerShell scripts totally depend upon drive letters for a successful execution, example a backup.

Today we will see how to use volume ids instead of drive letters for Windows robocopy, one of the best free backup tools that you could ever find.

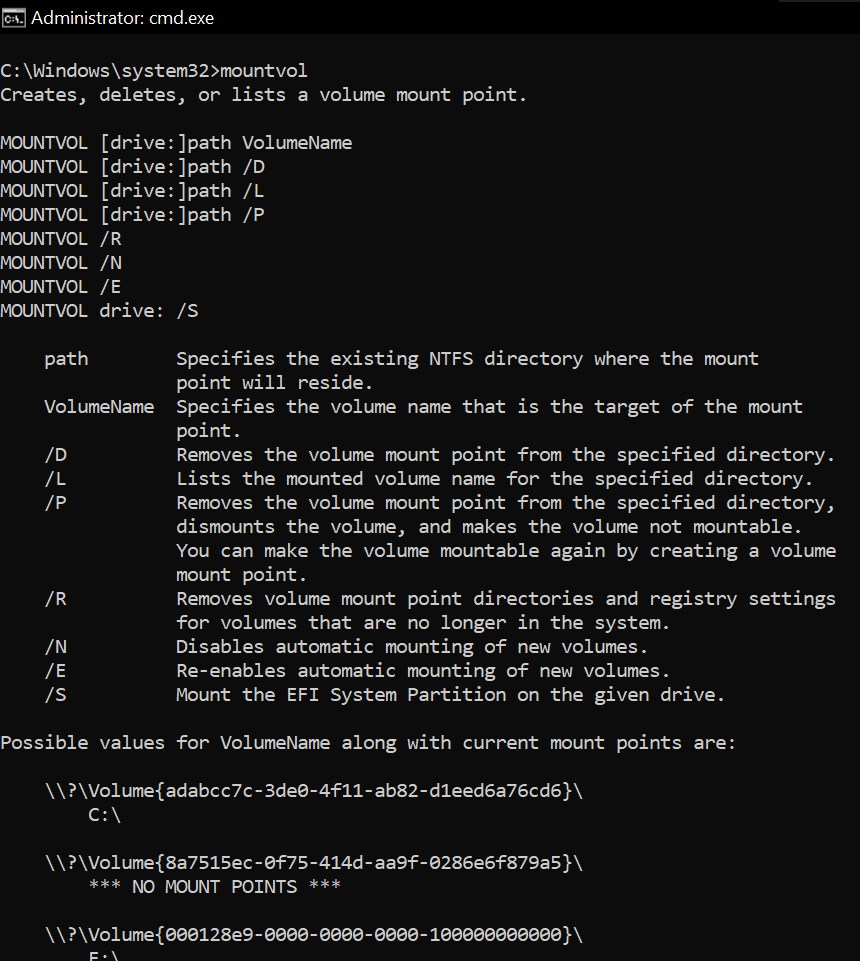
Open command prompt as administrator and execute the command “mountvol”. Immediately after few help text, the output will show the ids for all the volumes currently present.

Copy the Volume Id for the drive letter which is your target/source. Modify the backup.ps1 as given below example!

#Author: Rajesh Thampi
#Date: Few years back
#Last modified on: 14th June 2025
#Partner-in-crime: Microsoft Copilot

<#
Hint
Use "mountvol" command at prompt to get the currently connected disks and their volume ids, drive letters
Get the volume id for the drive letter, replace below.
Volume Id will change when you format the disc next time.
The escape character is ` not ' after the variable $DriveLetter
#>

$VolumeID = "Volume{d2540346-9901-49e9-9f57-413d95f52744}"  # Replace with actual Volume ID
$DriveLetter = Get-Partition | Where-Object { $_.AccessPaths -match $VolumeID } | Select-Object -ExpandProperty DriveLetter

if ($DriveLetter) {
    Write-Output "Drive Letter: $DriveLetter`:\KeepACopy"
} else {
    Write-Output "No matching drive letter found for Volume ID: $VolumeID"
}


$DestinationPath="E:\ERP-Inhouse Developments"
$SourcePath="$DriveLetter`:\ERP-Inhouse Developments"
$logfile = "C:\Scripts\logs\Inhouse_Developments_$(Get-Date -Format 'yyyy-MM-dd_HH-mm-ss').log"

robocopy $SourcePath $DestinationPath /MIR /ZB /R:5 /W:10 /LOG:$logfile


$DestinationPath="E:\MyProjects"
$SourcePath="$DriveLetter`:\MyProjects"
$logfile = "C:\Scripts\logs\MyProjects_$(Get-Date -Format 'yyyy-MM-dd_HH-mm-ss').log"

robocopy $SourcePath $DestinationPath /MIR /ZB /R:5 /W:10 /LOG:$logfile


$DestinationPath="E:\KeepACopy"
$SourcePath="$DriveLetter`:\KeepACopy"
$logfile = "C:\Scripts\logs\KeepACopy_$(Get-Date -Format 'yyyy-MM-dd_HH-mm-ss').log"

robocopy $SourcePath $DestinationPath /MIR /ZB /R:5 /W:10 /LOG:$logfile

#Finally cleanup the log directory, deleting all files that are more than 5 days old.
#This is useful incase if you are regularly using the script with a scheduled job.
Get-ChildItem 'C:\Scripts\logs' -Filter '*.log' | Where-Object { $_.LastWriteTime -lt (Get-Date).AddDays(-5) } | Remove-Item

Adjust your scripts based on your requirements. Now, you don’t have to worry about the drive letter changes anymore. Just plug your removable disk, execute the PowerShell script as administrator and you are all good.

Just make sure that you have set the PowerShell Execution Policy properly before trying to run scripts.

That’s all folks.

Windows Airplane Mode

I never ever used the Windows Airplane mode. Basically, as a developer, I hardly ever thought of being disconnected. Then one fine day I wanted to try it, so enabled it and was still able to browse and carry on with much of my “network” related activities as the built-in Windows “Airplane” mode only deals with “wireless” devices. Your Wi-Fi and Bluetooth connections are toggled when you enable/disable the mode, leaves alone the physical connections, like ethernet. I thought of something more & here is a home grown true “Airplane” mode enabler ;). Copy the code to a PowerShell script file & run it as administrator. Don’t be too excited and try it from a remote connection.

# Get all network adapters that are enabled
$enabledAdapters = Get-NetAdapter | Where-Object { $_.Status -eq "Up" }
# Count the number of enabled adapters
$enabledAdapterCount = $enabledAdapters.Count
# Output the result
<#
$wshell = New-Object -ComObject Wscript.Shell
$Output = $wshell.Popup("Number of enabled network adapters: $enabledAdapterCount", 0, "Active Adapters", 64)
#>


if ($enabledAdapterCount -gt 0) { 
    
    $wshell = New-Object -ComObject Wscript.Shell
    $Output = $wshell.Popup("Proceeding will disable all network adapters, Are you sure?", 0, "Number of Active Adapters: $enabledAdapterCount", 4 + 32)
    if ($Output -eq 6) { Disable-NetAdapter -Name "*" -Confirm:$false }
}
else { 
    
    $wshell = New-Object -ComObject Wscript.Shell
    $Output = $wshell.Popup("Proceeding will enable all network adapters, Are you sure?", 0, "Number of Active Adapters: $enabledAdapterCount", 4 + 32)
    if ($Output -eq 6) { Enable-NetAdapter -Name "*" -Confirm:$false  }
    }

Create a shortcut to “powershell.exe” on your desktop. Modify it like below image.

The same script can enable or disable all adapters based on their current status. You cannot execute this script as a normal user.

Windows backup using bitlocker and powershell secrets

Definitely not for an environment that boasts TBs of data that should be backed up the most efficient way. This solution is best suitable for environments where backups sizes are not exceeding couple of TBs in size as the BitLocker encryption will slow down the entire process by encrypting each new file during the initial copying. Once the first sync is over, consecutive synching should be far faster as only new and modified files will be copied & encrypted to the destination volume.

Further, the performance of the entire process depends upon the hardware resources available also. We deployed this solution for one of our businesses that has approximately 500GB total size, consist of hundreds of thousands of small files. The first robocopy run on each external disk over USB 3.0 took approximately 10-12 hours and the consecutive runs completed within 20-22 minutes. We used Tandberg RDX Quickstor External solution for this purpose. This time could be brought down to couple of hours if both source and destination volumes are based on SSD.

The solution approach was like this. All RDX tapes for 6 days per week were formatted as NTFS volumes, enabled BitLocker on them immediately after formatting.

The same machine Powershell was configured to run remote signed scripts. Powershell sample as below.

PS C:\Users\rajesh> Get-ExecutionPolicy
RemoteSigned
PS C:\Users\rajesh> $secretPW = "MySecretPassword123@" | ConvertTo-SecureString -AsPlainText -Force
PS C:\Users\rajesh> $secretPW | Export-Clixml -Path C:\Scripts\default.xml
PS C:\Users\rajesh> $MySecret = Import-Clixml -Path C:\Scripts\default.xml
PS C:\Users\rajesh> echo $MySecret
System.Security.SecureString
PS C:\Users\rajesh> Unlock-Bitlocker F: -Password $MySecret

Interested about what happens when your password is converted to Secure String? Check the image below. That’s how a secure string looks & someone who has access to your computer/server could still be able to convert it to plain text and get your password. Hence, this is not a 100% fail safe solution, however it could be pretty effective against robots/malicious codes.

The above exercises were to confirm everything is in place and working properly before developing the script that will be used for regular backups. Name it anything and refer it inside the scheduled job.

#DailyBackup.ps1
#Author: Rajesh Thampi
#Date: 14.10.2024

#Read the BitLocker password from the xml file
$Secret = Import-Clixml -Path C:\Scripts\default.xml

#Unlock the volume that is BitLocer protected.
Unlock-Bitlocker F: -Password $Secret

#Setup source and destination paths.
$source='D:\Some_Folder'
$destination='F:'

#Start robocopy. Use /ZB switches to avoid recyclebin related issues.
Robocopy.exe $source $destination /E /DCOPY:DAT /XO /ZB

#After the copying, lock the drive immediately.
manage-bde -lock F: -ForceDismount

By the way, RDX hardware is not cheap. Hence you should consider alternative mediums. The advantage of a BitLocker protected volume is, even during a ransomware attack these volumes could be completely immune, unless the volume is open for backups during the attack. Well, you never know.

References

Oracle 19c | Install sample schemas

Updated on 3rd June 2025

After a fresh installation of Oracle 19c and patch update to 25, I couldn’t get the mksample.sql to work as explained below. The 12th parameter for connect string “localhost:1521/SCT” started throwing many errors like listed below:

SQL*Loader: Release 19.0.0.0.0 - Production on Tue Jun 3 13:47:18 2025
Version 19.25.0.0.0

Copyright (c) 1982, 2024, Oracle and/or its affiliates.  All rights reserved.

SQL*Loader-704: Internal error: ulconnect: OCIServerAttach [0]
ORA-12154: TNS:could not resolve the connect identifier specified

I checked tnsnames.ora and listener.ora files to ensure that the necessary entries were available for the PDB so that I can connect to the PDB directly from .Net applications. I couldn’t figure out what was going wrong, and decided to give it a try by connecting to the the PDB directly and executing the mksample.sql script. This also didn’t work as the script failed to connect to the connection string.

For a curiosity purpose, I decided to enter only the connect string name during the next attempt and the script executed without any troubles. If you are facing the same issue, make sure that the current CMD is completely closed and you will execute the script from a new command window. Let us see how it work.

SCT is my PDB and I am connecting to it as sys & executing the script mksample.sql

That’s it!

End of update 3rd June 2025

Oracle 19c comes with a single sample schema HR. For other sample schemas, we have to download the installation media from github repositories. Today we will see how to install the sample schemas on a pluggable database. We’ll be installing Oracle 19.2 sample schemas and please remember, there are possibilities that the sample schema scripts differ for different releases. you can download the 19.2 sample scripts from here

Now comes the difficult part. Once you extract the archive, it creates a folder “db-sample-schemas-19.2”, unless you modified the extract location. I’ve discussed about this on my other post about the Windows software that I made for replacing strings recursively

Basically, Oracle scripts for sample schemas refer to a path, that has to be changed within all the nested SQL and DAT files being referred by the installer script. This is not going to be an easy task for anyone if manually attempted, prompting me to develop the above discussed small utility. Another approach is to write a batch or Powershell script. I opted the latter. Save the below as PowerShell script. Make sure that you configured the environment to run remote signed scripts.

<# run once for *.sql and again for *.dat #>

$count = 0;
Get-ChildItem 'D:\db-sample-schemas-19.2\*.sql' -Recurse | ForEach {
$count = (get-content $_ | select-string -pattern '__SUB__CWD__').length
if ($count -gt 0) {
Write-Host $_ " has $count matches & a backup file $_.bak will be created."
Copy-Item -Path $_ -Destination $_".bak"
(Get-Content $_ | ForEach { $_ -replace '__SUB__CWD__', 'D:/db-sample-schemas-19.2' }) | Set-Content $_
}
}

The above script should be run twice, to iterate through two different types of files. First time for “.sql” and second time for “.dat”

Once the scripts are modified with the correct path, we can proceed with setting up sample schemas. We will use the script “mksample.sql”. Start sqlplus from the script root, eg: D:\db-sample-schemas-19.2. Don’t forget to alter session to your PDB prior executing the script! Please ensure that you have created a new a tablespace “EXAMPLE” if it doesn’t exist (You can use another existing tablespace for the purpose, however not recommended)

Usually the script completes generating few errors. You can check the log files for detailed information about what went wrong, that are insignificant as long as you are only looking at tables/views and indexes.

Hope this helps!

Installing Gaming Services failed with error: 0x80310000

(The above image was doctored to show the error)

If you ever receive this error on #Windows 11, it means the XBox gaming services are toasted and you need to reinstall them. Usually after a fresh installation of Windows10/11, I always removed the bundled apps using PowerShell & later installed only the software that I need. I did install XBox and associated last time, as I constantly use XBox gaming bar screen recording. Looks like the Gaming Services were not fixed by re-installing XBox and components.

I landed on a working solution that is Microsoft answers thread. The working solution is copied below.

  1. Open Terminal as Administrator & enter the below commands one after another
  2. get-appxpackage Microsoft.GamingServices | remove-AppxPackage -allusers
  3. start ms-windows-store://pdp/?productid=9MWPM2CQNLHN

The second command “start…” will open a fresh instance of Microsoft Store app and you can install the gaming services. Restart the box and you are all set to go.

Hope this helps few out there.

How to hide Powershell background window

I’ve changed from Windows batch files to Powershell for almost every other repeated tasks & one of the scripts that I use to connect to our IKEv2 VPN script has a shortcut on my desktop. This script helps me to connect and disconnect from the VPN network just by double clicking the shortcut. You can checkout the script here

I had multiple iterations for the script and kept on deleting and recreating the shortcut and noticed that a black window started appearing when I executed script from the shortcut.

All I could remember was, not changing any settings for the Powershell & couldn’t find a “solution” (that was mere eyesore to my rigid expectations). Interestingly, my semi desktop/server class box didn’t have this “issue”, whenever I executed the script from the shortcut, all I was provided was the “Connected” or “Disconnected” message boxes.

After sometime, I decided to check the shortcut properties on my desktop & noticed that the “Run” option was selected as “Minimized”

Powershell provides many switches & one of the switches is “WindowStyle” that supports Normal, Minimized, Maximized and Hidden styles for the Window. Well, the style “Minimized” just hid the entire window, including the message popups that had prompts.

Quickly I moved to my laptop and changed the Run to “Minimized” and that was it. No more annoying black window behind my script message boxes! No more script outputs shown on the screen. So, if you reached here seeking a how to hide those annoying black windows, give this a try.