We use Tandberg RDX 2TB data cartridges for “EXTRA” backups on a daily basis. One of the major concerns while designing the homegrown solution was how to make the OS to mount the newly inserted cartridge to the same mount point every time, where the bash script would rsync the files. Please note, you can use the same with your other types of removable media also.
After some googling, consultations we decided to use Linux’s volume labeling for this requirement. I will do a walkthrough of all the processes involved. This should be useful for techies those do not use Linux on daily, however forced to at times.

Once after inserting a fresh cartridge, fdisk shows the above information against the cartridge. Identifying the device could take some practice for a Linux beginner, I am sorry about that. Making sure that you identified the correct device is the success key. Making blunders could land you up in unrecoverable mess. So be careful with rest of the instructions.
Remove the existing HPFS/NTFS/exFAT first
[root@hostname /]# fdisk /dev/sdc
Welcome to fdisk (util-linux 2.23.2).

Changes will remain in memory only, until you decide to write them.
Be careful before using the write command.


Command (m for help): m
Command action
   a   toggle a bootable flag
   b   edit bsd disklabel
   c   toggle the dos compatibility flag
   d   delete a partition
   g   create a new empty GPT partition table
   G   create an IRIX (SGI) partition table
   l   list known partition types
   m   print this menu
   n   add a new partition
   o   create a new empty DOS partition table
   p   print the partition table
   q   quit without saving changes
   s   create a new empty Sun disklabel
   t   change a partition's system id
   u   change display/entry units
   v   verify the partition table
   w   write table to disk and exit
   x   extra functionality (experts only)
List existing partitions, in our case RDX cartridge has single partition from the factory.
Command (m for help): p

Disk /dev/sdc: 2000.4 GB, 2000394739712 bytes, 3907020976 sectors
Units = sectors of 1 * 512 = 512 bytes
Sector size (logical/physical): 512 bytes / 512 bytes
I/O size (minimum/optimal): 512 bytes / 512 bytes
Disk label type: dos
Disk identifier: 0x00000000

   Device Boot      Start         End      Blocks   Id  System
/dev/sdc1            2048  3907020799  1953509376    7  HPFS/NTFS/exFAT
We will proceed with deleting the existing partition using the command “d”
Command (m for help): d
Selected partition 1
Partition 1 is deleted

Command (m for help): w
The partition table has been altered!

Calling ioctl() to re-read partition table.
Syncing disks.
We will create a new partition
Command (m for help): p

Disk /dev/sdc: 2000.4 GB, 2000394739712 bytes, 3907020976 sectors
Units = sectors of 1 * 512 = 512 bytes
Sector size (logical/physical): 512 bytes / 512 bytes
I/O size (minimum/optimal): 512 bytes / 512 bytes
Disk label type: dos
Disk identifier: 0x00000000

   Device Boot      Start         End      Blocks   Id  System

Command (m for help): n
Partition type:
   p   primary (0 primary, 0 extended, 4 free)
   e   extended
Select (default p): p
Partition number (1-4, default 1):
First sector (2048-3907020975, default 2048):
Using default value 2048
Last sector, +sectors or +size{K,M,G} (2048-3907020975, default 3907020975):
Using default value 3907020975
Partition 1 of type Linux and of size 1.8 TiB is set

Command (m for help): w
The partition table has been altered!

Calling ioctl() to re-read partition table.
Syncing disks.
Confirm the changes
Command (m for help): p

Disk /dev/sdc: 2000.4 GB, 2000394739712 bytes, 3907020976 sectors
Units = sectors of 1 * 512 = 512 bytes
Sector size (logical/physical): 512 bytes / 512 bytes
I/O size (minimum/optimal): 512 bytes / 512 bytes
Disk label type: dos
Disk identifier: 0x00000000

   Device Boot      Start         End      Blocks   Id  System
/dev/sdc1            2048  3907020975  1953509464   83  Linux

Command (m for help): q
Now we will proceed to format the file system for ext4. There are newer file systems, however our requirement is to have ext4 for standardization across the attached devices.
[root@hostname /]# mkfs.ext4 /dev/sdc1
mke2fs 1.45.4 (23-Sep-2019)
/dev/sdc1 contains a ntfs file system labelled 'QuikStor 2.0TB'
Proceed anyway? (y,N) y
Creating filesystem with 488377366 4k blocks and 122101760 inodes
Filesystem UUID: 056c2a9d-2482-4637-a823-9ef1e2ae9d30
Superblock backups stored on blocks:
        32768, 98304, 163840, 229376, 294912, 819200, 884736, 1605632, 2654208,
        4096000, 7962624, 11239424, 20480000, 23887872, 71663616, 78675968,
        102400000, 214990848

Allocating group tables: done
Writing inode tables: done
Creating journal (262144 blocks):
done
Writing superblocks and filesystem accounting information: done
Finally, the most import part of the entire exercise. Labeling the partition. You may need additional software downloads for e2label.
[root@hostname /]# e2label /dev/sdc1 RDXTAPEFinally modifying the fstab to mount the device automatically
#
# /etc/fstab
# Created by anaconda on Wed Sep 16 11:06:12 2020
#
# Accessible filesystems, by reference, are maintained under '/dev/disk'
# See man pages fstab(5), findfs(8), mount(8) and/or blkid(8) for more info
#
LABEL=RDXTAPE     /RDX    ext4   defaults 0 0
Issue the command mount to immediately mount this partition to a mount point.
[root@hostname /]# mount -a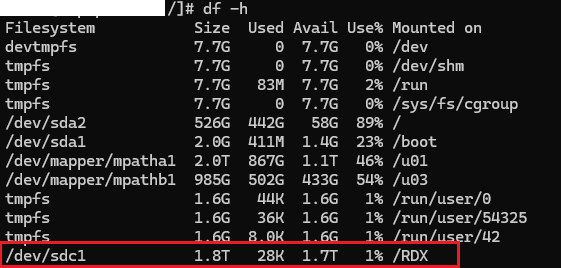
That’s all folks!