Today I managed to narrow down the issues to Intel driver specific. AX201 Wi-Fi module driver 22.160 and above breaks the mobile hotspot on both Windows 10 & Windows 11. The only possible solution is to rollback to driver version 22.150.x.x & stay there until Intel identifies and fixes this issue. I have opened a thread with Intel and the representative is investigating this issue. If you are interested, follow the thread here
We’ve poor cellular coverage by the datacenter area from the service provider & most of the times I use my work laptop as Mobile hotspot & it did work. Well, minimum until recent days.
I started seeing my mobile phone showing “Connected without internet” once in few minutes times & I had to reconnect which was a recent development. Unfortunately, I couldn’t land upon any relevant solutions after spending almost two working days searching for solutions & executing my own logic with resetting network/Winsock etcetera.
As I use Samsung Galaxy A71 5G Android phone, I thought of giving another attempt by searching for “Galaxy a71 5g connected without internet” & one of the first search results was:
Samsung Galaxy Phones “Connected without Internet”
Here, the vlogger talks about “Randomized MAC” Galaxy phones use when connecting to Wi-Fi networks. Although the vlogger suggests Static IP address & other changes to resolve this issue, I only changed the connection property from “Random MAC” to “Phone MAC” & days long frustrations were over.
I wanted to figure out why all of a sudden this issue started. I remember using the Mobile Hotspot without any issues, had a PowerShell script to start the mobile hotspot startup automatically whenever I am connected to work network for months & couldn’t just give up because I found a solution. Hence, I continued to find more answers.
There were more videos discussing the same issue about Samsung Galaxy phones & subsequently I landed on a Samsung community discussion here
My mobile is paired over Bluetooth to my laptop & it connects every time laptop restarts. One of the initial settings I checked was to ensure Mobile Hotspot was not setup for 2.4GHz, that causes issues for Bluetooth which uses 2.4GHz by default.
In my case, at work I am not connected to Wi-Fi networks & mobile hotspot is configured to share internet from my domain network connection. By default, as the 5GHz is not consumed by Wi-Fi connections, mobile hotspot utilizes that frequency and leaves a notification, asking to switch the frequency if devices fail to connect.
Hence, it could be one of the many elements as discussed in the Samsung community thread. All you need is to try and find out one that suits your situation. Regardless, if it is a Samsung Galaxy phone, the first solution you could try is to setup Phone MAC instead of Randomized MAC for the specific Wi-Fi connection that you have issues with. If that didn’t resolve, try others.
Windows built-in firewall does not block SSH connections those are going out & there is no need to create an exception for SSH connections from Windows to LINUX hosts. Still many things could mess up connections.
One of the major culprits being the DNS settings. We had a migration for Primary domain controller from 2008 R2 to Windows Server 2016. Prior the upgrade we brought a temporary VM using VirtualBox to insure that the migration could happen seamlessly. The migration to temporary server happened without issues and we rushed to change the DNS settings for all production servers with the new VM IP address, after removing the IP address for the old PDC from the list.
After the confirmations, we built a fresh VM on VMWare ESXi environment and promoted it as PDC & we ahead with decommissioning the VM built on VirtualBox and forgot that “one thing”. Changing DNS server details for our LINUX servers.
Initially we didn’t give much attention to the SSH connection slowness as these LINUX server(s) running Oracle Applications were known to be slow in responding. However, things didn’t look quite promising as we noticed delays like 40s+ to establish connection to the host while trying to upload files using FileZilla client. It took us almost 8 days to realize that the connection issues were not from the client end, rather from the servers.
Checking the network configurations revealed these servers were still configured with the IP address of the temporary DC at the first entry, that we had for a while. Resetting the DNS entries to existing DNS servers IP addresses resolved the problems instantly.
Side note: No, you cannot overcome this issue by using IP addresses to establish the SSH connection. Regardless, the Linux HOST will try to resolve the client’s IP using the given DNS entries. So the only solution was to correct the DNS entries!
If you ever run into a slow SSH, well, hope know where to look at first after reading this post.
Today we will see how to setup FileZilla FTP server with TLS. Well there are many documents explaining it, however, as usual I am going one step ahead and explain few elements those are missed by most of those posts.
Once installed (accept the defaults, letting FileZilla run as a Windows service) you can start configuring it for PASSIVE mode transfers and TLS.
As you could see, the installation sets port 21 as default listening port for FTP. If you choose to, can change it an available port. Usually you don’t have to do it.
If your FTP server/desktop machine has multiple IP addresses, you may assign a particular IP for the FTP Server under “IP Bindings”
Leaving it to default will not hurt you, usually.
Setting up Passive Mode can be bit tricky, especially when you are going to let users from internet to access your FTP server. Let us consider you have a router that is the gateway for all your computers in the network. So any communication that is leaving your network passes through this router. This is called a NAT network. Getting a FTP server to respond to a request from internet could be quite confusing for someone who doesn’t understand the NAT properly (I don’t, all the time)
Usually such a requirement is handled by forwarding the requests received by the router to one of the servers or computers hosting the FTP or other services.
Here for FileZilla, the router should forward port 21 to the server that is hosting the FTP server, to that the communication and transfer could happen. So basically, your router should have an entry like below. With the given example, FTP Server software is installed on a computer that has STATIC IP address 192.168.1.200, hence the below entry. Please make sure that all your computers/servers those host services have STATIC IP addresses.
Please note, based on the manufacturer, Applications & Gaming tab will be labelled differently. You need to check the router manual to find out where exactly you can locate “Single Port Forwarding”. If you are lucky enough, you may able to pick FTP from an available dropdown list, like the one I have. Else, just create one entry like the one you could see with this image for FTP.
Now you need to configure the ports for Passive mode, which most of the modern FTP clients will try to use for the transfer. I believe, without configuring the passive mode, FileZilla FTP server fails to establish connections.
Here you could see that I am using a custom port range for Passive mode. Most of the people who successfully configured FileZilla recommend using the port range between 50000-51000. You can try the ranges like 50000-50100 or like the one I have, which is approximately a 1000 ports.
Next couple of points are going to be vital for users from internet. I have a static IP address from ISP, hence for the area External IP address, I can use it safely. However, this may not be the case of most home users, as ISP provide them dynamic IP addresses which keep on change once in a pre-planned interval. So http://www.noip.com is your friend and I suggest you create a ddns.net hostname for yourself before proceeding. You can use their client software to keep update your host IP address against ddns.net hostname. You can use your hostname, eg: johwick3.ddns.net in the place of external IP address.
OR
You can try the “Retrieve external IP address from” option as well. I cannot guarantee the success rate.
The other important setting on this page is “Don’t use External IP for local connections”. You must not uncheck this box in case if your FTP server has external IP configured and expecting both local and external users to access the server.
Once set, you need to open the range of ports on your router. This time you need to access the page “Port range forwarding” and create an entry like the seen below.
This completes the initial level settings for the FTP server. Let us configure TLS in the next step. This involves creating a self signed certificate and secret key (secret key is not mandatory). Luckily FileZilla has built-in ability to create a self-signed certificate for you!
Once you are on the FTP over TLS settings page, you can use generate new certificate button to bring this window up. Fill in correct information & generate the certificate. FileZilla will automatically setup the certificate for you. “Save key and certificate to this file:” should be chosen wisely. Your certificate is accessed from this location, so make sure that you will generate the certificate in a location/folder which is not accidently prone to get deleted.
Now we will create a new user & setup few details for the testing.
In the above step, I have created a user with read only privileges and assigned a single directory access. As long as you want your users NOT to upload files to your FTP server, this setup is sufficient for a normal user. Please refer FileZilla documents for in-depth knowledge about creating groups and users.
Finally, we will configure Windows Firewall in order to establish the connection. Please note, I am against disabling firewall and other security suites those are installed/configured on any environment, unless for testing. You must NOT disable them permanently. If your browsing and other internet activities are limited to reputed websites and services, I can insure that you don’t need a commercial product to protect your Windows box. The built in Defender suite does a wonderful job protecting your computer. Follow the below images to create an incoming rule for the FTP traffic in the very server/computer on with you have install FileZilla FTP server.
Please note, there is no need to open the port 990 that is used for TLS. Unfortunately while I was trying everything, included the port in my setup. You only need to allow TCP Ports 21 & the range 50000-51000 (or the port range that you prefer to use)
That’s all take for setup. We can try to connect to our FTP server now!
Download and install FileZilla FTP Client/Or one of the other FTP clients available (You may not succeed to connect to FTP server using Windows built in command line FTP, as it doesn’t support TLS)
As you could see from the quick connections area, I have connected to FTP server from both local and internet & both attempts were successful.
I hope, if you are desperately looking for FileZilla FTP server setup guidelines, this post helps.
A local DNS will help a developer to access and test the applications across local network having to worry about hostnames (Especially mobile devices, where updating host files may force one to root the devices)
This time we will see how a local DNS could be setup using relatively cheap WIFI routers running DD-WRT firmware
I am using a Buffalo router that acts as a WIFI access point at my home.
Make sure you are running the latest available firmware for the device to insure maximum stability. Once the firmware has been updated to the latest, Click on Services and you will be landed on Services page. Setting up the local DNS is most effective when you have all your “Computers” have static IP allocation (As seen with below image)
Don’t worry about the lease time parameters, as long your computers are having static IP addresses, these entries work as ‘A’ records, letting you to access the computers by their name, instead of IP addresses.
Set Used Domain as “LAN & WAN” & provide a meaningful name to “Lan Domain”. This name will be appended to your hostnames when you do a simple ping like commands. For example, when I try to ping “rajesh-pc” from command prompt, “rajesh-pc.my.home” will be automatically generated incase if you set up parameter “expand-hosts” with Additional DNSMasq options (Check below image)
Save the settings & apply. You are all set to start using the local DNS server. Whenever you have a new host, access the services page and create a static host entry (one time) & your last device is accessible using a name, instead of IP addresses.
We’ve a legacy application for our Bahrain operations and after a disastrous hardware failure we wanted to find a cost effective method to bring the database dumps to Kuwait for regular health checks.
Options in front of us were pretty limited. The business in Bahrain only had a basic internet connection(dial-up DSL) without static IP address, hence we were forced to workout something that is dependable. Finally we decided to FTP the dump file in compressed form after the dump export every Friday once after realizing that the total size of the compressed dump file was less than 100MB in size!
Here is the script file We’ve compiled after referring a number of blogs/tech forum visits. Please note, the methods we implement here uses passwords seen in clear text. Hence make sure that you take maximum attention while implementing our solution in your environments.
SET ZIPNAME=%ZIPNAME%.zip
::Creating ZIP file using Java Runtime
::Dump files could be huge and take hours to transfer in full size. So we will use Java RunTime Executable to create a zip file which
::Will be smaller in size
::Make sure you have JRE installed, and the installation path is set in the environment variables, if not call JRE using the full path
::eg: C:\java\jre
echo Creating Zip file for transfer, filename ""%ZIPNAME%""
::We will create the zip file without meta-info, hence the M switch is used
::jar -cfM %ZIPNAME% %NEWEST%
::Another option is to go with 7Zip, 3rd party utility that could create zip/7z files
::7z a %ZIPNAME% %NEWEST%
::Or using Windows built-in Zip utility
zip %ZIPNAME% %NEWEST%
::You can use IP address or fully qualified domain names for the FTP server
::If the FQDN is not registered, you can add an entry with your hosts file
::FTP accepts parameter files, ftp -s:parameter file, so we will create the parameter during the initial running
::Please note, the parameter file created is permanent & clear text format, hence make sure that adequate security measures are practiced
::to avoid getting sensitive details exposed.
echo open ftpservername(FQDN/IP)>ftp.txt
echo username>>ftp.txt
echo password>>ftp.txt
echo binary>>ftp.txt
echo put %ZIPNAME%>>ftp.txt
echo disconnect>>ftp.txt
echo quit>>ftp.txt
D-link is a trusted cost effective router solution for homes and small offices, especially in the regions where cable internet is still an unreachable reality. Recently I changed my home DSL router, from a Linksys X1000 to DSL-2750U (India specific) and was pretty happy to see that the device stood robust, without a single hangup after being online for weeks. Further, the firmware of the device provided much more tweaks compared to Linksys x1000.
However, almost a month and half back, I have noticed that my internet connection (4MBPS DSL) started getting a lot slower, websites unreachable due to DNS timeouts.
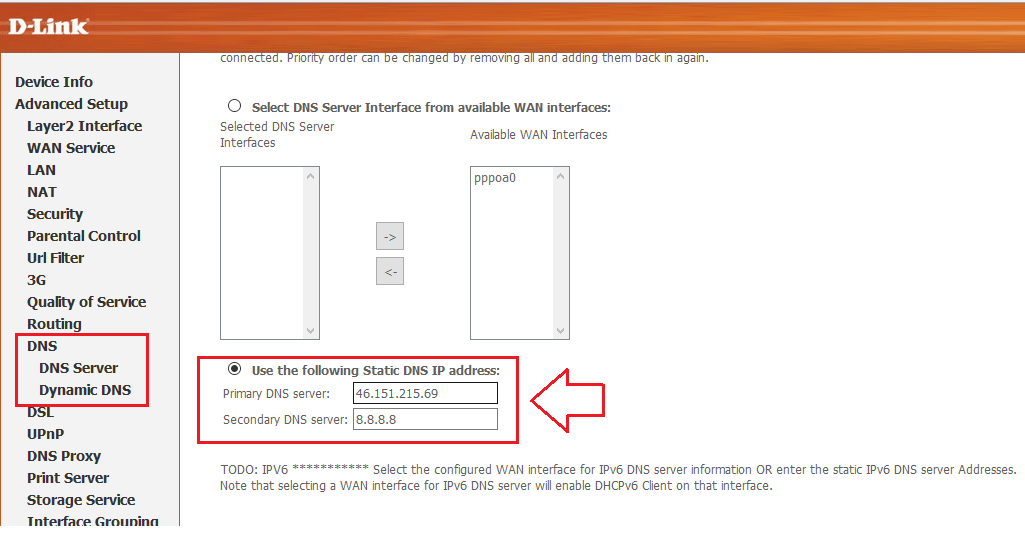
To my utter surprise, I found that the DNS settings with router were changed with a DNS server from Saudi Arabia (Primary) & Google DNS server 8.8.8.8 for the secondary. I changed the DNS to static and fed in KEMS Zajil corporate DNS server entries & found, sometimes within a day or other times after couple of days, the router is once again back to the “automatically” changed DNS server entries. This made me google about DNS hijacking, specific to D-link routers & here is what I came across
I contacted D-link support, instead of replying my query they forwarded me a link to download a firmware (patched? new?) , which I thought should be one with the fix. I had no troubles for almost 3 weeks. Once again, I started experiencing no internet at all or host not found errors! this time I knew where exactly to look & I found my router with compromised DNS entries
Obviously, this particular router firmware comes with TR-069, disabled. I ain’t at all sure whether, it is being exploited. Anyway, this time I didn’t bother to contact D-link and download another “firmware”, instead I quickly dusted out my old Linksys x1000 router, and configured it as a modem router, thus limiting the load on the device, which caused frequent hanging while used as Modem Router+ DHCP Server + WIFI access point combo.
So far so good, I keep on checking the status page of the router to make sure that the DNS entries are not manipulated by the ISP for some reasons, or hijacked by…
So if you are feeling your DSL connection has gone all slow or you are constantly getting timed out DNS errors, cross check your D-link router’s DNS entries page.