I’ve been using Oracle VirtualBox for last many years and ever since I moved to Windows 10, experienced some unexplainable stuttering and lags with Windows 10, 11 virtual machines. I think finally I made a breakthrough for myself. I am not sure whether this approach is helpful for everyone as virtual machines behave differently on different hardware setups. I’ve gone through many VirtualBox forum posts discussing issues with same nature, particularly with NVidia graphic chips/cards & all my boxes have NVidia graphic chips or cards.
My work laptop configuration.
and has one NVMe ssd for the OS and 2TB SSD for data on which I have all my virtual machines. Regardless, with the amount of hardware resources, my Windows 10 virtual machine stuttered, and the experience was horrible, compared to the Windows XP VM that I had. I never had issues with Linux VMs either. I tried almost every trick in the book and always ended with gaining very little.
Couple of weeks back, for one of the Oracle labs exercises I started the Windows 10 VM and for some unknown reasons found the virtual machine was not automatically resizing display. I managed to fix this problem earlier by changing the graphics controller from VBoxSVGA to VBoxVGA, force auto resize & switching graphics controller back to VBoxSVGA. For that exercise I disabled the 3D acceleration, basically landing on a solution unknowingly. I repeated the same exercise and found my Windows 10 virtual machine snappier than ever! To confirm, I switched back to 3D acceleration & managed to reproduce the same choppy, stuttering experience with the same virtual machine once again.
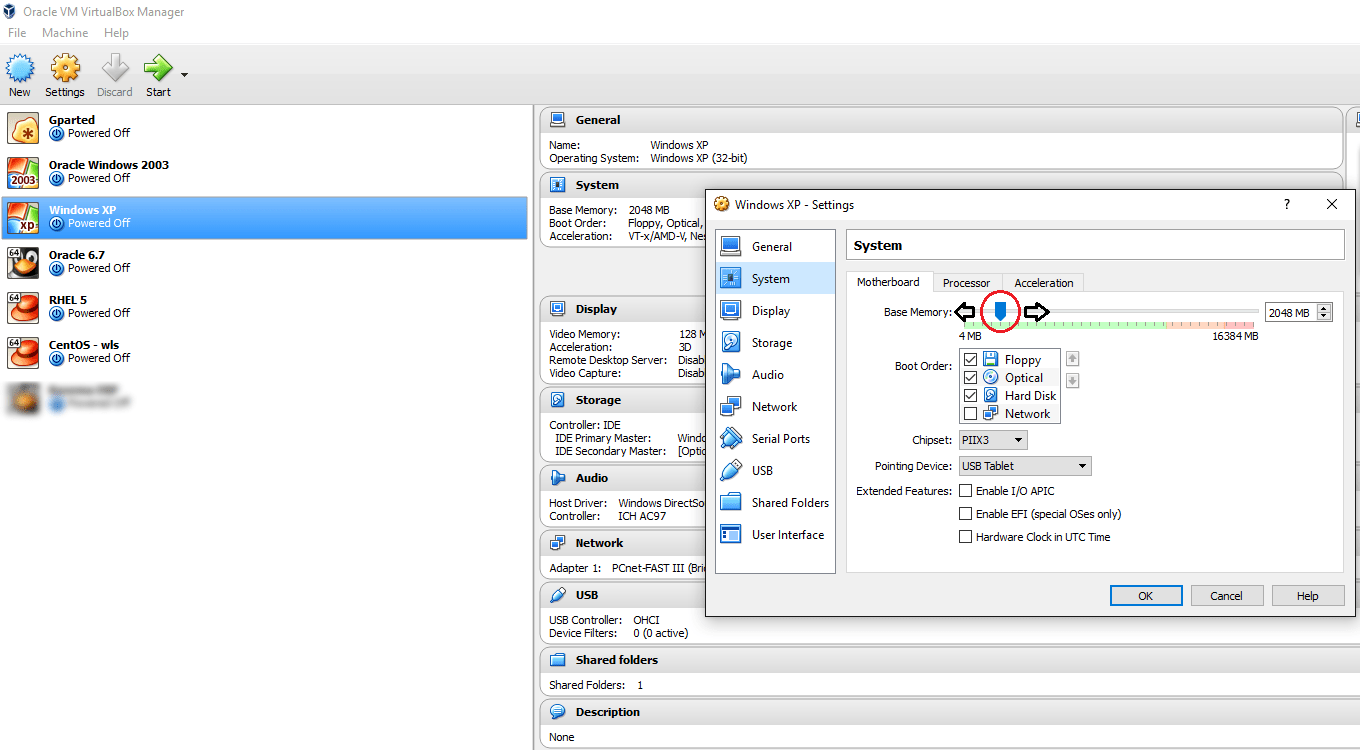
Let us see what happens with we enable 3D acceleration for the graphics controller.
VirtuaBox allows a maximum of 256MB memory for Video & check the below image to see what happens when we enable 3D acceleration.
half of the video memory is consumed by the 3D acceleration! OS like Windows 10, 11 have pretty heavy graphic elements and obviously the limited video memory makes the OS stuttering and lagging whole the way (or this is what I assume from my experiments).
As I mentioned in the beginning, disabling the 3D acceleration works for me on three different machines & different Windows OS virtual machines. Hope this helps few others out there.
I have one Windows 10 guest from last many years, upgraded through VirtualBox versions 5, 6. Recently I upgraded VirtualBox to 7. While Windows XP & Oracle Linux guests automatically resized the display on host, Windows 10 guest was adamant. Uninstalling and installing the guest addons didn’t help.
After scavenging through few posts over VirtualBox forums, came across one of them discussing about fixing the resizing issue by choosing “VBoxVGA”, though it was not supported. I decided to give it a try and Windows 10 guest resized the display when I toggled the “Auto-Resize Guest Display” from the view menu.
Then I shutdown the guest, changed the Display back to “VBoxSVGA” & the guest allowed me to resize the display using View menu & subsequent restarts were resizing the guest display as expected. However, there were times when I had to manually adjust the display size. Hope Oracle fixes this issue in coming releases.
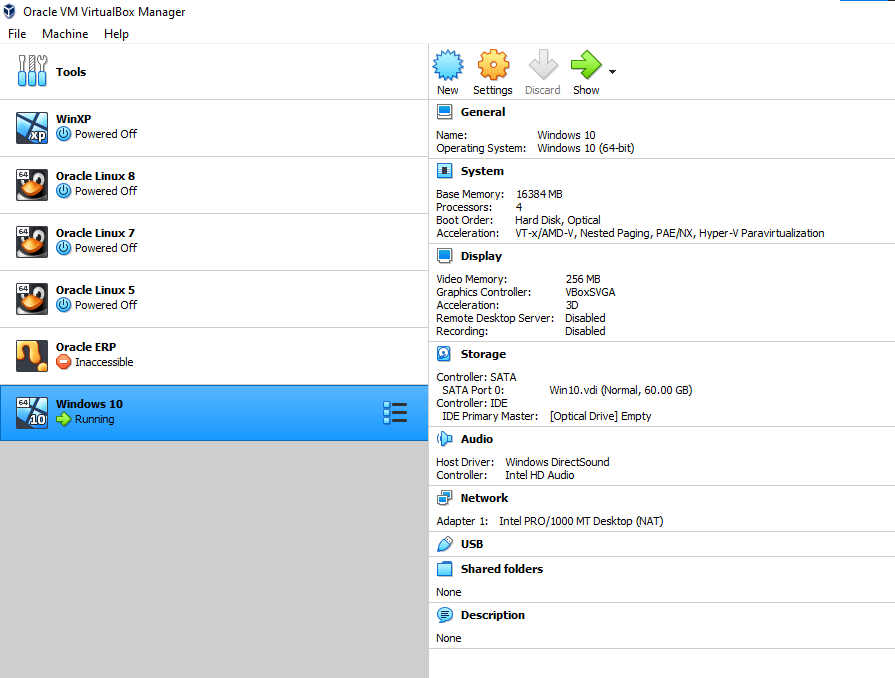
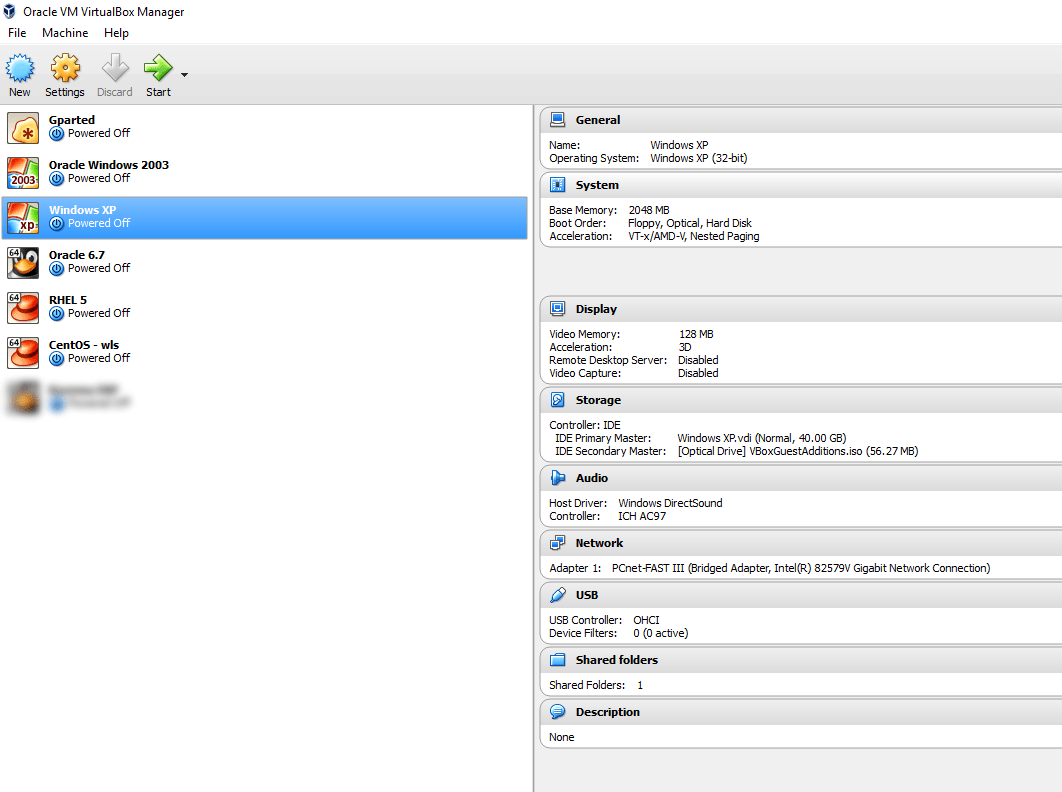
So how many Oracle VirtualBox VM (Virtual Machine)s you do have?
I’ve many. I try many new software & not to break production box, I try them using Virtual Machines. I use Oracle VirtualBox (mostly) for both Windows and Linux machines (and VMWare ESXi for Production servers), as you could see with the above image. VirtualBox and VMWare supply additional software called “Guest Additions” that synchronize the Guest Virtual Machines with Host machine seamlessly. Like Mouse integration that allows your mouse to travel between both host and guest machines without any difficulties.
On Linux OS, installing the Guest Additions could be sometimes challenging. Especially with Oracle Linux that uses UEK kernels. Let us see how to “fix” the common error messages that appears when installing the Guest Additions on Oracle Linux 7 and 8.
The best approach is to update your Linux OS with latest patches before trying the below. I consider you already updated your Linux box, if yes then
yum install kernel-uek-devel
is enough to install the devel package, suffice the kernel headers missing error. Install the package, reboot the box and try to install VirtualBox Guest Additions. This time module should get installed properly. You may need make, gcc & perl already installed for a successful installation of Guest Additions. You will find instructions to install them later in the article.
Now we have another situation when guest add-ons are required, however updating the new Linux box is not possible due to many reasons. Here we will use the Linux OS ISO image. Please note, the ISO file that you are going to use must be the same ISO that you used to install OS and OS was not updated at all. That means your Linux box is as it is after the OS installation.
Attach the ISO file to your Linux box & Switch to
Packages folder for Oracle Linux 7 and “BaseOS\Packages” for Linux 8
Now locate the kernel-uek-devel-xxxxxxxxxxxxxxxxxxxx package and install it. For example, I will execute the following for Linux 8
That’s it. Restart the box and try to install the guest add-ons once again and you must be through without other issues. You might need to install gcc, make & perl also to get the guest add-ons installed.
If you are connected to internet, you can install the above packages by issuing the command
yum install gcc make perl -y
Or go through the packages available in the Packages repo, install them.
I’m a huge fan of Oracle VirtualBox. Actually I have almost 10 different VMs (many of them were never used over years) scattered everywhere within my home network. Then I had this Windows 10 VM, that always had troubles.
Environment: HOST (HP PROBOOK 440 G7
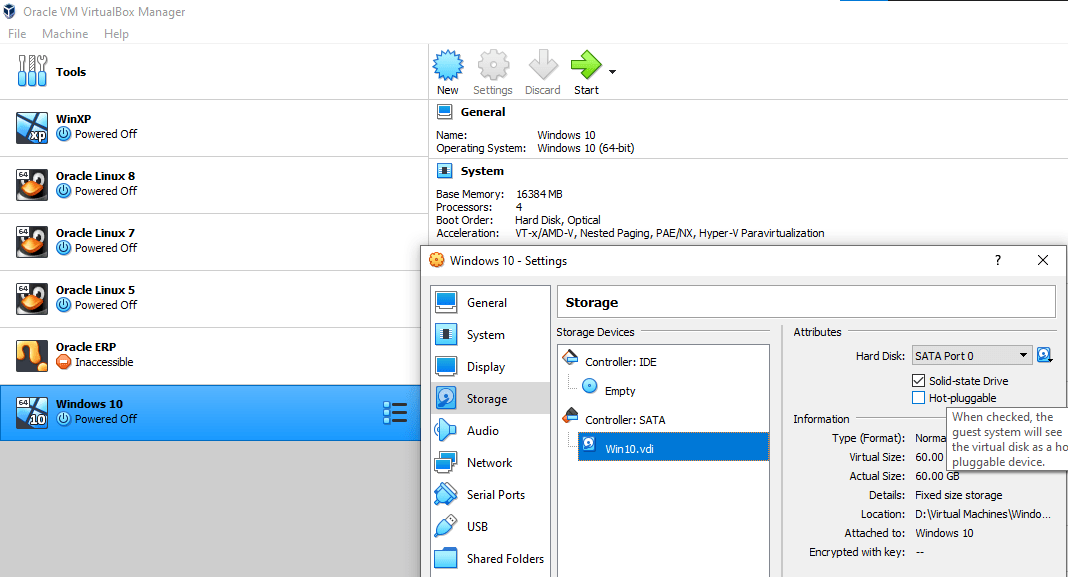
Windows 10 Pro 64Bit, i7-10th Generation Processor with 8 CPUs, 32GB RAM, NVMe disk for OS and Crucial MX500 series 1TB SSD for data/Virtual Machines & Windows 10 guest has the configurations as seen with the image.
In addition to, for the VDI with fixed size, I have exclusively set “Solid-state Drive” flag. If you have a keen observation, I have selected “Hyper-V Paravirtualization” for “Acceleration” and I don’t have Hyper-V enabled :). Well, I didn’t hear any complaints (yet)!
After reviewing many posts and answers over VirtualBox forum, I have made few changes those I felt could make some differences, and I feel my VM responds much better after those changes.
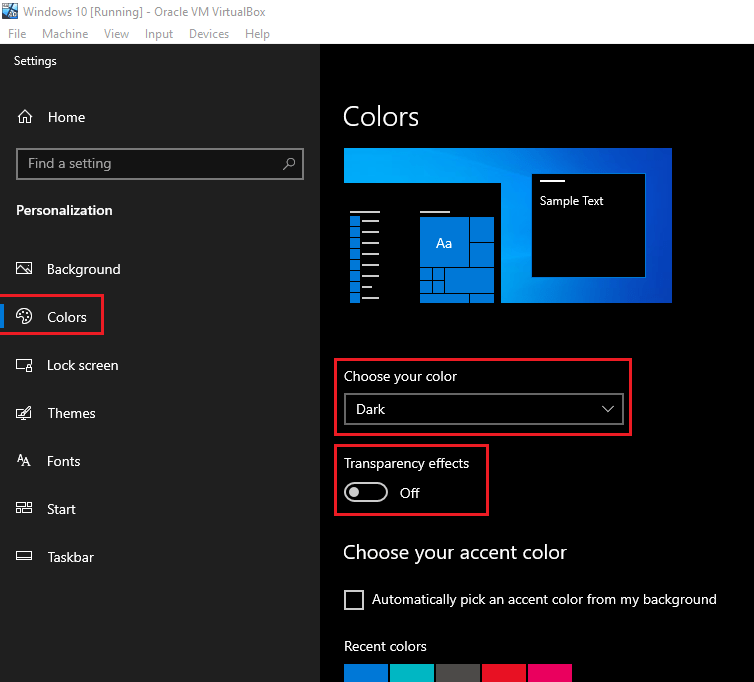
Disable Transparency. This makes your Windows 10 VM respond much faster (not just “seems faster®” ;) )
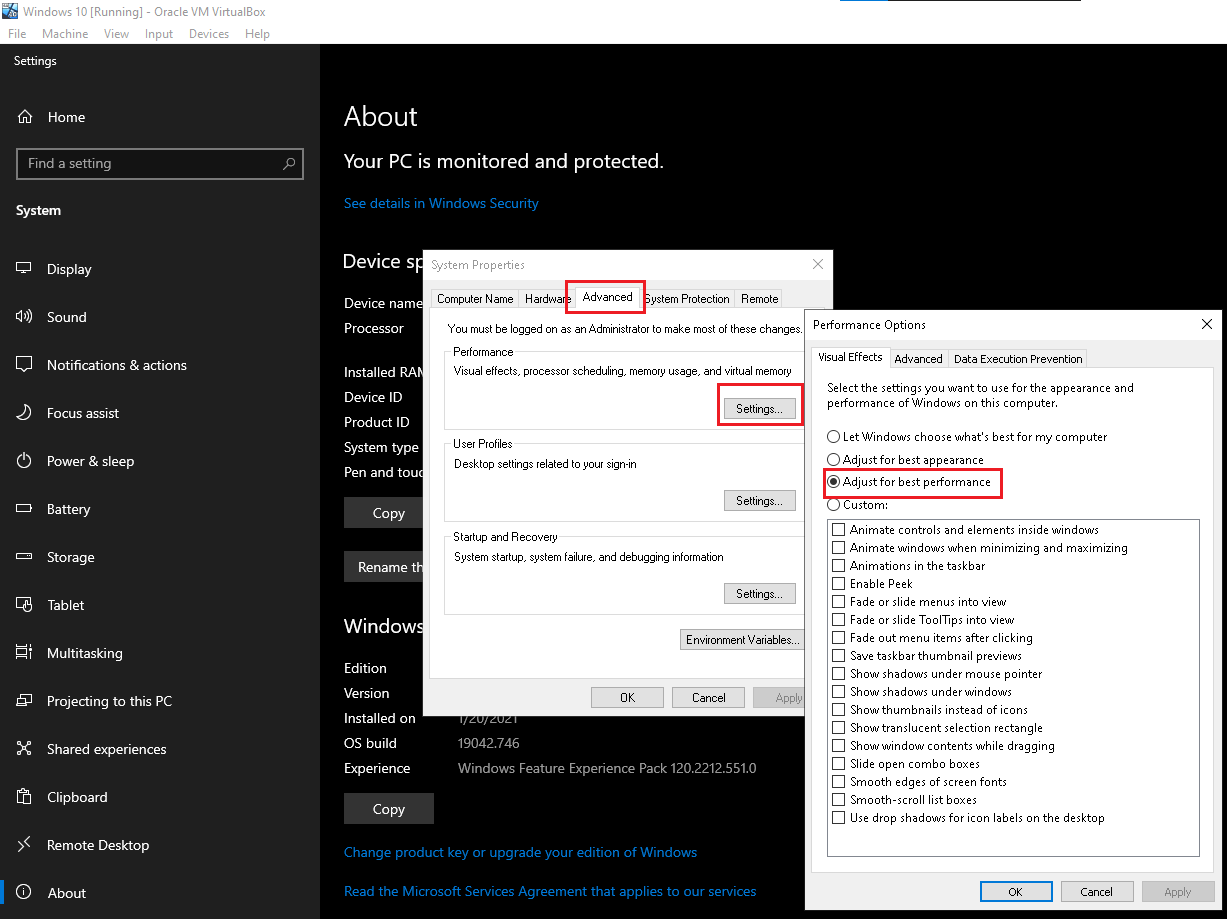
Setup your box for best performance.
Reboot the Virtual Machine. I have seen slight gains with the booting time, however once logged in the VM is snappier than ever. I cannot help you, if you are using VM for something fancy that depends upon the Graphic processing. For a server side software like Oracle database where the performance matters, I think this is the only one go with current VirtualBox/Windows 10 setup.
If you are interested to see how long it takes for my VM to finally let me log in, watch the below video.
This is a quick post towards one of the issues I faced once after enabling Windows Sandbox feature that was made available with Windows 10 1903. As Sandbox feature utilizes Hyper-V (regardless whether you have enabled it or not).
Once Sandbox feature enabled, Oracle VirtualBox 6.0.x fails to launch the Virtual Machines.
Although VirtualBox 6.0.x are supposed to support Hyper-V for acceleration, my attempts were futile, forcing me to disable the Sandbox feature, enter BIOS and browse through the virtualization settings.
I can’t say what has resolved the issues. I disabled Sandbox, restarted the box, was unable to launch the Virtual Machines.
Restarted the laptop, entered BIOS and insured that the virtualization was turned on & tried to launch the Virtual Machines and they opened.
So give it a try, if you are stuck with the following error while trying to open a Virtual Machine!
Call to WHvSetupPartition failed: ERROR_SUCCESS (Last=0xc000000d/87) (VERR_NEM_VM_CREATE_FAILED).
Recently I’ve started experiencing a peculiar issue with my Windows 10 VM on Windows 10. Once the VM starts, the entire desktop for the VM is either a white/black blank screen, however the Preview pan for the VM shows the proper desktop as loaded.
I’ve gone through multiple such complaints those are posted at VirtualBox forum, however none of them with a proper solution. One of the solutions which works in all cases is turning off the 3D under display settings for the VM
The another “hack” which works in my case is using the HOST+f (full screen) key combinations. This forces the VM to occupy the entire monitor and somehow the desktop is loaded to the view. To return, press HOST+f key once again. If you don’t know what is the HOST key, it is the right “Ctrl” button. A standard keyboard now days should have two numbers of “Ctrl” keys. Once by the extreme left side of the keyboard and the 2nd one by the right hand side, just below the Enter & Shift keys.
VirtualBox guys were saying this issue is mostly seen with Nvidia graphics, which should be true as my work laptop has Intel+NVidia combo, where low power applications are using Intel as primary display.
Give it a try and let us know whether this hack brings back your VM desktop/display. Let us hope VirtualBox fixes (if it is a bug from their software) or wait for another update from Microsoft fixes it.
Once after I built the Windows Instance from Linux Backups, I have started a thread with community.oracle.com, expecting answers for few concerns. Below, please have a look at the thread
jgarry states, as the redo logs are not applied, I am risking data loss. Now, I don’t really think someone would move from Linux to Windows for Oracle database, when the opposite happens most of the times.
We will consider the entire exercise as limited LAB & for some reasons, if this has to be performed for a production instance, make sure AN IMAGE BACKUP/Cold Backup is available to avoid possible data loss. Cold backup routine as below:
RMAN> shutdown immediate;
RMAN> startup mount;
RMAN>backup database; #replace with your backup routine
RMAN>
Hi guys
Greetings. I have been hell busy during last few weeks. Traveling, fixing stuffs & as usual learning new “things”. This time I am working with RMAN, the recovery manager for Oracle database & trying to establish something that is NOT that orthodox or this is how I feel once after going through many documents. Well, remember we did hack installations, we got “stuffs” work ;). So why not give it a try?
Attempted: Restoring Linux RMAN backup(s) to Windows. Doable? Well, YES.
Cons: No idea yet (6-March-2018, possible data loss as the redo log files will not be readable)
Could be used at Production: At your own risk
I am not going to break the flow anywhere, it is a lengthy one shot document. Prior giving it a try, make sure you have copied the backups from Linux machine to your Windows Machine.
Microsoft Windows [Version 10.0.16299.248]
(c) 2017 Microsoft Corporation. All rights reserved.

C:\WINDOWS\system32>d:

D:\>cd Oracle11g64\product\11.2.0\dbhome_1\BIN

D:\Oracle11g64\product\11.2.0\dbhome_1\BIN>oradim -new -sid LINUXDB
Instance created.

D:\Oracle11g64\product\11.2.0\dbhome_1\BIN>set ORACLE_SID=LINUXDB

D:\Oracle11g64\product\11.2.0\dbhome_1\BIN>rman target /

Recovery Manager: Release 11.2.0.4.0 - Production on Thu Mar 1 13:34:58 2018

Copyright (c) 1982, 2011, Oracle and/or its affiliates. All rights reserved.

connected to target database (not started)

RMAN> set DBID=439294518 shutdown immediate

using target database control file instead of recovery catalog
Oracle instance shut down
--We will use a copy of Windows environment specific INIT file to
--Manually create a INIT file for our new database
--sample
--make sure you have created all paths mentioned in the INIT file prior restarting the database
LINUXDB.__db_cache_size=486539264
LINUXDB.__java_pool_size=8388608
LINUXDB.__large_pool_size=8388608
LINUXDB.__shared_pool_size=746586112
LINUXDB.__streams_pool_size=0
*.audit_file_dest='D:\Oracle11g64\admin\LINUXDB\adump'
*.compatible='11.2.0.4.0'
*.control_files='D:\Oracle11g64\oradata\LINUXDB\control01.ctl','D:\Oracle11g64\oradata\LINUXDB\control02.ctl','D:\Oracle11g64\oradata\LINUXDB\control03.ctl'
*.db_block_size=8192
*.db_domain=''
*.db_file_multiblock_read_count=16
*.db_name='DB11G' #source database name
*.db_recovery_file_dest='D:\Oracle11g64\oradata\LINUXDB\flash_recovery_area'
*.db_recovery_file_dest_size=2147483648
*.dispatchers='(PROTOCOL=TCP) (SERVICE=DB11GXDB)'
*.job_queue_processes=10
*.log_archive_dest_1='LOCATION=H:\db11g\archivelog'
*.log_archive_format='DB11G_ARC%S_%R.%T'
*.open_cursors=300
*.pga_aggregate_target=418381824
*.processes=150
*.remote_login_passwordfile='EXCLUSIVE'
*.sga_target=1256194048
*.undo_management='AUTO'
*.undo_tablespace='UNDOTBS1'
--Sample INITFILE end

RMAN> startup nomount;

connected to target database (not started)
Oracle instance started

Total System Global Area 1252663296 bytes

Fixed Size 2280816 bytes
Variable Size 402653840 bytes
Database Buffers 838860800 bytes
Redo Buffers 8867840 bytes

RMAN> restore controlfile from 'H:\db11g\backup\bkpcontrol_file.ctl_DB11G_20180301';

Starting restore at 01-MAR-18
allocated channel: ORA_DISK_1
channel ORA_DISK_1: SID=63 device type=DISK

channel ORA_DISK_1: restoring control file
channel ORA_DISK_1: restore complete, elapsed time: 00:00:03
output file name=D:\ORACLE11G64\ORADATA\LINUXDB\CONTROL01.CTL
output file name=D:\ORACLE11G64\ORADATA\LINUXDB\CONTROL02.CTL
output file name=D:\ORACLE11G64\ORADATA\LINUXDB\CONTROL03.CTL
Finished restore at 01-MAR-18

RMAN> alter database mount;

database mounted
released channel: ORA_DISK_1

RMAN> catalog start with 'H:\db11g\backup';

Starting implicit crosscheck backup at 01-MAR-18
allocated channel: ORA_DISK_1
channel ORA_DISK_1: SID=191 device type=DISK
allocated channel: ORA_DISK_2
channel ORA_DISK_2: SID=129 device type=DISK
Crosschecked 18 objects
Finished implicit crosscheck backup at 01-MAR-18

Starting implicit crosscheck copy at 01-MAR-18
using channel ORA_DISK_1
using channel ORA_DISK_2
Finished implicit crosscheck copy at 01-MAR-18

searching for all files in the recovery area
cataloging files...
no files cataloged

searching for all files that match the pattern H:\db11g\backup

List of Files Unknown to the Database
=====================================
File Name: H:\DB11G\backup\archive_DB11G_lvl0_07ssmmpl_1_1
File Name: H:\DB11G\backup\archive_DB11G_lvl0_08ssmmpl_1_1
File Name: H:\DB11G\backup\archive_DB11G_lvl0_0kssmnh4_1_1
File Name: H:\DB11G\backup\archive_DB11G_lvl0_0lssmnh4_1_1
File Name: H:\DB11G\backup\bkpcontrol_file.ctl_DB11G_20180301
File Name: H:\DB11G\backup\ctl_c-439294518-20180301-00
File Name: H:\DB11G\backup\ctl_c-439294518-20180301-01
File Name: H:\DB11G\backup\ctl_c-439294518-20180301-02
File Name: H:\DB11G\backup\ctl_c-439294518-20180301-03
File Name: H:\DB11G\backup\ctl_c-439294518-20180301-04
File Name: H:\DB11G\backup\rman_comp_DB11G_lvl0_01ssmmoc_1_1
File Name: H:\DB11G\backup\rman_comp_DB11G_lvl0_02ssmmoc_1_1
File Name: H:\DB11G\backup\rman_comp_DB11G_lvl0_03ssmmoc_1_1
File Name: H:\DB11G\backup\rman_comp_DB11G_lvl0_04ssmmoc_1_1
File Name: H:\DB11G\backup\rman_comp_DB11G_lvl0_05ssmmoe_1_1
File Name: H:\DB11G\backup\rman_comp_DB11G_lvl0_0essmng7_1_1
File Name: H:\DB11G\backup\rman_comp_DB11G_lvl0_0fssmng7_1_1
File Name: H:\DB11G\backup\rman_comp_DB11G_lvl0_0gssmng7_1_1
File Name: H:\DB11G\backup\rman_comp_DB11G_lvl0_0hssmng7_1_1
File Name: H:\DB11G\backup\rman_comp_DB11G_lvl0_0issmnga_1_1

Do you really want to catalog the above files (enter YES or NO)? YES
cataloging files...
cataloging done

List of Cataloged Files
=======================
File Name: H:\DB11G\backup\archive_DB11G_lvl0_07ssmmpl_1_1
File Name: H:\DB11G\backup\archive_DB11G_lvl0_08ssmmpl_1_1
File Name: H:\DB11G\backup\archive_DB11G_lvl0_0kssmnh4_1_1
File Name: H:\DB11G\backup\archive_DB11G_lvl0_0lssmnh4_1_1
File Name: H:\DB11G\backup\bkpcontrol_file.ctl_DB11G_20180301
File Name: H:\DB11G\backup\ctl_c-439294518-20180301-00
File Name: H:\DB11G\backup\ctl_c-439294518-20180301-01
File Name: H:\DB11G\backup\ctl_c-439294518-20180301-02
File Name: H:\DB11G\backup\ctl_c-439294518-20180301-03
File Name: H:\DB11G\backup\ctl_c-439294518-20180301-04
File Name: H:\DB11G\backup\rman_comp_DB11G_lvl0_01ssmmoc_1_1
File Name: H:\DB11G\backup\rman_comp_DB11G_lvl0_02ssmmoc_1_1
File Name: H:\DB11G\backup\rman_comp_DB11G_lvl0_03ssmmoc_1_1
File Name: H:\DB11G\backup\rman_comp_DB11G_lvl0_04ssmmoc_1_1
File Name: H:\DB11G\backup\rman_comp_DB11G_lvl0_05ssmmoe_1_1
File Name: H:\DB11G\backup\rman_comp_DB11G_lvl0_0essmng7_1_1
File Name: H:\DB11G\backup\rman_comp_DB11G_lvl0_0fssmng7_1_1
File Name: H:\DB11G\backup\rman_comp_DB11G_lvl0_0gssmng7_1_1
File Name: H:\DB11G\backup\rman_comp_DB11G_lvl0_0hssmng7_1_1
File Name: H:\DB11G\backup\rman_comp_DB11G_lvl0_0issmnga_1_1

--Once the catalog built, query the schema for datafile details
RMAN> report schema;

RMAN-06139: WARNING: control file is not current for REPORT SCHEMA
Report of database schema for database with db_unique_name DB11G

List of Permanent Datafiles
===========================
File Size(MB) Tablespace RB segs Datafile Name
---- -------- -------------------- ------- ------------------------
1 0 SYSTEM *** /u01/app/oracle/oradata/DB11G/system01.dbf
2 0 SYSAUX *** /u01/app/oracle/oradata/DB11G/sysaux01.dbf
3 0 UNDOTBS1 *** /u01/app/oracle/oradata/DB11G/undotbs01.dbf
4 0 USERS *** /u01/app/oracle/oradata/DB11G/users01.dbf

List of Temporary Files
=======================
File Size(MB) Tablespace Maxsize(MB) Tempfile Name
---- -------- -------------------- ----------- --------------------
1 20 TEMP 32767 /u01/app/oracle/oradata/DB11G/temp01.dbf

--We can get the last sequence number of the archivelog by running the below query
--Which we will use for media recovery

RMAN> list archivelog all;

List of Archived Log Copies for database with db_unique_name DB11G
=====================================================================

Key Thrd Seq S Low Time
------- ---- ------- - ---------
1 1 5 A 01-MAR-18
Name: /u02/archivelog/DB11G_ARC0000000005_0969624950_0001.arc

2 1 6 A 01-MAR-18
Name: /u02/archivelog/DB11G_ARC0000000006_0969624950_0001.arc

3 1 7 A 01-MAR-18
Name: /u02/archivelog/DB11G_ARC0000000007_0969624950_0001.arc

4 1 8 A 01-MAR-18
Name: /u02/archivelog/DB11G_ARC0000000008_0969624950_0001.arc

--As 8 being the last sequence, we will add 8+1=9 AS the sequence number for the media recovery
RMAN> run
{
SET UNTIL SEQUENCE 9 THREAD 1;
set newname for datafile 1 to 'D:\Oracle11g64\oradata\LINUXDB\system01.dbf';
set newname for datafile 2 to 'D:\Oracle11g64\oradata\LINUXDB\sysaux01.dbf';
set newname for datafile 3 to 'D:\Oracle11g64\oradata\LINUXDB\undotbs01.dbf';
set newname for datafile 4 to 'D:\Oracle11g64\oradata\LINUXDB\users01.dbf';
restore database;
switch datafile all;
recover database;
}

executing command: SET until clause

executing command: SET NEWNAME

executing command: SET NEWNAME

executing command: SET NEWNAME

executing command: SET NEWNAME

Starting restore at 01-MAR-18
using channel ORA_DISK_1
using channel ORA_DISK_2

channel ORA_DISK_1: starting datafile backup set restore
channel ORA_DISK_1: specifying datafile(s) to restore from backup set
channel ORA_DISK_1: restoring datafile 00004 to D:\Oracle11g64\oradata\LINUXDB\users01.dbf
channel ORA_DISK_1: reading from backup piece H:\DB11G\BACKUP\RMAN_COMP_DB11G_LVL0_0ISSMNGA_1_1
channel ORA_DISK_2: starting datafile backup set restore
channel ORA_DISK_2: specifying datafile(s) to restore from backup set
channel ORA_DISK_2: restoring datafile 00003 to D:\Oracle11g64\oradata\LINUXDB\undotbs01.dbf
channel ORA_DISK_2: reading from backup piece H:\DB11G\BACKUP\RMAN_COMP_DB11G_LVL0_0GSSMNG7_1_1
channel ORA_DISK_1: piece handle=H:\DB11G\BACKUP\RMAN_COMP_DB11G_LVL0_0ISSMNGA_1_1 tag=DAILYFULL_DB_LVL0_BKP
channel ORA_DISK_1: restored backup piece 1
channel ORA_DISK_1: restore complete, elapsed time: 00:00:02
channel ORA_DISK_1: starting datafile backup set restore
channel ORA_DISK_1: specifying datafile(s) to restore from backup set
channel ORA_DISK_1: restoring datafile 00002 to D:\Oracle11g64\oradata\LINUXDB\sysaux01.dbf
channel ORA_DISK_1: reading from backup piece H:\DB11G\BACKUP\RMAN_COMP_DB11G_LVL0_0FSSMNG7_1_1
channel ORA_DISK_2: piece handle=H:\DB11G\BACKUP\RMAN_COMP_DB11G_LVL0_0GSSMNG7_1_1 tag=DAILYFULL_DB_LVL0_BKP
channel ORA_DISK_2: restored backup piece 1
channel ORA_DISK_2: restore complete, elapsed time: 00:00:08
channel ORA_DISK_2: starting datafile backup set restore
channel ORA_DISK_2: specifying datafile(s) to restore from backup set
channel ORA_DISK_2: restoring datafile 00001 to D:\Oracle11g64\oradata\LINUXDB\system01.dbf
channel ORA_DISK_2: reading from backup piece H:\DB11G\BACKUP\RMAN_COMP_DB11G_LVL0_0ESSMNG7_1_1
channel ORA_DISK_1: piece handle=H:\DB11G\BACKUP\RMAN_COMP_DB11G_LVL0_0FSSMNG7_1_1 tag=DAILYFULL_DB_LVL0_BKP
channel ORA_DISK_1: restored backup piece 1
channel ORA_DISK_1: restore complete, elapsed time: 00:00:22
channel ORA_DISK_2: piece handle=H:\DB11G\BACKUP\RMAN_COMP_DB11G_LVL0_0ESSMNG7_1_1 tag=DAILYFULL_DB_LVL0_BKP
channel ORA_DISK_2: restored backup piece 1
channel ORA_DISK_2: restore complete, elapsed time: 00:00:35
Finished restore at 01-MAR-18

datafile 1 switched to datafile copy
input datafile copy RECID=5 STAMP=969632161 file name=D:\ORACLE11G64\ORADATA\LINUXDB\SYSTEM01.DBF
datafile 2 switched to datafile copy
input datafile copy RECID=6 STAMP=969632161 file name=D:\ORACLE11G64\ORADATA\LINUXDB\SYSAUX01.DBF
datafile 3 switched to datafile copy
input datafile copy RECID=7 STAMP=969632161 file name=D:\ORACLE11G64\ORADATA\LINUXDB\UNDOTBS01.DBF
datafile 4 switched to datafile copy
input datafile copy RECID=8 STAMP=969632162 file name=D:\ORACLE11G64\ORADATA\LINUXDB\USERS01.DBF

Starting recover at 01-MAR-18
using channel ORA_DISK_1
using channel ORA_DISK_2

starting media recovery

channel ORA_DISK_1: starting archived log restore to default destination
channel ORA_DISK_1: restoring archived log
archived log thread=1 sequence=7
channel ORA_DISK_1: reading from backup piece H:\DB11G\BACKUP\ARCHIVE_DB11G_LVL0_0KSSMNH4_1_1
channel ORA_DISK_2: starting archived log restore to default destination
channel ORA_DISK_2: restoring archived log
archived log thread=1 sequence=8
channel ORA_DISK_2: reading from backup piece H:\DB11G\BACKUP\ARCHIVE_DB11G_LVL0_0LSSMNH4_1_1
channel ORA_DISK_1: piece handle=H:\DB11G\BACKUP\ARCHIVE_DB11G_LVL0_0KSSMNH4_1_1 tag=TAG20180301T132700
channel ORA_DISK_1: restored backup piece 1
channel ORA_DISK_1: restore complete, elapsed time: 00:00:01
archived log file name=H:\DB11G\ARCHIVELOG\DB11G_ARC0000000007_0969624950.0001 thread=1 sequence=7
channel ORA_DISK_2: piece handle=H:\DB11G\BACKUP\ARCHIVE_DB11G_LVL0_0LSSMNH4_1_1 tag=TAG20180301T132700
channel ORA_DISK_2: restored backup piece 1
channel ORA_DISK_2: restore complete, elapsed time: 00:00:01
archived log file name=H:\DB11G\ARCHIVELOG\DB11G_ARC0000000008_0969624950.0001 thread=1 sequence=8
media recovery complete, elapsed time: 00:00:02
Finished recover at 01-MAR-18

RMAN> exit

Recovery Manager complete.

D:\Oracle11g64\product\11.2.0\dbhome_1\BIN>

--SQL Activities
Microsoft Windows [Version 10.0.16299.248]
(c) 2017 Microsoft Corporation. All rights reserved.

C:\WINDOWS\system32>d:

D:\>cd D:\Oracle11g64\product\11.2.0\dbhome_1\BIN

D:\Oracle11g64\product\11.2.0\dbhome_1\BIN>set ORACLE_SID=LINUXDB

D:\Oracle11g64\product\11.2.0\dbhome_1\BIN>sqlplus / as sysdba

SQL*Plus: Release 11.2.0.4.0 Production on Thu Mar 1 14:18:44 2018

Copyright (c) 1982, 2013, Oracle. All rights reserved.

Connected to:
Oracle Database 11g Enterprise Edition Release 11.2.0.4.0 - 64bit Production
With the Partitioning, OLAP, Data Mining and Real Application Testing options

SQL> SELECT GROUP#, STATUS FROM V$LOG
2 /

GROUP# STATUS
---------- ----------------
1 INACTIVE
3 CURRENT
2 INACTIVE

SQL> SELECT MEMBER FROM V$LOGFILE;

MEMBER
--------------------------------------------------------------------------------
/u01/app/oracle/oradata/DB11G/redo03.log
/u01/app/oracle/oradata/DB11G/redo02.log
/u01/app/oracle/oradata/DB11G/redo01.log

--As the datafiles for the redo logs are pointing towards the LINUX file system
--We need to recreate redo log files for the Windows environment
--Prior that, we will try to drop those redo log groups which are inactive
--In our case redo log group 3 is the one active, hence 1,2 should be available to be dropped

SQL> alter database drop logfile group 1;

Database altered.

SQL> alter database drop logfile group 2;
alter database drop logfile group 2
*
ERROR at line 1:
ORA-01567: dropping log 2 would leave less than 2 log files for instance
linuxdb (thread 1)
ORA-00312: online log 2 thread 1: '/u01/app/oracle/oradata/DB11G/redo02.log'

--Minimum 2 redo log files are required for the instance, so dropping redo log group 2 fails in our case
--So we will add more redo groups to the database

SQL> alter database add logfile group 4
2 ('D:\Oracle11g64\oradata\LINUXDB\redo04.rdo','D:\Oracle11g64\oradata\LINUXDB\redo04a.rdo') size 50M;

Database altered.

SQL> alter database add logfile group 5
2 ('D:\Oracle11g64\oradata\LINUXDB\redo05.rdo','D:\Oracle11g64\oradata\LINUXDB\redo05a.rdo') size 50M;

Database altered.

SQL> alter database add logfile group 6
2 ('D:\Oracle11g64\oradata\LINUXDB\redo06.rdo','D:\Oracle11g64\oradata\LINUXDB\redo06a.rdo') size 50M;

Database altered.

--Now try to drop the rego log file group 2
SQL> alter database drop logfile group 2;

Database altered.

--Can we drop the redo group 3 finally?
SQL> alter database drop logfile group 3;
alter database drop logfile group 3
*
ERROR at line 1:
ORA-01623: log 3 is current log for instance linuxdb (thread 1) - cannot drop
ORA-00312: online log 3 thread 1: '/u01/app/oracle/oradata/DB11G/redo03.log'

--We cannot drop the redo group 3 because it is being the current redo group for the database
--We cannot switch the log file group because the database is not open

SQL> alter system switch logfile;
alter system switch logfile
*
ERROR at line 1:
ORA-01109: database not open

--We cannot rename the redo log group members because the filenames are not recognized by the Windows environment

SQL> alter database rename file '/u01/app/oracle/oradata/DB11G/redo03.log' to 'D:\Oracle11g64\oradata\LINUXDB\redo03.log';
alter database rename file '/u01/app/oracle/oradata/DB11G/redo03.log' to 'D:\Oracle11g64\oradata\LINUXDB\redo03.log'
*
ERROR at line 1:
ORA-01511: error in renaming log/data files
ORA-01516: nonexistent log file, data file, or temporary file
"/u01/app/oracle/oradata/DB11G/redo03.log"

--Though we know the database cannot be opened, let us give it an attempt
SQL> alter database open resetlogs;
alter database open resetlogs
*
ERROR at line 1:
ORA-00344: unable to re-create online log
'/u01/app/oracle/oradata/DB11G/redo03.log'
ORA-27040: file create error, unable to create file
OSD-04002: unable to open file
O/S-Error: (OS 3) The system cannot find the path specified.
--Expected, we will proceed to next step

SQL> shutdown immediate
ORA-01109: database not open

Database dismounted.
ORACLE instance shut down.
SQL> startup nomount
ORACLE instance started.

Total System Global Area 1252663296 bytes
Fixed Size 2280816 bytes
Variable Size 402653840 bytes
Database Buffers 838860800 bytes
Redo Buffers 8867840 bytes
SQL> alter database backup controlfile to trace as 'D:\Oracle11g64\oradata\LINUXDB\ctrlfile.trc';
alter database backup controlfile to trace as 'D:\Oracle11g64\oradata\LINUXDB\ctrlfile.trc'
*
ERROR at line 1:
ORA-01507: database not mounted

SQL> alter database mount
2 /

Database altered.
--We will trace the current control file to a readable format now

SQL> alter database backup controlfile to trace as 'D:\Oracle11g64\oradata\LINUXDB\ctrlfile.trc';

Database altered.

SQL> shutdown immediate;
ORA-01109: database not open

Database dismounted.
ORACLE instance shut down.

--Start the database in nomount state, so that we can try to create a fresh control file for the database
--Using NORESETLOGS
--COPY AND PASTE THE CREATE CONTROL FILE SEGEMENT FROM THE controlfile trace
--Do not forget to remove the line(s) pointing towards redo log files from LINUX enviornment
SQL> startup nomount
ORACLE instance started.

Total System Global Area 1252663296 bytes
Fixed Size 2280816 bytes
Variable Size 402653840 bytes
Database Buffers 838860800 bytes
Redo Buffers 8867840 bytes
SQL> CREATE CONTROLFILE REUSE DATABASE "DB11G" NORESETLOGS ARCHIVELOG
2 MAXLOGFILES 16
3 MAXLOGMEMBERS 3
4 MAXDATAFILES 100
5 MAXINSTANCES 8
6 MAXLOGHISTORY 292
7 LOGFILE
8 GROUP 4 (
9 'D:\ORACLE11G64\ORADATA\LINUXDB\REDO04.RDO',
10 'D:\ORACLE11G64\ORADATA\LINUXDB\REDO04A.RDO'
11 ) SIZE 50M BLOCKSIZE 512,
12 GROUP 5 (
13 'D:\ORACLE11G64\ORADATA\LINUXDB\REDO05.RDO',
14 'D:\ORACLE11G64\ORADATA\LINUXDB\REDO05A.RDO'
15 ) SIZE 50M BLOCKSIZE 512,
16 GROUP 6 (
17 'D:\ORACLE11G64\ORADATA\LINUXDB\REDO06.RDO',
18 'D:\ORACLE11G64\ORADATA\LINUXDB\REDO06A.RDO'
19 ) SIZE 50M BLOCKSIZE 512
20 -- STANDBY LOGFILE
21 DATAFILE
22 'D:\ORACLE11G64\ORADATA\LINUXDB\SYSTEM01.DBF',
23 'D:\ORACLE11G64\ORADATA\LINUXDB\SYSAUX01.DBF',
24 'D:\ORACLE11G64\ORADATA\LINUXDB\UNDOTBS01.DBF',
25 'D:\ORACLE11G64\ORADATA\LINUXDB\USERS01.DBF'
26 CHARACTER SET AL32UTF8
27 ;
CREATE CONTROLFILE REUSE DATABASE "DB11G" NORESETLOGS ARCHIVELOG
*
ERROR at line 1:
ORA-01503: CREATE CONTROLFILE failed
ORA-01192: must have at least one enabled thread

--So, next attempt we will try to create the control file using RESETLOGS

SQL> CREATE CONTROLFILE REUSE DATABASE "DB11G" RESETLOGS ARCHIVELOG
2 MAXLOGFILES 16
3 MAXLOGMEMBERS 3
4 MAXDATAFILES 100
5 MAXINSTANCES 8
6 MAXLOGHISTORY 292
7 LOGFILE
8 GROUP 4 (
9 'D:\ORACLE11G64\ORADATA\LINUXDB\REDO04.RDO',
10 'D:\ORACLE11G64\ORADATA\LINUXDB\REDO04A.RDO'
11 ) SIZE 50M BLOCKSIZE 512,
12 GROUP 5 (
13 'D:\ORACLE11G64\ORADATA\LINUXDB\REDO05.RDO',
14 'D:\ORACLE11G64\ORADATA\LINUXDB\REDO05A.RDO'
15 ) SIZE 50M BLOCKSIZE 512,
16 GROUP 6 (
17 'D:\ORACLE11G64\ORADATA\LINUXDB\REDO06.RDO',
18 'D:\ORACLE11G64\ORADATA\LINUXDB\REDO06A.RDO'
19 ) SIZE 50M BLOCKSIZE 512
20 -- STANDBY LOGFILE
21 DATAFILE
22 'D:\ORACLE11G64\ORADATA\LINUXDB\SYSTEM01.DBF',
23 'D:\ORACLE11G64\ORADATA\LINUXDB\SYSAUX01.DBF',
24 'D:\ORACLE11G64\ORADATA\LINUXDB\UNDOTBS01.DBF',
25 'D:\ORACLE11G64\ORADATA\LINUXDB\USERS01.DBF'
26 CHARACTER SET AL32UTF8
27 ;

Control file created.

SQL> alter database open resetlogs;

Database altered.

SQL> shutdown immediate;
Database closed.
Database dismounted.
ORACLE instance shut down.
SQL> startup
ORACLE instance started.

Total System Global Area 1252663296 bytes
Fixed Size 2280816 bytes
Variable Size 402653840 bytes
Database Buffers 838860800 bytes
Redo Buffers 8867840 bytes
Database mounted.
Database opened.
SQL> create temporary tablespace TEMP01 TEMPFILE 'D:\Oracle11g64\oradata\LINUXDB\TEMP01.dbf' SIZE 200M;

Tablespace created.

SQL> ALTER DATABASE DEFAULT TEMPORARY TABLESPACE TEMP01;

Database altered.

SQL> drop tablespace TEMP including contents and datafiles;

Tablespace dropped.

SQL> create temporary tablespace TEMP TEMPFILE 'D:\Oracle11g64\oradata\LINUXDB\TEMP02.dbf' SIZE 200M;

Tablespace created.

SQL> ALTER DATABASE DEFAULT TEMPORARY TABLESPACE TEMP;

Database altered.

--You may drop the TEMP01 tablespace and content once after a shutdown, startup procedure

--Now we will attempt to change the DBID & DATABASE name for the database

SQL> shutdown immediate
Database closed.
Database dismounted.
ORACLE instance shut down.
SQL> startup mount
ORACLE instance started.

Total System Global Area 1252663296 bytes
Fixed Size 2280816 bytes
Variable Size 402653840 bytes
Database Buffers 838860800 bytes
Redo Buffers 8867840 bytes
Database mounted.
SQL> quit
Disconnected from Oracle Database 11g Enterprise Edition Release 11.2.0.4.0 - 64bit Production
With the Partitioning, OLAP, Data Mining and Real Application Testing options

D:\Oracle11g64\product\11.2.0\dbhome_1\BIN>nid target=/ DBNAME=LINUXDB

DBNEWID: Release 11.2.0.4.0 - Production on Thu Mar 1 14:52:32 2018

Copyright (c) 1982, 2011, Oracle and/or its affiliates. All rights reserved.

Connected to database DB11G (DBID=439294518)

Connected to server version 11.2.0

Control Files in database:
D:\ORACLE11G64\ORADATA\LINUXDB\CONTROL01.CTL
D:\ORACLE11G64\ORADATA\LINUXDB\CONTROL02.CTL
D:\ORACLE11G64\ORADATA\LINUXDB\CONTROL03.CTL

Change database ID and database name DB11G to LINUXDB? (Y/[N]) => Y

Proceeding with operation
Changing database ID from 439294518 to 3227660209
Changing database name from DB11G to LINUXDB
Control File D:\ORACLE11G64\ORADATA\LINUXDB\CONTROL01.CTL - modified
Control File D:\ORACLE11G64\ORADATA\LINUXDB\CONTROL02.CTL - modified
Control File D:\ORACLE11G64\ORADATA\LINUXDB\CONTROL03.CTL - modified
Datafile D:\ORACLE11G64\ORADATA\LINUXDB\SYSTEM01.DB - dbid changed, wrote new name
Datafile D:\ORACLE11G64\ORADATA\LINUXDB\SYSAUX01.DB - dbid changed, wrote new name
Datafile D:\ORACLE11G64\ORADATA\LINUXDB\UNDOTBS01.DB - dbid changed, wrote new name
Datafile D:\ORACLE11G64\ORADATA\LINUXDB\USERS01.DB - dbid changed, wrote new name
Datafile D:\ORACLE11G64\ORADATA\LINUXDB\TEMP02.DB - dbid changed, wrote new name
Control File D:\ORACLE11G64\ORADATA\LINUXDB\CONTROL01.CTL - dbid changed, wrote new name
Control File D:\ORACLE11G64\ORADATA\LINUXDB\CONTROL02.CTL - dbid changed, wrote new name
Control File D:\ORACLE11G64\ORADATA\LINUXDB\CONTROL03.CTL - dbid changed, wrote new name
Instance shut down

Database name changed to LINUXDB.
Modify parameter file and generate a new password file before restarting.
Database ID for database LINUXDB changed to 3227660209.
All previous backups and archived redo logs for this database are unusable.
Database is not aware of previous backups and archived logs in Recovery Area.
Database has been shutdown, open database with RESETLOGS option.
Succesfully changed database name and ID.
DBNEWID - Completed succesfully.

D:\Oracle11g64\product\11.2.0\dbhome_1\BIN>sqlplus / as sysdba

SQL*Plus: Release 11.2.0.4.0 Production on Thu Mar 1 14:52:57 2018

Copyright (c) 1982, 2013, Oracle. All rights reserved.

Connected to an idle instance.

SQL> startup nomount;
ORACLE instance started.

Total System Global Area 1252663296 bytes
Fixed Size 2280816 bytes
Variable Size 402653840 bytes
Database Buffers 838860800 bytes
Redo Buffers 8867840 bytes

SQL> create spfile from pfile;

File created.

SQL> shutdown immediate;
ORA-01507: database not mounted

ORACLE instance shut down.
SQL> startup nomount;
ORACLE instance started.

Total System Global Area 1252663296 bytes
Fixed Size 2280816 bytes
Variable Size 402653840 bytes
Database Buffers 838860800 bytes
Redo Buffers 8867840 bytes
SQL> alter system set DB_NAME=LINUXDB scope=spfile;

System altered.

SQL> shutdown immediate;
ORA-01507: database not mounted

ORACLE instance shut down.
SQL> startup mount;
ORACLE instance started.

Total System Global Area 1252663296 bytes
Fixed Size 2280816 bytes
Variable Size 402653840 bytes
Database Buffers 838860800 bytes
Redo Buffers 8867840 bytes
Database mounted.
SQL> alter database open resetlogs;

Database altered.
Give it a try, recompile the invalid objects (my case there were none).
I have 3 Windows 10 Professional licenses (Yes, paid licenses). 2 of the licenses are used in two hardware devices & the 3rd one I am using with a VirtualBox VM machine.
My semi server class desktop computer at home has approximately 4.5T storage, consolidated from different disks. My Windows10 VM is frequently factory reset to try out different software (Mostly Oracle software at uncertified environments) & the particular partition on which I had the VM was running out of space & I planned to move the VM & the disks to a different partition with bigger free space.
Scenario: Move “Windows 10” VM from L: drive to M: drive
My nightmare started when the copy process stopped abruptly with Windows popping an error window stating there were read errors while copying disk1.vdi & I attempted again to realize that the disk1.vdi is has bad sectors or clusters.
I hurried to confirm that the VM is still accessible by restarting the VM couple of times & to my greatest pleasure the VM did start, did shutdown properly and I was able to access the Oracle database installation.
Fix:
A quick googling suggested that an attempt to repair the hard disks using “CHKDSK”, the old utility could fix the .vdi corruptions & without wasting more time I jumped in
At an elevated command prompt issued the command
> chkdsk L: /F
My partition is of 1TB & after 15-16 minutes the chkdsk completed with few messages like fixing some cluster information.
I tried to copy the disk1.vdi once again to M: drive, and this time the copy process managed almost 19GB out of 29.1GB and again presented me the read error.
Now, I was left with just one more option in front of me & it was to attempt recover the bad sectors, and there were chances that my virtual disk may get corrupt if the damages are more in numbers. knowing my VM is already Activated by Microsoft, I could try to reinstall Windows in a new virtual disk and retain the license as long as I am still using the other VM files as the id of the machine registered with Microsoft.
Please be informed, if you copy ONLY the vdi file, the activation will be nullified and you will be prompted to activate the copy of the Windows as soon as you start the new VM built using the copied VDI file!
So I proceeded to
>chkdsk L: /F /R
Windows suggested that it may take around 6 hrs for the repair process & I woke up next day morning to read multiple status messages about moving the corrupt sectors to new positions & some errors those could not be repaired.
I hurried to copy the disk once again & even though it seemed like forever, finally I was able to copy the disk1.vdi to M: drive!
So if you ever come across such a situation, give the above a try. If you are not cursed, most probably you will able to recover the virtual disk.
This is my first post for the year 2016. Actually I have more drafts than posts this time with me and I truly hope that I will able to finish all of them in few weeks time. I’m sure you are interested about Oracle 12c products on Windows platform. Stay tuned, am on it
Coming back to the topic, I have a decent desktop computer that could be called a “half server” with the following configurations
i7 processor 2nd generation
16GB DDR3 memory
Around 4.5-5 terabyte of storage
windows 10 64Bit Professional
I came across VMWare always 8 years back, liked it, and used it until they started charging for everything. Then Oracle VirtualBox (Earlier JAVA VirtualBox) started giving tough fight and it has become quite famous among developer communities where NOT many were truly able to afford VMWare’s paid software.
VMWare is altogether a different standard made for sophisticated environments, hence we will never compare both the products here. Our intention is to point you towards the advantages of using Virtual Machines that could less clutter your rig, give you better exposure to different technologies and a bit of networking etc
So our product of interest for this post is Oracle VirtualBox and we will see how we can utilize our existing desktops/laptops to run multiple virtual machines at the same time and thus utilize the available hardware to the maximum extends
So prior attempting to virtualize your existing computer, you need to know what kind of hardware you have and whether your computer meets minimum requirements to support virtualization.
So today is 3rd January 2016 & if your computer is 4 years old or less, 99.9% chances that your rig sure supports virtualization. Most of BIOS comes with the virtualization enabled by default.
Yet we should make sure that our computers support virtualization. Read the instructions provided here to find out whether your current processor supports virtualization OR
Just install Oracle VirtualBox and try to create a VM. You will immediately come to realize whether your rig really supports virtualization ;)
Well, that’s the brute force way of doing stuffs, adapt the one that defines you. If you are using Windows 10, I’ve noticed that many default installations enable Hyper-V by default. You need to disable it from add remove windows features console, so that you can create 64Bit VMs using Oracle VirtualBox. This post explains how to enable it, just do the opposite to disable it
Before anything else, you need to identify your processor, it’s capabilities. A nice comparison is available here for i3, i5 & i7 processors and definitely, the author favors i7 processors. Please spend few minutes to read about the differences between these three different processors.
What the difference between Core i3, i5, i7: Hyper-Threading
A thread in computing terms is a sequence of programmed instructions that the CPU has to process. If a CPU has one core, it can process only one thread at once, so can only do one thing at once (as before, it’s actually more complex than this, but the aim here is to keep it simple and understandable).
Hence, a dual-core CPU can process two threads at once, a quad-core four threads at once. That’s twice or four times the work in the same amount of time.
Hyper-Threading is a clever way to let a single core handle multiple threads.
A Core i3 with Hyper-Threading can process two threads per core which means a total of four threads can run simultaneously. The current Core i5 range doesn’t have Hyper-Threading so can also only process four cores. i7 processors do have it, so can process eight threads at once. Combine that with 8MB of cache and Turbo Boost Technology, and you can see why it’s good to choose a Core i7 over an i5 or i3.
Now, you should know how much physical memory you have. More, the merrier. Starting with Windows 7, computers started shipping with a minimum of 4GB as a standard. So, 4GB is enough for your OS and proposed virtualization? It’s going to be a tight fit. I will suggest an additional 4GB minimum, making the total physical memory 8GB so that you won’t have to sacrifice performance.
Finally the storage. Most of the branded PCs and laptops are coming with 500GB HDD as standard & extending the storage of a laptop is complex than of a desktop computer. For the later, all you need is another HDD which you can plug to one of the available SATA ports and configure. With a laptop, you may need to replace the HDD with a higher capacity one or use an external HDD for your additional storage requirements.
My current Virtualizations are mostly for Oracle technologies. I am a forms and reports developer, doing a certain level of .NET development & manage Oracle EBS R12 instances (“NOT a DBA”). Further I try almost all the database, weblogic versions & currently learning ASMM & RMAN. I have never attempted other areas of Oracle technologies, so my VMs run
Oracle EBS R12 cloned instances
Oracle database(s)
Oracle weblogic server(s) with forms and reports (supported)
My EBS R12 VM has the following configuations
8GB memory out of 16GB physical, 4 processor out of 8 logical processors & almost 850GB of storage out of 4.5 terabyte total storage. Our instance has 400GB database size, 175GB application instance & the VM responds to requests instantaneously once after scheduled jobs are completed after a restart of the application. Usually I find the application responding better after 3 hours of settling down & the performance is assured throughout days and weeks until a restart.
My Weblogic, database VMs have the following configurations
4GB memory out of 16GB physical, 4 processor out of 8 logical processors & almost 250 GB of storage out of 4.5 terabyte total storage. I have my weblogic VM running 11gR2 64bit database as well. I get instant responses from both the Weblogic server and Oracle database 11gR2 from a client system, whenever accessed
Recommendations
Even though you can run multiple VMs at the same time, I would suggest, based on your hardware, limit them. Example
When I run my EBS R12 VM (8GB memory, 4 processors) my HOST computer is left with only 8GB free memory and 4 logical processors. If I start a Windows XP VM (2GB memory, 2 processors) to check the application performance, I feel my rig start slowing down and couple of times my computer shutdown with a high thermal point.
So make sure that you do tweaking to your VMs in order to make sure that your HOST doesn’t breakdown due to overload.
I always make sure that my HOST always has half of the hardware resources reserved for it, ie, 8GB memory, 4 processors regardless how many VMs I run at the same time! This is by using the VirtualBox console to alter the parameters of VMs before they are started
All the settings for the VMs could be altered using the settings, like increasing or decreasing the memory, processors, adding and removing storage devices etc.
Below you watch how fast my VM running EBS r12 responds to requests from another VM running Windows XP
Advantages of using Virtualization
The most important advantage for me is: I’ve a less cluttered HOST, said, I am NOT installing all the technologies to one OS, breaking it with conflicting versions of services and libraries and processing load.
Other advantages
I can backup (copy) my entire “machine” and restore it during a total mess up or loss of data, rather than rebuilding the entire computer
I get a sand-boxed environment & without fearing my attempts will break my main OS, continue the experiments
I can make a VM, for example, running Oracle Enterprise Linux, copy and keep the OS installed disk somewhere and copy it to new VMs whenever required! Say, you install the OS only once and whenever you need to create a new VM with same OS, just duplicate the disk that has the OS! (Make sure you make a backup of the OS disk prior installing and configuring additional software into it)
Finally my suggestions for you, in case if you are considering to build your 1st VM using Oracle VirtualBox
Majority of the Oracle geeks prefer Linux against Windows for database, weblogic deployments. So if you are NOT familiar with Linux, I suggest you start learning, regardless whether you FEEL very comfortable with it or NOT. You may be joining a firm that has reservations towards Windows OS running Oracle products, especially Oracle DBAs who have valid points like block corruptions, difficulties to recover from a crash are complex in the case of Windows OS.
Install OS in a separate disk. 40GB dynamic size should be more than enough for any recent Linux distros. Avoid Linux 7 if you are truly new to Linux. Oracle Linux 6.7 should be your friend.
Install 64Bit OS, so that you can take the advantage of your 64Bit processor and physical memory
Install Oracle supported Linux distros (RHEL, OEL & certain versions of Debian. CentOS is not at all supported)
Install the complete desktop, you are hardly going to complete the installations on pure CLI mode.
Add SCSI interface to your VM and for Oracle database etc, use SCSI disks. I had a huge argument with VirtualBox guys about the performance difference between SATA VDI disks and SCSI VDI disks. I found the SCSI VDI disks performing better, however I was dismissed saying as far both the types are created on the same HDD, it must be more psychological :O
Use 1TB 7200 RPM disks in the place of 2TB 5400 RPM disks. Later ones are best for data storage, when the previous ones give you better I/O. Create fixed size VDI for databases & applications, that means you will NOT able to increase the size of the disk once after created, however, it gives you faster I/O and better performance.
Update your OS. As soon as the VM is built, update your OS prior installing database, weblogic etc. RHEL will NOT allow you to update the packages without subscription, hence Oracle Enterprise Linux should be your best choice of Linux distro. Please note, you shouldn’t use Oracle Linux in a production environment without acquiring sufficient licenses. Whatever I suggest here are limited for study/evaluation purposes and I don’t encourage any kind of illegal usage of software!
Use Oracle’s pre-install packages to install database, EBS etc prerequisites rather than trying to download individual components from different download sites.
Use shared folders between HOST and Guest (VM) so that you don’t have to sacrifice storage. Not just that, when you want to keep the backup of some files from the VM, the shared folders will make it as easy as possible
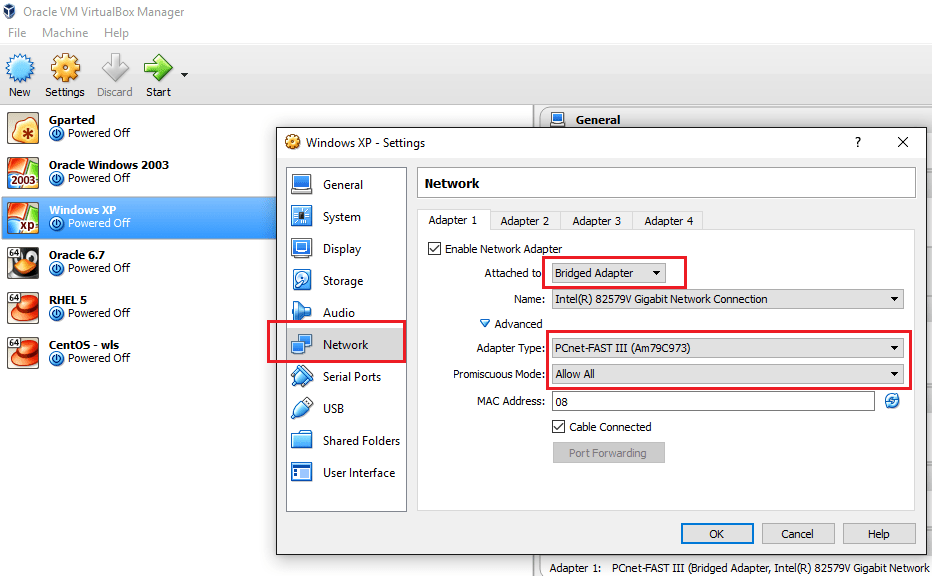
Use bridged network, with Promiscuous Mode “Allow All” so that you can communicate with the VM from network
Disable IPV6, firewall, SELinux on your Linux VM
If you creating a Windows VM, I’m sure you better know how to configure your guest so that you can access it from a network.
Finally recommendations for a DESKTOP computer to try virtualization
i7 processor + good quality heat sink. Your HOST and VMs are going to create loads of heat!
16GB Memory (DDR4 is the new standard, do not ignore it)
1×2 TB HDD
Few years back, such a configuration looked impossible for me, well, I saved bit by bit and made my dream computer. I’m sure you can also do it :) & trust me, a good computer opens a new world for you.
All the best and wish you all a very successful year ahead!
Recently I tried to build a cloned instance of our production instance over VirtualBox for some emergency issues faced by our inventory module. As this instance was supposed to be only accessed by me, I opted to use my desktop machine for the same. Throughout the last many years I built my own machines, choosing the best available hardware at the time of building them. My current desktop configuration is like following
i7 processor, 16GB memory, 2x1TB 7200 RPM HDD, 2x2TB 5200 RPM HDD, 1x500GB HDD for the OS (Windows 8.1 64Bit)
and throughout the years I built dozens of Virtual Machines using Oracle VirtualBox, mainly for testing un-certified Oracle & other products in a sand-boxed environment, against the crippled VMplayer, VirtualBox’s unrestricted interface supported almost everything I needed from a virtual environment.
So I built my R12 instance, that is around 600GB roughly in size with almost 4.5-5 years of business data, media etc. The following resources were dedicated for the fresh VM
4 processors
10GB memory
40GB fixed size SATA VDI for the Operating System (I used both OEL 5 & OEL 7 64bit)
1.2TB fixed size SATA VDI for the instance files
A dedicated D-Link 10/100MB NIC
Once the instance came online, I removed, cancelled all the scheduled concurrent programs, changed the database level parameters like job_queue_processes etc, however the lag experienced throughout the access attempts remained the same. Sometimes the HTML pages took 5-6 minutes to open, forms based modules took 8-10 minutes to open and timeouts were happening, frustrating me to the most possible levels
That is when I decided to give VMPlayer a try, I converted the existing VDI for the OS as vmdk and created a fresh 850 fixed size vmdk for the instance files and attached the same as SCSI to the VM. Did the complete clone process and to my utter surprise, the login page loaded within a minutes once after the instance was started!
This lead me to do various attempts with the fresh instance, I was able to shutdown the instance much faster, forms were opening faster, though LOVs having more than thousands of items were taking more time than anticipated
Once again, I created another fresh VM with VirtualBox and attached the disks created for VMplayer with it and repeated the tests. Well, I got the same performances from the new VM and somehow I came to a conclusion that, both VirtualBox and VMPlayer provide better I/O for SCSI interfaces compared to plain SATA emulators, ironically, the disks were created over SATA drives!
This difference you may not experience with VMs those are not hosting resource hungry applications like Oracle E-Business Suite. So, if you are attempting what I had described above and notice the differences, please update me with comments section.