I recently had to reinstall the 19c database and chose not to configure a new listener since I already had an 11g listener set up. Everything was fine until I attempted to set up APEX again. The APEX installation went well, but when I tried to set up ORDS, I began encountering the following errors..
Connecting to database user: system url: jdbc:oracle:thin:@//localhost:1521/orcl
Failed to connect to user: system url: jdbc:oracle:thin:@//localhost:1521/orcl
Listener refused the connection with the following error:
ORA-12518, TNS:listener could not hand off client connection
  (CONNECTION_ID=GUdr3KiAROGLcH8vxlpaMg==)
java.sql.SQLException: Listener refused the connection with the following error:
ORA-12518, TNS:listener could not hand off client connection
  (CONNECTION_ID=GUdr3KiAROGLcH8vxlpaMg==)
The situation seemed dire. Oracle support articles primarily addressed process deficiencies and the reconfiguration of 11g listeners for 19c database services, but these methods were ineffective for me this time. After some research, I stumbled upon a post detailing Oracle Net Services versions 9.2.0.5 to 10.2.0.1, notorious for ORA-12518 errors.
Consequently, I eliminated all 19c references from the 11g listener services and established a new 19c listener service. That turned out to be the solution. It appears that the jdbc thin clients utilized by the latest ORDS versions are incompatible with 11g net services, according to my tests. If this resolves your issue, please inform us in the comments!
(This post was rewritten using #Microsoft #Copilot preview)
One of the major benefits of getting exposed to Linux was coming across some fabulous tools for managing and manipulating files. Let it be a simple utility that could replace strings within hundreds of files within a path or find and delete files matching patterns, age etcetera was out of the box available on most of the Linux distributions. Windows Operating System lacks such tools out of the box & next possibility is to write own scripts, which is not very possible for many users.
“Purger” is a file shredding project that I devised few years ago, while we were still hosting our Oracle 11g R2 version on Windows for multiple custom business applications, that generated multiple log files. Today I am sharing a working version of the software with you!
This software can, recursively scan and list files that match the age specified by the user & delete them from the file system. I’ve a minimalistic help file (PDF) under the help section of the software, please make sure that you will read it before using the software.
I’ve tried my level best to ensure that the software doesn’t give the user surprises. Regardless, observe caution when you are using the same as the software is expected to “delete” or “purge” files from your system permanently. If you are not using the “Send to Recyclebin” option, you might end up using tools like Recuva to recover the files deleted!
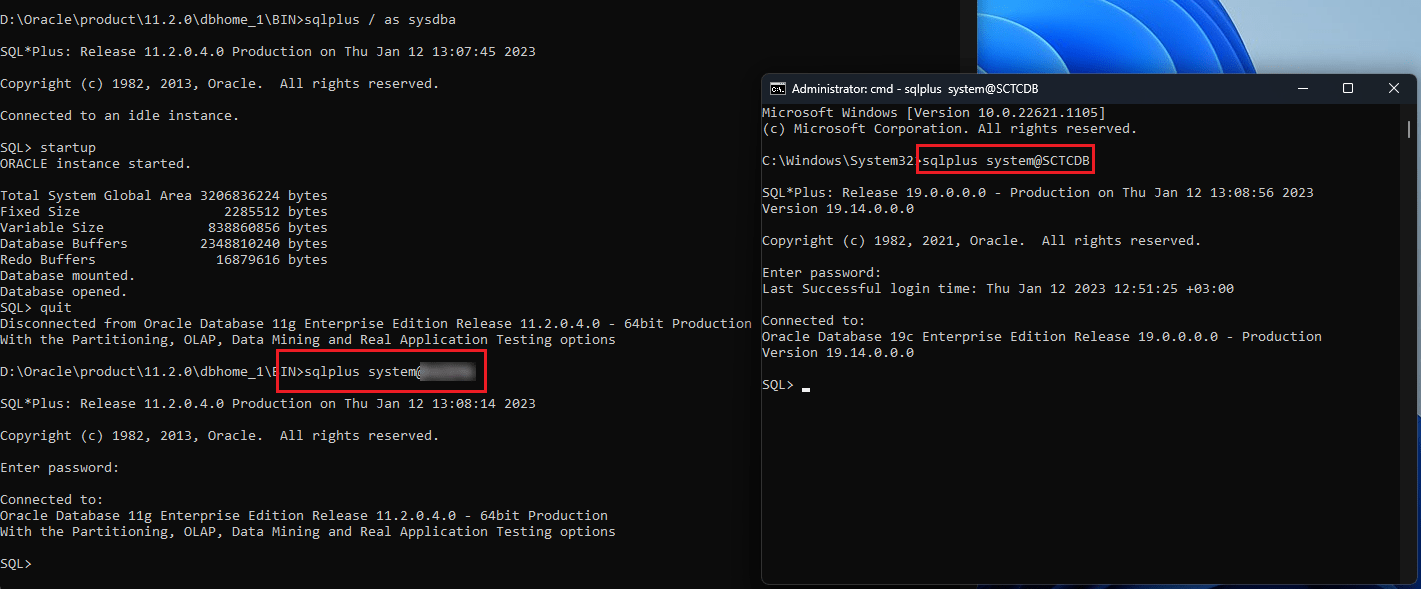
Currently I’ve 2 different versions of Oracle database installed & instances running from my development machine. Oracle 11G R2 (11.20.4) and Oracle 19c (19.14) & yes, we are supported by Oracle. I had 11G installed first & later installed 19c for checking out APEX and ORDS.
As 11G listener was running, I didn’t notice anything problematic until, tried to connect as a specific user. I started getting the error that the listener doesn’t know of the service name.
PS D:\Oracle19c> sqlplus / as sysdba

SQL*Plus: Release 19.0.0.0.0 - Production on Thu Jan 12 12:45:30 2023
Version 19.14.0.0.0

Copyright (c) 1982, 2021, Oracle.  All rights reserved.


Connected to:
Oracle Database 19c Enterprise Edition Release 19.0.0.0.0 - Production
Version 19.14.0.0.0

SQL> quit
Disconnected from Oracle Database 19c Enterprise Edition Release 19.0.0.0.0 - Production
Version 19.14.0.0.0
PS D:\Oracle19c> sqlplus system@SCTCDB

SQL*Plus: Release 19.0.0.0.0 - Production on Thu Jan 12 12:45:34 2023
Version 19.14.0.0.0

Copyright (c) 1982, 2021, Oracle.  All rights reserved.

Enter password:
ERROR:
ORA-12514: TNS:listener does not currently know of service requested in connect
descriptor


Enter user-name:
I went ahead and using netca registered the 19c service with 11g listener, restarted the listener services and this time instead of complaining about the missing service, connection attempt froze.
After some confusion, I decided to drop the 11g listener services and created a new listener from 19c environment.
Registered both 19c & 11g services using 19c NETCA this time & restarted the listener. I was able to connect to both databases using username/password@servicename syntax this time.
So let us see what went wrong. 11g database was configured for connections from Oracle Developer 6i legacy applications.
This cannot be modified without failing the legacy application. Please refer the below to understand how the authentication works with different versions of databases and what has changed.
As I am not allowed to change 11g environment, the ONLY one way I can use the same listener was to register 11g service with 19c listener. Simple, clean and effective. Hope this helps few out there who is not a certified DBA like me ;)
Recently at a gathering I was asked about my job. I told a group of young chaps that I work with Oracle EBS and my primary role is developing extensions using Oracle Forms & Reports. Interestingly, none of them knew anything about Oracle Forms & Reports.
Couple of days back I installed Oracle 11G R2 database once “again” as I had to open our legacy software for some historical data access. Then I had to develop a report and to my utter surprise, found Oracle 10g report developer will not connect to 11G database, generating the following errors:
REP-0501: Unable to connect to the specified database.
ORA-12640: Authentication adapter initialization failed
I hurried to check the database sqlnet.ora file and found the authentication set as NTS (Windows default for Oracle products) & interestingly Developer 6i products were connecting to the database without any issues. This helped me to confirm that issues were from Developer 10g side & I changed the sqlnet.ora settings for the Developer 10g Suite.
from NTS to NONE did the trick.
I don’t know how my people are ever going to land on this page! Trust me, I haven’t seen an interesting question about Oracle Forms/Reports in any of the Oracle support forums from last many years. I will be pretty sad to see such a wonderful product that was built for developing Business applications on the go being ignored for some crappy browser based gimmicks.
Few weeks back one DBA told me there is no need to setup HugePages as we are not using 40+GB SGA & we had it enabled from the initial days of 11g migration from 10g (10.2.0.3). Well, here is how you can setup HugePages for your Oracle database instance.
A brief explanation that might help you to decide whether you should enable HugePages or not is quoted from Tim Hall’s article below.
“For large SGA sizes, HugePages can give substantial benefits in virtual memory management. Without HugePages, the memory of the SGA is divided into 4K pages, which have to be managed by the Linux kernel. Using HugePages, the page size is increased to 2MB (configurable to 1G if supported by the hardware), thereby reducing the total number of pages to be managed by the kernel and therefore reducing the amount of memory required to hold the page table in memory. In addition to these changes, the memory associated with HugePages can not be swapped out, which forces the SGA to stay memory resident. The savings in memory and the effort of page management make HugePages pretty much mandatory for Oracle 11g systems running on x86-64 architectures.“
Recently I had a short Twitter exchange with Tim Hall about the subject & He mentioned that he always enables it.
Please refer the article from below link, it is by Tim Hall, a geek in this field and the owner of https://oracle-base.com
Exercises explained in this article is applicable to 19c also (verified as working). Please make sure that your version of Oracle database supports these settings before attempting. Please do not copy this to PRODUCTION environments without enough testing.
We’ve our Oracle EBS instance hosted from Linux environment. However I post much for the Windows OS as I see there are not many articles targeting Oracle on Windows. I think for better view counts, I should consider posting the articles for both OS.
In my last post about restoring 1g RMAN online backup to 19c non CDB database, I said my ultimate goal was to convert the upgraded database from non CDB to PDB, that is plugged on to an existing CDB. Let us see how to achieve this goal this time.
Before start, there are few mandatory checks you must do to insure a successful migration from Non CDB to PDB. I will list few of them those came as hurdles for me.
Character Set. Make sure that your CDB and the Non CDB database have the same character set. There are few possible conversions. Please check 12c Multitenant Container Databases (CDB) and Pluggable Databases (PDB) Character set restrictions / ORA-65116/65119: incompatible database/national character set ( Character set mismatch: PDB character set CDB character set ) (Doc ID 1968706.1) for more details. My CDB was using Arabic character set and the upgraded non CDB database was using a noncompatible set. So I dropped the CDB and created a new CDB without PDB(s). Dropping a CDB will not be always possible because other PDBs are attached to it.
Available storage space. This could be a real concern incase if you are planning to create a PDB, cross verify & then delete the non CDB database. You will need approximately the same size of your non CDB datafiles size storage available to do this activity. My database was less than 5 GB in size, hence it never occurred to me. If your database has a bigger size, plan accordingly.
Let’s do it now.
From and elevated command prompt (Windows Terminal is not yet matured enough to handle such “heavy” tasks) source the non CDB. Shutdown and startup mount exclusive.
C:\Windows\system32>set ORACLE_SID=KAZEMA
C:\Windows\system32>sqlplus / as sysdba
SQL> shu immediate
SQL> startup mount exclusive
SQL> alter database open read only;
Create manifest file for the non CDB now.
SQL> exec dbms_pdb.describe (pdb_descr_file=>'D:\Oracle19c\kazema_manifest_file.xml');
SQL> shu immediate
Source the CDB now.
C:\Windows\system32>set ORACLE_SID=KAZEMACDB
C:\Windows\system32>sqlplus / as sysdba
SQL> SHOW CON_NAME

CON_NAME
------------------------------
CDB$ROOT
Now, we need to see whether non CDB meets the compatibility requirements. There could be multiple elements those you may have to fix before, the non CDB is ready for a successful migration as PDB. You will have to refer PDB_PLUG_IN_VIOLATIONS view for these details. Go ahead, execute the below code block.
SQL>   SET SERVEROUTPUT ON;
SQL>    DECLARE
       Compatible CONSTANT VARCHAR2(3) :=CASE  DBMS_PDB.CHECK_PLUG_COMPATIBILITY
       (pdb_descr_file => 'D:\Oracle19c\kazema_manifest_file.xml')
       WHEN TRUE THEN 'YES'
       ELSE 'NO'
       END;
       BEGIN
          DBMS_OUTPUT.PUT_LINE(compatible);
       END;
     /
YES
My case I didn’t have incompatibilities blocking possible migration. Your case could be different. If the output is “NO”, run the following query (use SQL Developer for better view)
select * from PDB_PLUG_IN_VIOLATIONS where name='<your non CDB name>';
Fix each and every other ERROR & you can safely ignore the “WARNINGS” for now.
Proceed with creating a new PDB from the manifest file that we have created in the 1st step.
SQL> CREATE PLUGGABLE DATABASE KAZEMA USING 'D:\Oracle19c\kazema_manifest_file.xml' COPY FILE_NAME_CONVERT=('D:\ORACLE19C\DB\ORADATA\KAZEMA\DATAFILE','D:\ORACLE19C\DB\ORADATA\KAZEMA');

Pluggable database created.

SQL> show pdbs;

    CON_ID CON_NAME                       OPEN MODE  RESTRICTED
---------- ------------------------------ ---------- ----------
         2 PDB$SEED                       READ ONLY  NO
         3 KAZEMA                         MOUNTED
Once the PDB has been created, confirm the same & proceed with balance activities. Run “noncdb_to_pdb.sql”
SQL> alter session set container=KAZEMA;

Session altered.

SQL> @$ORACLE_HOME/rdbms/admin/noncdb_to_pdb.sql
Based on the resource available, this might take a while for the script to complete execution. Once completed you can try to open the PDB. Check for Errors and Warnings in the PDB_PLUG_IN_VIOLATIONS view. If there are new ERRORS & WARNINGS fix them.
A typical scenario could list you many things like this (reference image only)
After fix attempts, I am still left with one Warning about sys lock issues. This is mainly due to the password file format 12.2. I hope to find a solution soon for it. Status column states whether the Error/Warning was taken care off.
SQL> alter pluggable database open;

Pluggable database altered.

SQL> SELECT name, open_mode FROM v$pdbs;

NAME
--------------------------------------------------------------------------------
OPEN_MODE
----------
KAZEMA
READ WRITE


1 row selected.

SQL> show pdbs;

    CON_ID CON_NAME                       OPEN MODE  RESTRICTED
---------- ------------------------------ ---------- ----------
         3 KAZEMA                         READ WRITE NO
SQL>
Now you have a non CDB and PDB with the same SID. You can proceed with dropping the non CDB database after cross verifying the concerns.
Foot Note: If you are plugging a database that was hosted in another server/computer after converting, make sure to verify the “local_listener” parameter for the PDB exist.
D:\Oracle19c>sqlplus / as sysdba

SQL*Plus: Release 19.0.0.0.0 - Production on Sun Apr 10 11:18:33 2022
Version 19.14.0.0.0

Copyright (c) 1982, 2021, Oracle.  All rights reserved.


Connected to:
Oracle Database 19c Enterprise Edition Release 19.0.0.0.0 - Production
Version 19.14.0.0.0

SQL> show parameter local_listener

NAME                                 TYPE        VALUE
------------------------------------ ----------- ------------------------------
local_listener                       string      LISTENER_KAZEMACDB
SQL> alter session set container="KAZEMA";

Session altered.

SQL> show parameter local_listener

NAME                                 TYPE        VALUE
------------------------------------ ----------- ------------------------------
local_listener                       string      LISTENER_KAZEMACDB
SQL>
If the local listener is not reachable, PDB level services will fail to register with listener and the applications those depend on such services will fail to establish connections. This applies mostly to Oracle E-Business Suite environments and could be mapped to sophisticated applications that use specific service names to establish connections to the database.
Is it possible to restore previous version RMAN database backup to a later version? Depending upon the supported upgrade paths, the lowest version I managed to restore to 19c (19.14) was 11g R2 (11.2.0.4)
Upgrade Path for Oracle database 19c
Please note, my final goal is to convert this NON CDB database to PDB and attach to an existing CDB.
What you need?
Intact RMAN online backup
Enough memory and storage space available on your computer.
Time and patience
Oracle support access, for many of the documents mentioned later in the article.
Scenario (fictitious): I’m given a full RMAN backup without any other details. I don’t know the source server details other than that it was windows & the version of the database release was 11.2.0.4.
Step#1
Using DBCA created a new non CDB database with the target database name, eg “KAZEMA”. After shutting down database, stopped listener keeping Windows Service for Oracle database running. Physically deleted all data files including control, redo logs.
(You can create an empty instance using ORADIM. That means ORADIM will create Windows services necessary for Oracle. You will have to create the necessary folders. Not just that, you need create a parameter file (initDATABASENAME.ora) to start the instance. Refer the below example)
D:\Oracle19c>oradim -new -sid KAZEMA -syspwd Oracle123 -startmode auto
Enter password for Oracle service user:

OPW-00029: Password complexity failed for SYS user : Password must contain at least 1 special character.
Instance created.
Considering the fact that my target database name is “KAZEMA”, I have modified a copy of parameter file that I had. One of the most important factor you should pay attention here is to create all the physical paths mentioned in the parameter file. Example D:\Oracle19c\db\admin\KAZEMA\adump, D:\Oracle19c\db\oradata\KAZEMA\CONTROLFILE. Failing to find these physical paths might cause errors or your database will not start at all.
D:\Oracle19c\db\admin\KAZEMA has few more folders, like shown in the image. Please create them manually before starting the database.
Add *.max_string_size=’STANDARD’ to the parameter file, necessary for the upgrade. You will have to change this parameter once again after upgrade completes. We will discuss about it later in the article.
SQL> startup nomount (pfile=D:\Oracle19c\database\initKAZEMA.ora # if instance was created using ORADIM)
ORACLE instance started.

Total System Global Area 2147482424 bytes
Fixed Size                  9030456 bytes
Variable Size             503316480 bytes
Database Buffers         1627389952 bytes
Redo Buffers                7745536 bytes
From another elevated command prompt started RMAN & restored control file from backup that I had in “D:\BAHRMAN” folder.
D:\BAHRMAN>set ORACLE_SID=KAZEMA

D:\BAHRMAN>rman target /

Recovery Manager: Release 19.0.0.0.0 - Production on Wed Mar 23 09:52:14 2022
Version 19.14.0.0.0

Copyright (c) 1982, 2021, Oracle and/or its affiliates.  All rights reserved.

connected to target database: KAZEMA (DBID=964058362, not open)

RMAN>restore controlfile from 'D:\BAHRMAN\CTL_C-964058362-20210927-02';
RMAN>alter database mount;
RMAN>report schema; #This will populate the data file details
Shutdown the database now. Restart the database in “nomount” mode using parameter file.
Once database shutdown and restarted, exit RMAN and connect again. We’ll duplicate database using the RMAN backup now using “NOOPEN” switch that is supported from versions 12.
D:\BAHRMAN>rman auxiliary /

Recovery Manager: Release 19.0.0.0.0 - Production on Wed Mar 23 09:56:42 2022
Version 19.14.0.0.0

Copyright (c) 1982, 2021, Oracle and/or its affiliates.  All rights reserved.

connected to auxiliary database: KAZEMA (not mounted)

run
{
ALLOCATE AUXILIARY CHANNEL c1 DEVICE TYPE disk;
ALLOCATE AUXILIARY CHANNEL c2 DEVICE TYPE disk;
ALLOCATE AUXILIARY CHANNEL c3 DEVICE TYPE disk;
ALLOCATE AUXILIARY CHANNEL c4 DEVICE TYPE disk;
duplicate database to "KAZEMA" NOOPEN backup location 'D:\BAHRMAN' nofilenamecheck
db_file_name_convert=('D:\ORACLE\ORADATA\KAZEMA\','D:\Oracle19c\db\oradata\KAZEMA\DATAFILE\')
LOGFILE
GROUP 1 (
'D:\Oracle19c\db\oradata\KAZEMA\LOGFILE\redo01a.log',
'D:\Oracle19c\db\oradata\KAZEMA\LOGFILE\redo01b.log'
) SIZE 1200M ,
GROUP 2 (
'D:\Oracle19c\db\oradata\KAZEMA\LOGFILE\redo02a.log',
'D:\Oracle19c\db\oradata\KAZEMA\LOGFILE\redo02b.log'
) SIZE 1200M ,
GROUP 3 (
'D:\Oracle19c\db\oradata\KAZEMA\LOGFILE\redo03a.log',
'D:\Oracle19c\db\oradata\KAZEMA\LOGFILE\redo03b.log'
) SIZE 1200M ,
GROUP 4 (
'D:\Oracle19c\db\oradata\KAZEMA\LOGFILE\redo04a.log',
'D:\Oracle19c\db\oradata\KAZEMA\LOGFILE\redo04b.log'
) SIZE 1200M ;
# 19c & later, no need to exclusively release channels. If you restoring to other versions, make sure to release the channels.
# https://www.thegeekdiary.com/oracle-database-19c-rman-06012-channel-d1-not-allocated/
RELEASE CHANNEL c1;
RELEASE CHANNEL c2;
RELEASE CHANNEL c3;
RELEASE CHANNEL c4;
}

allocated channel: c1
channel c1: SID=498 device type=DISK

allocated channel: c2
channel c2: SID=619 device type=DISK

allocated channel: c3
channel c3: SID=742 device type=DISK

allocated channel: c4
channel c4: SID=862 device type=DISK

Starting Duplicate Db at 23-MAR-22
searching for database ID
found backup of database ID 964058362

contents of Memory Script:
.....Removed........
datafile 9 switched to datafile copy
input datafile copy RECID=8 STAMP=1100081253 file name=D:\ORACLE19C\DB\ORADATA\KAZEMA\DATAFILE\LC01.DBF
datafile 10 switched to datafile copy
input datafile copy RECID=9 STAMP=1100081253 file name=D:\ORACLE19C\DB\ORADATA\KAZEMA\DATAFILE\BAHAR01.DBF
Leaving database unopened, as requested
Finished Duplicate Db at 23-MAR-22
#You will see the below errors for 19c and later while trying to release the channels exclusively. Remove the release channel instructions from the RMAN scripts to avoid seeing these messages.

RMAN-00571: ===========================================================
RMAN-00569: =============== ERROR MESSAGE STACK FOLLOWS ===============
RMAN-00571: ===========================================================
RMAN-03002: failure of release command at 03/23/2022 10:07:32
RMAN-06012: channel: c1 not allocated

RMAN>
Ignore errors by the end of RMAN process, if they are related to releasing channels. If there are errors of other nature, you must resolve them. Now we will open the database resetting logs and ready to upgrade.
D:\Oracle19c>sqlplus / as sysdba

SQL*Plus: Release 19.0.0.0.0 - Production on Wed Mar 23 10:09:51 2022
Version 19.14.0.0.0

Copyright (c) 1982, 2021, Oracle.  All rights reserved.


Connected to:
Oracle Database 19c Enterprise Edition Release 19.0.0.0.0 - Production
Version 19.14.0.0.0

SQL> alter database open resetlogs upgrade;

Database altered.
As we have restored a RMAN backup, it is obvious that the source database had archive logs enabled. Let us disable archive logging from our new database. Shutdown the database and open it in mount mode.
SQL> startup mount pfile=D:\Oracle19c\database\initKAZEMA.ora
ORACLE instance started.

Total System Global Area 2147482424 bytes
Fixed Size                  9030456 bytes
Variable Size             503316480 bytes
Database Buffers         1627389952 bytes
Redo Buffers                7745536 bytes

SQL> alter database noarchivelog;
This is a long process for many reasons. First of all, no prerequisites were executed and recommended actions were performed against the source 11G database for 19c upgrade. This will cause upgrade process to fix prerequisites during upgrade & brace for few errors. Without MAX_STRING_SIZE set as ‘STANDARD’ for 11g, upgrade will fail. I have started the database instance using parameter file ONLY for this reason. I’m not sure whether RMAN restore crated SPFILE copies this value. So, I didn’t take chances.
Argument list for [D:\Oracle19c\rdbms\admin\catctl.pl]
For Oracle internal use only A = 0
Run in                       c = 0
Do not run in                C = 0
Input Directory              d = 0
Echo OFF                     e = 1
Simulate                     E = 0
Forced cleanup               F = 0
Log Id                       i = 0
Child Process                I = 0
Log Dir                      l = D:\Oracle19c\
Priority List Name           L = 0
Upgrade Mode active          M = 0
SQL Process Count            n = 4
SQL PDB Process Count        N = 0
Open Mode Normal             o = 0
Start Phase                  p = 0
End Phase                    P = 0
Reverse Order                r = 0
AutoUpgrade Resume           R = 0
Script                       s = 0
Serial Run                   S = 0
RO User Tablespaces          T = 0
Display Phases               y = 0
Debug catcon.pm              z = 0
Debug catctl.pl              Z = 0

catctl.pl VERSION: [19.0.0.0.0]
           STATUS: [Production]
            BUILD: [RDBMS_19.14.0.0.0DBRU_WINDOWS.X64_211224.3]


D:\Oracle19c\rdbms\admin\orahome.exe = [D:\Oracle19c]
D:\Oracle19c\bin\orabasehome.exe = [D:\Oracle19c]
catctlGetOraBaseLogDir = [D:\Oracle19c]

Analyzing file D:\Oracle19c\rdbms\admin\catupgrd.sql

Log file directory = [D:\Oracle19c]

catcon::set_log_file_base_path: ALL catcon-related output will be written to [D:\Oracle19c\catupgrd_catcon_8056.lst]

catcon::set_log_file_base_path: catcon: See [D:\Oracle19c\catupgrd*.log] files for output generated by scripts
catcon::set_log_file_base_path: catcon: See [D:\Oracle19c\catupgrd_*.lst] files for spool files, if any


Number of Cpus        = 8
Database Name         = KAZEMA
DataBase Version      = 11.2.0.4.0
Parallel SQL Process Count            = 4
Components in [KAZEMA]
    Installed [APEX APS CATALOG CATJAVA CATPROC CONTEXT EM JAVAVM ORDIM OWM SDO XDB XML XOQ]
Not Installed [DV MGW ODM OLS RAC WK]
DataBase Version      = 11.2.0.4.0

------------------------------------------------------
Phases [0-107]         Start Time:[2022_03_23 10:18:27]
------------------------------------------------------
***********   Executing Change Scripts   ***********
Serial   Phase #:0    [KAZEMA] Files:1    Time: 273s
***************   Catalog Core SQL   ***************
Serial   Phase #:1    [KAZEMA] Files:5    Time: 31s
Restart  Phase #:2    [KAZEMA] Files:1    Time: 1s
***********   Catalog Tables and Views   ***********
Parallel Phase #:3    [KAZEMA] Files:19   Time: 11s
Restart  Phase #:4    [KAZEMA] Files:1    Time: 0s
*************   Catalog Final Scripts   ************
Serial   Phase #:5    [KAZEMA] Files:7    Time: 14s
*****************   Catproc Start   ****************
Serial   Phase #:6    [KAZEMA] Files:1    Time: 11s
*****************   Catproc Types   ****************
Serial   Phase #:7    [KAZEMA] Files:2    Time: 6s
Restart  Phase #:8    [KAZEMA] Files:1    Time: 0s
****************   Catproc Tables   ****************
Parallel Phase #:9    [KAZEMA] Files:70   Time: 11s
Restart  Phase #:10   [KAZEMA] Files:1    Time: 1s
*************   Catproc Package Specs   ************
Serial   Phase #:11   [KAZEMA] Files:1    Time: 42s
Restart  Phase #:12   [KAZEMA] Files:1    Time: 0s
**************   Catproc Procedures   **************
Parallel Phase #:13   [KAZEMA] Files:95   Time: 4s
Restart  Phase #:14   [KAZEMA] Files:1    Time: 0s
Parallel Phase #:15   [KAZEMA] Files:122  Time: 6s
Restart  Phase #:16   [KAZEMA] Files:1    Time: 0s
Serial   Phase #:17   [KAZEMA] Files:25   Time: 2s
Restart  Phase #:18   [KAZEMA] Files:1    Time: 0s
*****************   Catproc Views   ****************
Parallel Phase #:19   [KAZEMA] Files:32   Time: 8s
Restart  Phase #:20   [KAZEMA] Files:1    Time: 0s
Serial   Phase #:21   [KAZEMA] Files:3    Time: 8s
Restart  Phase #:22   [KAZEMA] Files:1    Time: 0s
Parallel Phase #:23   [KAZEMA] Files:25   Time: 157s
Restart  Phase #:24   [KAZEMA] Files:1    Time: 0s
Parallel Phase #:25   [KAZEMA] Files:12   Time: 96s
Restart  Phase #:26   [KAZEMA] Files:1    Time: 0s
Serial   Phase #:27   [KAZEMA] Files:1    Time: 0s
Serial   Phase #:28   [KAZEMA] Files:4    Time: 2s
Serial   Phase #:29   [KAZEMA] Files:1    Time: 0s
Restart  Phase #:30   [KAZEMA] Files:1    Time: 1s
***************   Catproc CDB Views   **************
Serial   Phase #:31   [KAZEMA] Files:1    Time: 0s
Restart  Phase #:32   [KAZEMA] Files:1    Time: 0s
Serial   Phase #:34   [KAZEMA] Files:1    Time: 0s
*****************   Catproc PLBs   *****************
Serial   Phase #:35   [KAZEMA] Files:297  Time: 19s
Serial   Phase #:36   [KAZEMA] Files:1    Time: 0s
Restart  Phase #:37   [KAZEMA] Files:1    Time: 1s
Serial   Phase #:38   [KAZEMA] Files:10   Time: 3s
Restart  Phase #:39   [KAZEMA] Files:1    Time: 0s
***************   Catproc DataPump   ***************
Serial   Phase #:40   [KAZEMA] Files:3    Time: 40s
Restart  Phase #:41   [KAZEMA] Files:1    Time: 0s
******************   Catproc SQL   *****************
Parallel Phase #:42   [KAZEMA] Files:13   Time: 91s
Restart  Phase #:43   [KAZEMA] Files:1    Time: 0s
Parallel Phase #:44   [KAZEMA] Files:11   Time: 7s
Restart  Phase #:45   [KAZEMA] Files:1    Time: 0s
Parallel Phase #:46   [KAZEMA] Files:3    Time: 1s
Restart  Phase #:47   [KAZEMA] Files:1    Time: 0s
*************   Final Catproc scripts   ************
Serial   Phase #:48   [KAZEMA] Files:1    Time: 9s
Restart  Phase #:49   [KAZEMA] Files:1    Time: 0s
**************   Final RDBMS scripts   *************
Serial   Phase #:50   [KAZEMA] Files:1    Time: 15s
************   Upgrade Component Start   ***********
Serial   Phase #:51   [KAZEMA] Files:1    Time: 0s
Restart  Phase #:52   [KAZEMA] Files:1    Time: 1s
**********   Upgrading Java and non-Java   *********
Serial   Phase #:53   [KAZEMA] Files:2    Time: 363s
*****************   Upgrading XDB   ****************
Restart  Phase #:54   [KAZEMA] Files:1    Time: 0s
Serial   Phase #:56   [KAZEMA] Files:3    Time: 22s
Serial   Phase #:57   [KAZEMA] Files:3    Time: 1s
Parallel Phase #:58   [KAZEMA] Files:10   Time: 2s
Parallel Phase #:59   [KAZEMA] Files:25   Time: 3s
Serial   Phase #:60   [KAZEMA] Files:4    Time: 4s
Serial   Phase #:61   [KAZEMA] Files:1    Time: 0s
Serial   Phase #:62   [KAZEMA] Files:32   Time: 2s
Serial   Phase #:63   [KAZEMA] Files:1    Time: 0s
Parallel Phase #:64   [KAZEMA] Files:6    Time: 5s
Serial   Phase #:65   [KAZEMA] Files:2    Time: 14s
Serial   Phase #:66   [KAZEMA] Files:3    Time: 59s
****************   Upgrading ORDIM   ***************
Restart  Phase #:67   [KAZEMA] Files:1    Time: 0s
Serial   Phase #:69   [KAZEMA] Files:1    Time: 1s
Parallel Phase #:70   [KAZEMA] Files:2    Time: 25s
Restart  Phase #:71   [KAZEMA] Files:1    Time: 0s
Parallel Phase #:72   [KAZEMA] Files:2    Time: 1s
Serial   Phase #:73   [KAZEMA] Files:2    Time: 1s
*****************   Upgrading SDO   ****************
Restart  Phase #:74   [KAZEMA] Files:1    Time: 0s
Serial   Phase #:76   [KAZEMA] Files:1    Time: 29s
Serial   Phase #:77   [KAZEMA] Files:2    Time: 1s
Restart  Phase #:78   [KAZEMA] Files:1    Time: 1s
Serial   Phase #:79   [KAZEMA] Files:1    Time: 14s
Restart  Phase #:80   [KAZEMA] Files:1    Time: 0s
Parallel Phase #:81   [KAZEMA] Files:3    Time: 28s
Restart  Phase #:82   [KAZEMA] Files:1    Time: 0s
Serial   Phase #:83   [KAZEMA] Files:1    Time: 4s
Restart  Phase #:84   [KAZEMA] Files:1    Time: 0s
Serial   Phase #:85   [KAZEMA] Files:1    Time: 8s
Restart  Phase #:86   [KAZEMA] Files:1    Time: 1s
Parallel Phase #:87   [KAZEMA] Files:4    Time: 56s
Restart  Phase #:88   [KAZEMA] Files:1    Time: 0s
Serial   Phase #:89   [KAZEMA] Files:1    Time: 1s
Restart  Phase #:90   [KAZEMA] Files:1    Time: 0s
Serial   Phase #:91   [KAZEMA] Files:2    Time: 7s
Restart  Phase #:92   [KAZEMA] Files:1    Time: 0s
Serial   Phase #:93   [KAZEMA] Files:1    Time: 0s
Restart  Phase #:94   [KAZEMA] Files:1    Time: 1s
*******   Upgrading ODM, WK, EXF, RUL, XOQ   *******
Serial   Phase #:95   [KAZEMA] Files:1    Time: 18s
Restart  Phase #:96   [KAZEMA] Files:1    Time: 0s
***********   Final Component scripts    ***********
Serial   Phase #:97   [KAZEMA] Files:1    Time: 2s
*************   Final Upgrade scripts   ************
Serial   Phase #:98   [KAZEMA] Files:1    Time: 61s
*******************   Migration   ******************
Serial   Phase #:99   [KAZEMA] Files:1    Time: 30s
***   End PDB Application Upgrade Pre-Shutdown   ***
Serial   Phase #:100  [KAZEMA] Files:1    Time: 1s
Serial   Phase #:101  [KAZEMA] Files:1    Time: 0s
Serial   Phase #:102  [KAZEMA] Files:1    Time: 80s
*****************   Post Upgrade   *****************
Serial   Phase #:103  [KAZEMA] Files:1    Time: 49s
****************   Summary report   ****************
Serial   Phase #:104  [KAZEMA] Files:1    Time: 0s
***   End PDB Application Upgrade Post-Shutdown   **
Serial   Phase #:105  [KAZEMA] Files:1    Time: 1s
Serial   Phase #:106  [KAZEMA] Files:1    Time: 0s
Serial   Phase #:107  [KAZEMA] Files:1     Time: 41s

------------------------------------------------------
Phases [0-107]         End Time:[2022_03_23 10:48:42]
------------------------------------------------------
Grand Total Time: 1847s


*** WARNING: ERRORS FOUND DURING UPGRADE ***

 1. Evaluate the errors found in the upgrade logs
    and determine the proper action.
 2. Rerun the upgrade when the problem is resolved

REASON:
      ERRORS FOUND: During Upgrade
         FILENAME: D:\Oracle19c\catupgrd0.log AT LINE NUMBER: 1124126
------------------------------------------------------
Identifier CATPROC 22-03-23 10:31:12
SCRIPT    = [D:\Oracle19c\rdbms\admin\execsvrm.sql]
ERROR     = [ORA-13509: error encountered during updates to a AWR table ORA-12899: value too large for column ORA-12899: value too large for column "SYS"."OBJ$"."SUBNAME" (actual: 31, maximum: 30)
 (actual: , maximum: )
ORA-06512: at "SYS.DBMS_SWRF_INTERNAL", line 524
ORA-06512: at line 3
]
STATEMENT = [BEGIN
  /* Perform the required AWR catalog operations for this release */
  dbms_swrf_internal.refresh_catalog;
END;]
------------------------------------------------------
------------------------------------------------------
Identifier CATPROC 22-03-23 10:31:12
SCRIPT    = [D:\Oracle19c\rdbms\admin\execsvrm.sql]
ERROR     = [ORA-12899: value too large for column ORA-12899: value too large for column "SYS"."OBJ$"."SUBNAME" (actual: 31, maximum: 30)
 (actual: , maximum: )
ORA-06512: at "SYS.DBMS_SWRF_INTERNAL", line 524
ORA-06512: at line 3
]
STATEMENT = [as above]
------------------------------------------------------
------------------------------------------------------
Identifier CATPROC 22-03-23 10:31:12
SCRIPT    = [D:\Oracle19c\rdbms\admin\execsvrm.sql]
ERROR     = ["SYS"."OBJ$"."SUBNAME" (actual: 31, maximum: 30)  (actual: , maximum: )
ORA-06512: at "SYS.DBMS_SWRF_INTERNAL", line 524
ORA-06512: at line 3
]
STATEMENT = [as above]
------------------------------------------------------
------------------------------------------------------
Identifier CATPROC 22-03-23 10:31:12
SCRIPT    = [D:\Oracle19c\rdbms\admin\execsvrm.sql]
ERROR     = [(actual: , maximum: ) ORA-06512: at "SYS.DBMS_SWRF_INTERNAL", line 524
ORA-06512: at line 3
]
STATEMENT = [as above]
------------------------------------------------------
------------------------------------------------------
Identifier CATPROC 22-03-23 10:31:12
SCRIPT    = [D:\Oracle19c\rdbms\admin\execsvrm.sql]
ERROR     = [ORA-06512: at "SYS.DBMS_SWRF_INTERNAL", line 524 ORA-06512: at line 3
]
STATEMENT = [as above]
------------------------------------------------------
------------------------------------------------------
Identifier CATPROC 22-03-23 10:31:12
SCRIPT    = [D:\Oracle19c\rdbms\admin\execsvrm.sql]
ERROR     = [ORA-06512: at line 3]
STATEMENT = [as above]
------------------------------------------------------

 LOG FILES: (D:\Oracle19c\catupgrd*.log)

Upgrade Summary Report Located in:
D:\Oracle19c\upg_summary.log

Grand Total Upgrade Time:    [0d:0h:30m:47s]
I didn’t remove lines from the output to give you an overview of what happened during the initial “catupgrd.sql” call without MAX_STRING_SIZE set as “STANDARD“. As you can see, it has generated few errors & we need to fix them.
ERROR = [ORA-12899: value too large for column ORA-12899: value too large for column “SYS”.”OBJ$”.”SUBNAME” (actual: 31, maximum: 30) is pretty easy to fix. This is mainly due to strings lengths & follow the below steps to fix it.
Move to %ORACLE_HOME%\rdbms\admin folder.
SHUTDOWN IMMEDIATE;
STARTUP UPGRADE;
alter system set MAX_STRING_SIZE=EXTENDED;
@utl32k.sql
SHUTDOWN IMMEDIATE;
STARTUP;
Once the script runs successfully, shutdown the database once again and start in upgrade mode. Rerun the “catupgrd.sql” as instructed above. Let the upgrade finish. Insure there are no errors. A successfully finished upgrade process will look like below. I mentioned earlier, this process could be pretty time taking based on the size of the database you are upgrading. My entire database was less than 5GB in size & I’ve NVMe+SSD based work laptop running i7 10th generation processor & 32GB memory. The waiting was frustrating.
Serial   Phase #:101  [KAZEMA] Files:1    Time: 0s
Serial   Phase #:102  [KAZEMA] Files:1    Time: 78s
*****************   Post Upgrade   *****************
Serial   Phase #:103  [KAZEMA] Files:1    Time: 23s
****************   Summary report   ****************
Serial   Phase #:104  [KAZEMA] Files:1    Time: 1s
***   End PDB Application Upgrade Post-Shutdown   **
Serial   Phase #:105  [KAZEMA] Files:1    Time: 1s
Serial   Phase #:106  [KAZEMA] Files:1    Time: 0s
Serial   Phase #:107  [KAZEMA] Files:1     Time: 36s

------------------------------------------------------
Phases [0-107]         End Time:[2022_03_23 15:15:34]
------------------------------------------------------

Grand Total Time: 1209s

 LOG FILES: (D:\Oracle19c\catupgrd0\catupgrd*.log)

Upgrade Summary Report Located in:
D:\Oracle19c\catupgrd0\upg_summary.log

Grand Total Upgrade Time:    [0d:0h:20m:9s]
I came across the errors while I called the upgrade and went ahead and fixed them. Kept the same in the article so that the search engine could pick up the errors for someone else out there. Now it is time for to recompile all invalid objects after upgrade.
SQL>@utlrp.sql
Unless you have a huge number of PL/SQL libraries and other, this should complete in few minutes. A count for invalid objects will be provided to you & you can proceed to fix them once after a database restart. Keep a tight watch on the alert log file and address additional errors, if any.
Finally create SPFILE from current parameter file, shutdown and restart the database. You should be good to go now. Check for the Temporary files, Redo Log files and other vitals.
These invalid objects are from custom schema & could be fixed/dropped if not needed. Make sure there are no system level invalid objects.
Another area of interest could be OLAP.
Check and confirm OLAP objects are not invalid. OLAP catalog was deprecated after 11g. You may proceed removing it if needed.
Few “years” back, while it was almost impossible to install Oracle 10g on Windows 7/8, I made some attempts & managed to install 32Bit versions of 10g 10.2.0.3.x successfully. A particular release 10.2.0.4 had helluva of issues, mainly TNS related & I can see many visits to that thread even today! I believe, those visitors are not coming over there for 10g, instead for TNS.
On Windows, the below is a typical situation & we’ll see the primary reasons for the same.
Microsoft Windows [Version 10.0.22000.556]
(c) Microsoft Corporation. All rights reserved.

C:\Windows\system32>sqlplus / as sysdba

SQL*Plus: Release 19.0.0.0.0 - Production on Mon Mar 21 07:59:29 2022
Version 19.11.0.0.0

Copyright (c) 1982, 2020, Oracle.  All rights reserved.

ERROR:
ORA-12560: TNS:protocol adapter error


Enter user-name:
On Windows, everything is another service. So we’ll start with checking whether the “Oracle” service for the database instance has started.
I’m using Oracle database on my laptop mostly for learning purposes, hence the service startup is set as “Manual”. This gives me control over the resources consumed by the database. Not just the service, I have setup the instance to start manual to insure Oracle service doesn’t open the database automatically. Latest Windows OS that use quick boot will save the state of the service, hence you might find your database readily available once after a reboot, although you set everything as manual :)
Let’s see what happens after starting the “Oracle Service”.
Well, that fixes one of the many reasons for the dreaded ORA-12560: TNS:protocol adapter error! As soon I am hit with another, will amend this post.
We migrated to 11G R2 (11.2.0.4) for our Oracle Applications R12 few years back, yes few years back (2017) & lived with one of the worst experiences…
Connecting Oracle Developer 10g (Forms/Reports) suite to 11G database.
I have scavenged through community articles for long time before giving up. I hardly came across a single fix for the connection time that used to hang up the Developer suite at times…
Today, I decided to find a solution for the nagging SSH connection issues from Windows 11 to our LINUX application servers and realized that we didn’t update the DNS settings for them once after we decommissioned a domain controller. Once the SSH issues were rectified and addressed, my next attempt was to find a solution for “frmcmp_batch” taking long time to start compiling modules & I landed on the below post.
As we are already on 11G R2 11.2.0.4, patching was not required. All I needed was to alter the hidden parameter “_FIX_CONTROL” as mentioned in the article.
SQL> ALTER SYSTEM SET "_FIX_CONTROL"='8560951:ON';
(Use scope=spfile to make this change permanent. This will require you to restart the database.)
I opted to go without spfile for testing & as soon as applied, the “frmcmp_batch” started compiling the modules instantly, against the usual delay that ran into many minutes other times.
Out of curiosity, I tried to connect to the database from Developer 10g & the connection was instant! within a fraction of a second.
So DNS being one of the most important elements establishing successful connections, patches and fixes also play crucial role in providing stable connections. Were you stuck with the same issue? give the solution a try and let us know whether it helped you also.
We are using Oracle EBS R12 and for a custom module, wanted to log the Oracle seeded API outputs to custom log files for later scrutiny & error corrections.
Following the standard procedure, create the folder like below
create or replace directory OMS_LOGS as '/u01/applmgr/oms_logs'
and started testing the directory using SQL Developer where I am logged in as APPS user
I kept getting the below errors
ERROR at line 1:
ORA-29283: invalid file operation
ORA-06512: at "SYS.UTL_FILE", line 536
ORA-29283: invalid file operation
ORA-06512: at line 8
and the detailed errors said this could be due to OS level access permissions. Luckily I landed on a stackoverflow discussion & one of the answers clearly said this error “could” be due to the file/folder permissions for user “oracle”.
As “root” I changed the permissions for the path “/u01/applmgr/oms_logs” like below
chmod g+w /u01/applmgr/oms_logs
and that fixed the invalid file operation errors. Hope this helps someone out there!