Oracle workflow developer for Oracle Applications (EBS) R12 version 2.6.3.x has total 33k downloads. That gives us an idea how scarcely this software is used. Oracle sucks at one place the most, that is fixing their legacy software for new operating systems. For example, Oracle EBS R12 release 12.2 is expected to be supported until 2031, while the development tools for the same were supported till Windows XP OS. Then once in a while they boast about releasing another version of legacy tool, expected to work on later operating systems.
Oracle Workflow builder is not different. Their documentation misses one of the vital point about why one should install the software in a brand new Oracle home! Yes, if you have multiple Oracle products already installed on your computer, Workflow builder installer will pickup the first Oracle home it could read from the Windows registry and default it for the installation, which is the core of all problems you will face while & after the installation.
So, let us do a proper installation of Oracle workflow builder 2.6.3 this time.
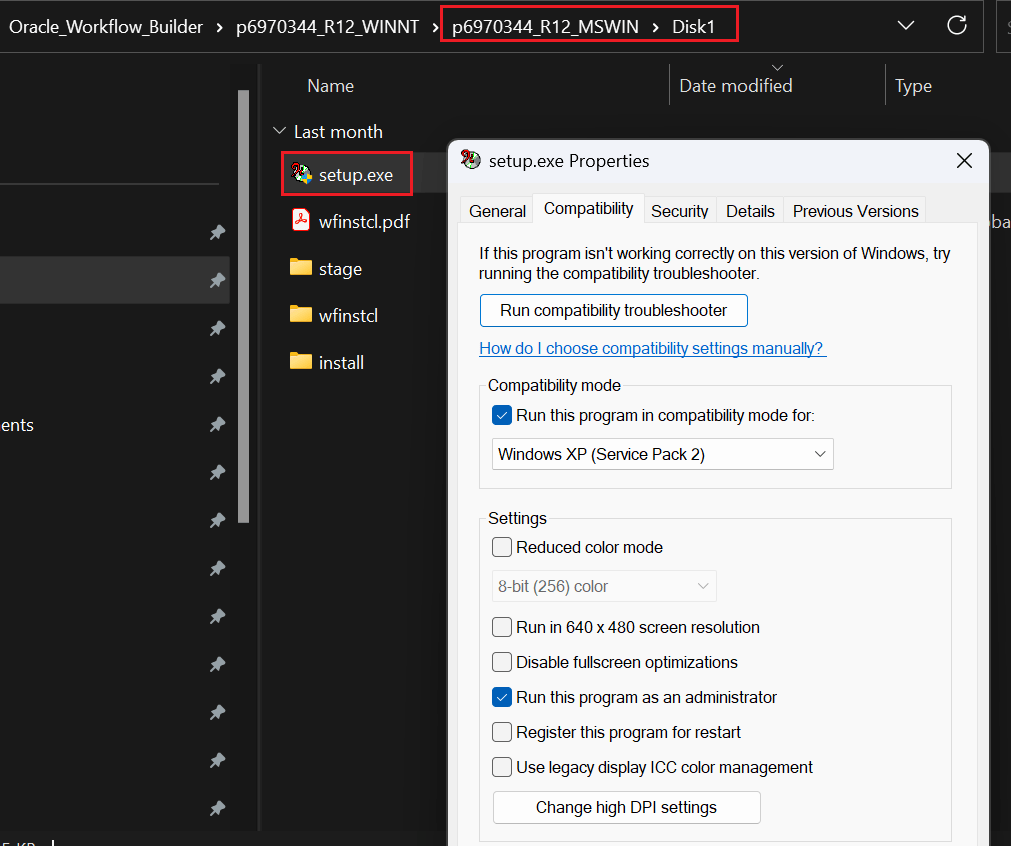
Download the installer, which might need a valid Oracle support (Please note, this particular post might only satisfy this particular version of Oracle workflow builder). Extract the archive, go to Disk1 folder and change the property of Setup.exe as seen in the below image.
Setup the compatibility and Running this program as administrator are mandatory for a successful installation.
Now, before starting the software installation, take a backup of your PATH environment variable. Please read my other post explaining how to make a backup for the PATH and later restoring it after the Workflow builder installation.
This is not mandatory, however advisable based on the number of software that you have already installed on your computer.
Once the setup starts make sure you will setup a fresh home for “Workflow builder”
If you made a correct decision for a fresh home, then installation must complete without issues. Please check the below images for additional details. If you try to install the workflow builder in one of the existing Oracle homes, you will comes across installation error(s)
If you ignored the errors and continued with the installation, you will not be presented with net configuration wizard or other post installation steps & you will not able to start Workflow builder, throwing a run-time error.
Leave the prompts to their defaults unless necessary.
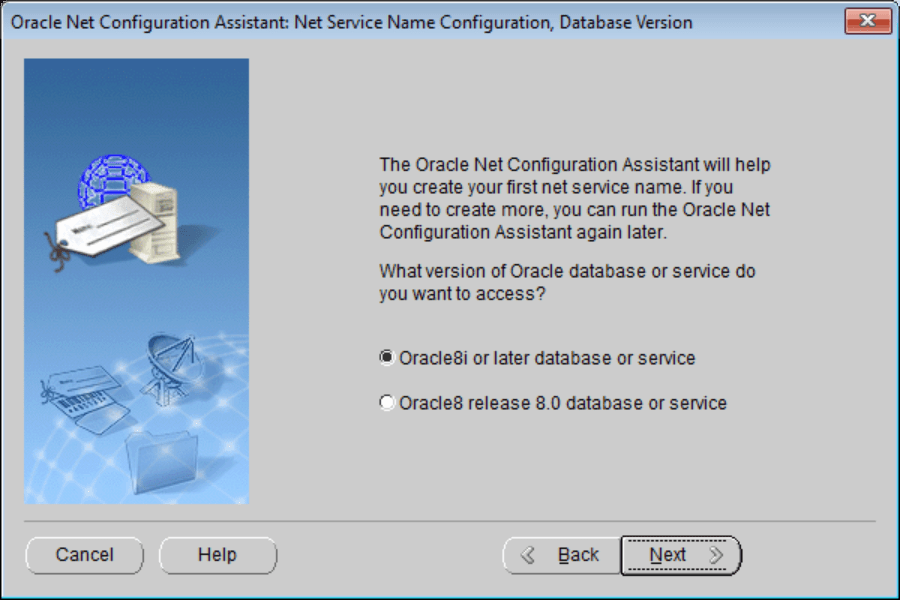
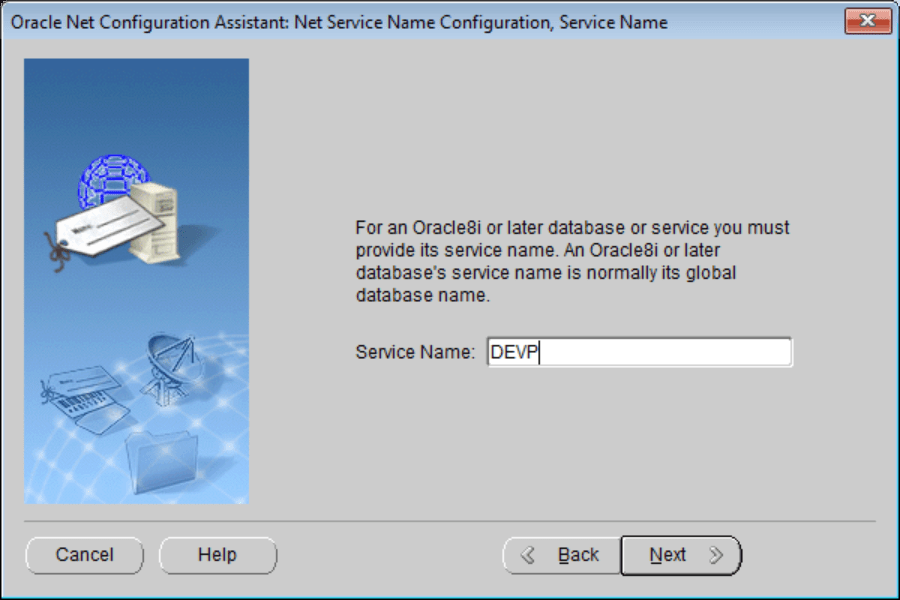
At the last phase of the installation, Net configuration assistant starts.
Well, there is no guarantee that the network configuration setup will complete successfully. My development machine has many Oracle products installed and has multiple JAVA runtimes, I think that should be one of the reasons why the configuration tool always failed to complete the setup successfully. Your case may differ.
Please note, you can Oracle XML Gateway Message Designer is also a part of the installation package, you can proceed to install the product if you want at this stage.
Once the installation(s) over, open Oracle Workflow Builder as administrator always, without which the software cannot read Windows Registry keys.
That’s all. Please note, you are installing a software that was made for Windows XP and hardly received much love from Oracle afterwards. Oracle is keeping it only to support legacy software like Oracle E-Business Suite, which Oracle dearly wants to the pull the plugs off, so that they could force the half cooked cloud based Fusion software & squeeze the customers further through subscriptions. Hence don’t expect Oracle fixing these installation ever, EVER!
It looks like one of the parties, either Intel or Microsoft (must be intel, because disabling the intel display adaptor helped earlier) has fixed the issue & screen recording works as expected even on multiple displays. Enjoy!
Updated on 20th December 2023. Yesterday, I came across Intel forum discussion, about a particular decoder issue strongly tied to Intel UHD. It was quite a discussion and I noticed that the user was able to get stuffs work when he was using “Microsoft Basic Display Adapter” instead of Intel UHD drivers. So, I wanted to see whether it is the case with Snipping tool recording also. I kept removing the display drivers until the device manager shown “Microsoft Basic Display Adapter” for me. I started the screen recording and, yes, it worked! Let us check out a small video now, that was captured using Snipping Tool. Unfortunately, as soon the drivers were reinstalled, I lost this privilege and the only solution “working” for me was as discussed below.
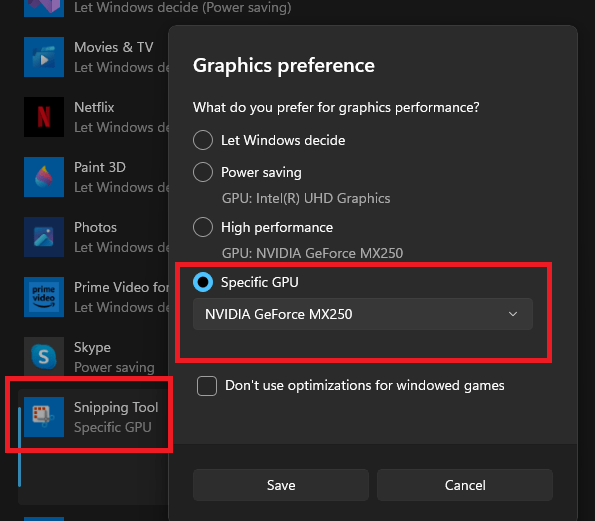
Updated on 3rd December 2023. It looks like, many people were able to get the snipping tool working finally by setting graphics to High Performance GPU. For me, the only option that works as on date is disabling the Intel UHD from devices panel. I think, it is a device specific issue & not many others are affected the way I am. Anyway, cheers guys. We have a working workaround now!
Disable the Intel Graphics. Snipping tool works, or worked for me through multiple hot and cold restarts after this hack.
If it fails, will update this thread with further information.
I will keep this as an open thread as, while the above hack works every time it has some adverse effects. Once I disable the Intel UHD graphics, my box cannot “Project” anymore! That means my multiple monitors setup goes for a toast. To get it back, I must enable the Intel UHD graphics once after the screen recording, feels awkward.
My HP laptop is more than 4 years old & the BIOS does not support selecting NVIDIA as default GPU, instead it is either the low power or hybrid mode. NVidia control panel is not of much help as Windows 11 handles such settings itself.
So for the time being, whenever you want to record screen using snipping tool, just disable the Intel UHD graphics and turn it on immediately after that in order to get back the multiple monitors support. If you are not using multiple monitors, then you can leave the changes as it is.
I’ve been using Oracle VirtualBox for last many years and ever since I moved to Windows 10, experienced some unexplainable stuttering and lags with Windows 10, 11 virtual machines. I think finally I made a breakthrough for myself. I am not sure whether this approach is helpful for everyone as virtual machines behave differently on different hardware setups. I’ve gone through many VirtualBox forum posts discussing issues with same nature, particularly with NVidia graphic chips/cards & all my boxes have NVidia graphic chips or cards.
My work laptop configuration.
and has one NVMe ssd for the OS and 2TB SSD for data on which I have all my virtual machines. Regardless, with the amount of hardware resources, my Windows 10 virtual machine stuttered, and the experience was horrible, compared to the Windows XP VM that I had. I never had issues with Linux VMs either. I tried almost every trick in the book and always ended with gaining very little.
Couple of weeks back, for one of the Oracle labs exercises I started the Windows 10 VM and for some unknown reasons found the virtual machine was not automatically resizing display. I managed to fix this problem earlier by changing the graphics controller from VBoxSVGA to VBoxVGA, force auto resize & switching graphics controller back to VBoxSVGA. For that exercise I disabled the 3D acceleration, basically landing on a solution unknowingly. I repeated the same exercise and found my Windows 10 virtual machine snappier than ever! To confirm, I switched back to 3D acceleration & managed to reproduce the same choppy, stuttering experience with the same virtual machine once again.
Let us see what happens with we enable 3D acceleration for the graphics controller.
VirtuaBox allows a maximum of 256MB memory for Video & check the below image to see what happens when we enable 3D acceleration.
half of the video memory is consumed by the 3D acceleration! OS like Windows 10, 11 have pretty heavy graphic elements and obviously the limited video memory makes the OS stuttering and lagging whole the way (or this is what I assume from my experiments).
As I mentioned in the beginning, disabling the 3D acceleration works for me on three different machines & different Windows OS virtual machines. Hope this helps few others out there.
I have one Windows 10 guest from last many years, upgraded through VirtualBox versions 5, 6. Recently I upgraded VirtualBox to 7. While Windows XP & Oracle Linux guests automatically resized the display on host, Windows 10 guest was adamant. Uninstalling and installing the guest addons didn’t help.
After scavenging through few posts over VirtualBox forums, came across one of them discussing about fixing the resizing issue by choosing “VBoxVGA”, though it was not supported. I decided to give it a try and Windows 10 guest resized the display when I toggled the “Auto-Resize Guest Display” from the view menu.
Then I shutdown the guest, changed the Display back to “VBoxSVGA” & the guest allowed me to resize the display using View menu & subsequent restarts were resizing the guest display as expected. However, there were times when I had to manually adjust the display size. Hope Oracle fixes this issue in coming releases.
Today I managed to narrow down the issues to Intel driver specific. AX201 Wi-Fi module driver 22.160 and above breaks the mobile hotspot on both Windows 10 & Windows 11. The only possible solution is to rollback to driver version 22.150.x.x & stay there until Intel identifies and fixes this issue. I have opened a thread with Intel and the representative is investigating this issue. If you are interested, follow the thread here
We’ve poor cellular coverage by the datacenter area from the service provider & most of the times I use my work laptop as Mobile hotspot & it did work. Well, minimum until recent days.
I started seeing my mobile phone showing “Connected without internet” once in few minutes times & I had to reconnect which was a recent development. Unfortunately, I couldn’t land upon any relevant solutions after spending almost two working days searching for solutions & executing my own logic with resetting network/Winsock etcetera.
As I use Samsung Galaxy A71 5G Android phone, I thought of giving another attempt by searching for “Galaxy a71 5g connected without internet” & one of the first search results was:
Samsung Galaxy Phones “Connected without Internet”
Here, the vlogger talks about “Randomized MAC” Galaxy phones use when connecting to Wi-Fi networks. Although the vlogger suggests Static IP address & other changes to resolve this issue, I only changed the connection property from “Random MAC” to “Phone MAC” & days long frustrations were over.
I wanted to figure out why all of a sudden this issue started. I remember using the Mobile Hotspot without any issues, had a PowerShell script to start the mobile hotspot startup automatically whenever I am connected to work network for months & couldn’t just give up because I found a solution. Hence, I continued to find more answers.
There were more videos discussing the same issue about Samsung Galaxy phones & subsequently I landed on a Samsung community discussion here
My mobile is paired over Bluetooth to my laptop & it connects every time laptop restarts. One of the initial settings I checked was to ensure Mobile Hotspot was not setup for 2.4GHz, that causes issues for Bluetooth which uses 2.4GHz by default.
In my case, at work I am not connected to Wi-Fi networks & mobile hotspot is configured to share internet from my domain network connection. By default, as the 5GHz is not consumed by Wi-Fi connections, mobile hotspot utilizes that frequency and leaves a notification, asking to switch the frequency if devices fail to connect.
Hence, it could be one of the many elements as discussed in the Samsung community thread. All you need is to try and find out one that suits your situation. Regardless, if it is a Samsung Galaxy phone, the first solution you could try is to setup Phone MAC instead of Randomized MAC for the specific Wi-Fi connection that you have issues with. If that didn’t resolve, try others.
Last couple of years, I stopped evaluating new Windows OS, as they were shipped with so many bugs and updates breaking them further. I felt reporting the bugs didn’t make anything better & few of the folks from Microsoft on Twitter are just lame like their OS. Always finding excuses for a broken OS.
Well, regardless, I always applied the updates, always fixed the issues and continued working on my projects, which are Oracle development (mostly). Like usual, I’ve downloaded the Windows11 22H2 the very first day it was released and upgraded my work laptop. Basically the OS is once again filled with many bugs, one of the notorious being the large file copying lag issues, that is openly acknowledged by Microsoft.
Well I was stuck by an undocumented issue ;) Whenever I tried to open File Explorer, it took many minutes before it was ready to interact with. None of the searches landed me on a proper solution & I just wasted hours tweaking the OS following tips to parameterize the OS for better performance. Then I was expected to copy a large SQL output for our sales manager and I had a shortcut for a folder in his computer on my desktop. I couldn’t open this folder this time & I couldn’t find his laptop’s hostname in the DNS. As the folder was mapped using the hostname, every time I tried to access the folder, gave me the same network path not found error. It took the same amount of time file explorer tried to open & I could make a guess towards what was going wrong with the file explorer.
I remembered this particular folder always listed under the quick access area of the File explorer & I removed it from the quick access area once after the File Explorer was ready next time. File Explorer started opening as snappier as possible then onwards.
Now, this looks like another problem from Microsoft’s latest release that attempts to connect to all the items listed under quick access, ie, like connecting the network folders & failing to establish a connection, throws the exception “File explorer not responding” and taking minutes until the attempts are aborted.
I’ve many folders pinned to quick access area, as a developer I work with multiple projects and this saves loads of time for me. Windows 10, 11 keep tabs on regularly accessed items and pin them to quick access area, a default behavior of the OS. This might create certain unexpected situations like the one I described above. I will not say this feature is useless, but sometimes a user who is not that tech savvy may never realize what is going on here. If I were the File explorer designer/developer I will definitely make sure to code the piece in a way that Explorer would try to connect to network folders only when the user tries to open the folder.
Said, if you are having the same issues with File Explorer taking too much time to open, please check whether any network folders are listed under Quick Access area. If yes, remove them. Unless you are a die hard of fan of automatically pinning items in the Quick Access area, disable the automatic pinning.
This could OS automatically pinning items to your Quick access area & avoid the issue I were discussing.
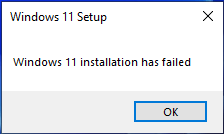
If your hardware is eligible, might have noticed a banner like below
whenever you visited Windows update settings area. It’s free, it’s ready & there are a million possibilities stop your computer from upgrading to Windows 11. The only one thing Windows upgrade manages to show is a popup telling you “Windows 11 installation has failed” after a failure.
Please note, as I already mentioned, there could be a million reasons failing the upgrade, especially when you are upgrading from Windows 10 that was upgraded from different versions of Windows 7,8 and 10 itself. I’ve lost the count of upgrades I’ve made to my semi-server type desktop machine and didn’t expect Windows 11 upgrade to be all smooth at the first place. I knew I was in for a long game. My machine has different database software installed for testing, my Kids have heavy games like Doom & other and a clean installation was not at all my first choice.
So my first task was to find out where exactly the installation process writes the errors. To be quite frank, I haven’t had many installation/upgrade issues in near future and I totally forgot where to look for the logs! A quick search landed me on this post Log files that are created when you upgrade to a new version of Windows (microsoft.com) & as my upgrade failed, I was able to locate the “setuperr.log” file at this location “C:\$Windows.~BT\Sources\panther”
Based on the errors, the log file could have hundreds of lines. Mine had the below listed.
2022-10-08 10:40:19, Error MOUPG CDlpActionImpl<class CDlpErrorImpl<class CDlpObjectInternalImpl<class CUnknownImpl<class IMoSetupDlpAction> > > >::Suspend(1253): Result = 0xC1800104[gle=0x00000002] 2022-10-08 10:40:19, Error MOUPG CDlpTask::CheckUserInterruptEx(3060): Result = 0x800704D3 2022-10-08 10:40:19, Error MOUPG CDlpTask::CheckUserInterrupt(3112): Result = 0x800704D3 2022-10-08 10:40:19, Error MOUPG CSetupManager::ExecuteInstallMode(1006): Result = 0x800705BB 2022-10-08 10:40:19, Error MOUPG CSetupManager::ExecuteDownlevelMode(569): Result = 0x800705BB 2022-10-08 10:40:20, Error MOUPG CSetupManager::Execute(313): Result = 0x800705BB 2022-10-08 10:40:20, Error MOUPG CSetupHost::Execute(454): Result = 0x800705BB 2022-10-08 10:40:25, Error CONX Appraiser: ERROR,SdbpGetManifestedMergeStubAlloc,1017,SdbpGetMergeSdbsDisabled failed [c0000034] 2022-10-08 10:43:37, Error DU DU::CDUSession::Search: Failed to set WU internal configuration property for targeted scans. hr = 0x80070057 2022-10-08 10:45:12, Error CONX Appraiser: ERROR,SdbpGetManifestedMergeStubAlloc,1017,SdbpGetMergeSdbsDisabled failed [c0000034] 2022-10-08 10:45:19, Error CONX aeinv: ERROR,StoreAppFinder::EnumeratePackages,414,onecore\base\appcompat\inventory\software\inv\lib\storeappfinder.cpp(489)\aeinv.dll!00007FFF5F3ABB72: (caller: 00007FFF5F3AACD0) Exception(1) tid(13c8) 80070780 The file cannot be accessed by the system.## 2022-10-08 10:45:19, Error CONX aeinv: ERROR,StoreAppFinder::EnumeratePackages,414,onecore\base\appcompat\inventory\software\inv\lib\storeappfinder.cpp(489)\aeinv.dll!00007FFF5F3ABB72: (caller: 00007FFF5F3AACD0) Exception(2) tid(13c8) 80070780 The file cannot be accessed by the system.## 2022-10-08 10:45:36, Error CONX aeinv: ERROR,OrphanFileFinder::GetEvidence,98,onecore\base\appcompat\inventory\software\inv\lib\file.cpp(1881)\aeinv.dll!00007FFF5F3A6E51: (caller: 00007FFF5F3E8532) Exception(3) tid(13c8) 80070001 Incorrect function.## 2022-10-08 10:45:43, Error CONX devinv: ERROR,DeviceMapInitializeTelemetryAndCache,144,TelCacheProvider::Initialize failed [0x80004002] 2022-10-08 10:45:43, Error CONX acmigration: ERROR,CheckDriverStatus,2249,GetDevInventory failed_ 80004002 2022-10-08 10:54:05, Error [0x0803b6] MIG Can't retrieve group information for user NT SERVICE\SQLTELEMETRY. NetUserGetLocalGroups failed 0x000008AD 2022-10-08 10:54:05, Error [0x0803b6] MIG Can't retrieve group information for user NT SERVICE\SQLSERVERAGENT. NetUserGetLocalGroups failed 0x000008AD 2022-10-08 10:54:05, Error [0x0803b6] MIG Can't retrieve group information for user NT SERVICE\MSSQLSERVER. NetUserGetLocalGroups failed 0x000008AD 2022-10-08 10:54:05, Error [0x0803b6] MIG Can't retrieve group information for user NT SERVICE\SQLServerReportingServices. NetUserGetLocalGroups failed 0x000008AD 2022-10-08 10:54:05, Error [0x0803b6] MIG Can't retrieve group information for user IIS APPPOOL\Classic .NET AppPool. NetUserGetLocalGroups failed 0x000008AD 2022-10-08 10:54:05, Error [0x0803b6] MIG Can't retrieve group information for user IIS APPPOOL\.NET v4.5. NetUserGetLocalGroups failed 0x000008AD 2022-10-08 10:54:05, Error [0x0803b6] MIG Can't retrieve group information for user IIS APPPOOL\DefaultAppPool. NetUserGetLocalGroups failed 0x000008AD 2022-10-08 10:54:05, Error [0x0803b6] MIG Can't retrieve group information for user IIS APPPOOL\.NET v2.0. NetUserGetLocalGroups failed 0x000008AD 2022-10-08 10:54:05, Error [0x0803b6] MIG Can't retrieve group information for user IIS APPPOOL\.NET v4.5 Classic. NetUserGetLocalGroups failed 0x000008AD 2022-10-08 10:54:05, Error [0x0803b6] MIG Can't retrieve group information for user IIS APPPOOL\.NET v2.0 Classic. NetUserGetLocalGroups failed 0x000008AD 2022-10-08 10:54:05, Error [0x0803b6] MIG Can't retrieve group information for user IIS APPPOOL\nop. NetUserGetLocalGroups failed 0x000008AD 2022-10-08 10:54:05, Error SP Failure while getting the known folder path for CSIDL_PRINTHOOD (S-1-5-82-3682073875-1643277370-2842298652-3532359455-2406259117): Win32Exception: The system cannot find the file specified. [0x00000002] class UnBCL::String *__cdecl Mig::CFacadeUser::GetKnownFolderLocation(class UnBCL::String *,int *,class UnBCL::String **) 2022-10-08 10:54:05, Error SP Failure while getting the known folder path for CSIDL_PRINTHOOD (S-1-5-80-2652535364-2169709536-2857650723-2622804123-1107741775): Win32Exception: The system cannot find the file specified. [0x00000002] class UnBCL::String *__cdecl Mig::CFacadeUser::GetKnownFolderLocation(class UnBCL::String *,int *,class UnBCL::String **) 2022-10-08 10:54:05, Error SP Failure while getting the known folder path for CSIDL_PRINTHOOD (S-1-5-21-3050672445-3209544092-517134063-1010): Win32Exception: The system cannot find the file specified. [0x00000002] class UnBCL::String *__cdecl Mig::CFacadeUser::GetKnownFolderLocation(class UnBCL::String *,int *,class UnBCL::String **) 2022-10-08 10:54:05, Error SP Failure while getting the known folder path for CSIDL_PRINTHOOD (S-1-5-82-3006700770-424185619-1745488364-794895919-4004696415): Win32Exception: The system cannot find the file specified. [0x00000002] class UnBCL::String *__cdecl Mig::CFacadeUser::GetKnownFolderLocation(class UnBCL::String *,int *,class UnBCL::String **) 2022-10-08 10:54:05, Error SP Failure while getting the known folder path for CSIDL_PRINTHOOD (S-1-5-80-4050220999-2730734961-1537482082-519850261-379003301): Win32Exception: The system cannot find the file specified. [0x00000002] class UnBCL::String *__cdecl Mig::CFacadeUser::GetKnownFolderLocation(class UnBCL::String *,int *,class UnBCL::String **) 2022-10-08 10:54:05, Error SP Failure while getting the known folder path for CSIDL_PRINTHOOD (S-1-5-21-3050672445-3209544092-517134063-500): Win32Exception: The system cannot find the file specified. [0x00000002] class UnBCL::String *__cdecl Mig::CFacadeUser::GetKnownFolderLocation(class UnBCL::String *,int *,class UnBCL::String **) 2022-10-08 10:54:05, Error SP Failure while getting the known folder path for CSIDL_PRINTHOOD (S-1-5-21-3050672445-3209544092-517134063-1001): Win32Exception: The system cannot find the file specified. [0x00000002] class UnBCL::String *__cdecl Mig::CFacadeUser::GetKnownFolderLocation(class UnBCL::String *,int *,class UnBCL::String **) 2022-10-08 10:54:05, Error SP Failure while getting the known folder path for CSIDL_PRINTHOOD (S-1-5-82-4068219030-1673637257-3279585211-533386110-4122969689): Win32Exception: The system cannot find the file specified. [0x00000002] class UnBCL::String *__cdecl Mig::CFacadeUser::GetKnownFolderLocation(class UnBCL::String *,int *,class UnBCL::String **) 2022-10-08 10:54:05, Error SP Failure while getting the known folder path for CSIDL_PRINTHOOD (S-1-5-82-4155437066-4169509114-2127487463-1916158496-2406408509): Win32Exception: The system cannot find the file specified. [0x00000002] class UnBCL::String *__cdecl Mig::CFacadeUser::GetKnownFolderLocation(class UnBCL::String *,int *,class UnBCL::String **) 2022-10-08 10:54:05, Error SP Failure while getting the known folder path for CSIDL_PRINTHOOD (S-1-5-82-271721585-897601226-2024613209-625570482-296978595): Win32Exception: The system cannot find the file specified. [0x00000002] class UnBCL::String *__cdecl Mig::CFacadeUser::GetKnownFolderLocation(class UnBCL::String *,int *,class UnBCL::String **) 2022-10-08 10:54:05, Error SP Failure while getting the known folder path for CSIDL_PRINTHOOD (S-1-5-80-3880718306-3832830129-1677859214-2598158968-1052248003): Win32Exception: The system cannot find the file specified. [0x00000002] class UnBCL::String *__cdecl Mig::CFacadeUser::GetKnownFolderLocation(class UnBCL::String *,int *,class UnBCL::String **) 2022-10-08 10:54:05, Error SP Failure while getting the known folder path for CSIDL_PRINTHOOD (S-1-5-80-344959196-2060754871-2302487193-2804545603-1466107430): Win32Exception: The system cannot find the file specified. [0x00000002] class UnBCL::String *__cdecl Mig::CFacadeUser::GetKnownFolderLocation(class UnBCL::String *,int *,class UnBCL::String **) 2022-10-08 10:54:05, Error SP Failure while getting the known folder path for CSIDL_PRINTHOOD (S-1-5-21-3050672445-3209544092-517134063-1023): Win32Exception: The system cannot find the file specified. [0x00000002] class UnBCL::String *__cdecl Mig::CFacadeUser::GetKnownFolderLocation(class UnBCL::String *,int *,class UnBCL::String **) 2022-10-08 10:54:05, Error SP Failure while getting the known folder path for CSIDL_PRINTHOOD (S-1-5-82-3876422241-1344743610-1729199087-774402673-2621913236): Win32Exception: The system cannot find the file specified. [0x00000002] class UnBCL::String *__cdecl Mig::CFacadeUser::GetKnownFolderLocation(class UnBCL::String *,int *,class UnBCL::String **) 2022-10-08 10:54:05, Error SP Failure while getting the known folder path for CSIDL_PRINTHOOD (S-1-5-82-1036420768-1044797643-1061213386-2937092688-4282445334): Win32Exception: The system cannot find the file specified. [0x00000002] class UnBCL::String *__cdecl Mig::CFacadeUser::GetKnownFolderLocation(class UnBCL::String *,int *,class UnBCL::String **) 2022-10-08 10:54:05, Error SP Failure while getting the known folder path for CSIDL_PRINTHOOD (S-1-5-80-2885764129-887777008-271615777-1616004480-2722851051): Win32Exception: The system cannot find the file specified. [0x00000002] class UnBCL::String *__cdecl Mig::CFacadeUser::GetKnownFolderLocation(class UnBCL::String *,int *,class UnBCL::String **) 2022-10-08 10:54:05, Error SP Failure while getting the known folder path for CSIDL_PRINTHOOD (S-1-5-21-3050672445-3209544092-517134063-1022): Win32Exception: The system cannot find the file specified. [0x00000002] class UnBCL::String *__cdecl Mig::CFacadeUser::GetKnownFolderLocation(class UnBCL::String *,int *,class UnBCL::String **) 2022-10-08 10:56:30, Error [0x0803b6] MIG Can't retrieve group information for user NT SERVICE\SQLTELEMETRY. NetUserGetLocalGroups failed 0x000008AD 2022-10-08 10:56:30, Error [0x0803b6] MIG Can't retrieve group information for user NT SERVICE\SQLSERVERAGENT. NetUserGetLocalGroups failed 0x000008AD 2022-10-08 10:56:30, Error [0x0803b6] MIG Can't retrieve group information for user NT SERVICE\MSSQLSERVER. NetUserGetLocalGroups failed 0x000008AD 2022-10-08 10:56:30, Error [0x0803b6] MIG Can't retrieve group information for user NT SERVICE\SQLServerReportingServices. NetUserGetLocalGroups failed 0x000008AD 2022-10-08 10:56:30, Error [0x0803b6] MIG Can't retrieve group information for user IIS APPPOOL\Classic .NET AppPool. NetUserGetLocalGroups failed 0x000008AD 2022-10-08 10:56:30, Error [0x0803b6] MIG Can't retrieve group information for user IIS APPPOOL\.NET v4.5. NetUserGetLocalGroups failed 0x000008AD 2022-10-08 10:56:30, Error [0x0803b6] MIG Can't retrieve group information for user IIS APPPOOL\DefaultAppPool. NetUserGetLocalGroups failed 0x000008AD 2022-10-08 10:56:30, Error [0x0803b6] MIG Can't retrieve group information for user IIS APPPOOL\.NET v2.0. NetUserGetLocalGroups failed 0x000008AD 2022-10-08 10:56:30, Error [0x0803b6] MIG Can't retrieve group information for user IIS APPPOOL\.NET v4.5 Classic. NetUserGetLocalGroups failed 0x000008AD 2022-10-08 10:56:30, Error [0x0803b6] MIG Can't retrieve group information for user IIS APPPOOL\.NET v2.0 Classic. NetUserGetLocalGroups failed 0x000008AD 2022-10-08 10:56:30, Error [0x0803b6] MIG Can't retrieve group information for user IIS APPPOOL\nop. NetUserGetLocalGroups failed 0x000008AD 2022-10-08 10:56:43, Error [0x0803b6] MIG Can't retrieve group information for user NT SERVICE\SQLTELEMETRY. NetUserGetLocalGroups failed 0x000008AD 2022-10-08 10:56:43, Error [0x0803b6] MIG Can't retrieve group information for user NT SERVICE\SQLSERVERAGENT. NetUserGetLocalGroups failed 0x000008AD 2022-10-08 10:56:43, Error [0x0803b6] MIG Can't retrieve group information for user NT SERVICE\MSSQLSERVER. NetUserGetLocalGroups failed 0x000008AD 2022-10-08 10:56:43, Error [0x0803b6] MIG Can't retrieve group information for user NT SERVICE\SQLServerReportingServices. NetUserGetLocalGroups failed 0x000008AD 2022-10-08 10:56:43, Error [0x0803b6] MIG Can't retrieve group information for user IIS APPPOOL\Classic .NET AppPool. NetUserGetLocalGroups failed 0x000008AD 2022-10-08 10:56:43, Error [0x0803b6] MIG Can't retrieve group information for user IIS APPPOOL\.NET v4.5. NetUserGetLocalGroups failed 0x000008AD 2022-10-08 10:56:43, Error [0x0803b6] MIG Can't retrieve group information for user IIS APPPOOL\DefaultAppPool. NetUserGetLocalGroups failed 0x000008AD 2022-10-08 10:56:44, Error [0x0803b6] MIG Can't retrieve group information for user IIS APPPOOL\.NET v2.0. NetUserGetLocalGroups failed 0x000008AD 2022-10-08 10:56:44, Error [0x0803b6] MIG Can't retrieve group information for user IIS APPPOOL\.NET v4.5 Classic. NetUserGetLocalGroups failed 0x000008AD 2022-10-08 10:56:44, Error [0x0803b6] MIG Can't retrieve group information for user IIS APPPOOL\.NET v2.0 Classic. NetUserGetLocalGroups failed 0x000008AD 2022-10-08 10:56:44, Error [0x0803b6] MIG Can't retrieve group information for user IIS APPPOOL\nop. NetUserGetLocalGroups failed 0x000008AD 2022-10-08 10:56:54, Error [0x0808ff] MIG COutOfProcPluginFactory::CreateInstance: m_currentHostSurrogate->LoadDllServer(C:\$WINDOWS.~BT\Sources\ReplacementManifests\Microsoft-Windows-RasServer-MigPlugin\RasMigPlugin.dll, {D26AA4A5-92AD-48DB-8D59-95EF0DCE6939}, 1) failed, hr=[0x8007007f]. 2022-10-08 10:56:54, Error [0x080387] MIG Failure while calling IDiscovery->Discover for Plugin={ServerPath="Microsoft-Windows-RasServer-MigPlugin\RasMigPlugin.dll", CLSID={D26AA4A5-92AD-48DB-8D59-95EF0DCE6939}, ThreadingModel=Apartment, ExceptionHandling=Default}. Error: 0x8007007F 2022-10-08 10:56:55, Error [0x0803b6] MIG Can't retrieve group information for user NT SERVICE\SQLTELEMETRY. NetUserGetLocalGroups failed 0x000008AD 2022-10-08 10:56:55, Error [0x0803b6] MIG Can't retrieve group information for user NT SERVICE\SQLSERVERAGENT. NetUserGetLocalGroups failed 0x000008AD 2022-10-08 10:56:55, Error [0x0803b6] MIG Can't retrieve group information for user NT SERVICE\MSSQLSERVER. NetUserGetLocalGroups failed 0x000008AD 2022-10-08 10:56:55, Error [0x0803b6] MIG Can't retrieve group information for user NT SERVICE\SQLServerReportingServices. NetUserGetLocalGroups failed 0x000008AD 2022-10-08 10:56:55, Error [0x0803b6] MIG Can't retrieve group information for user IIS APPPOOL\Classic .NET AppPool. NetUserGetLocalGroups failed 0x000008AD 2022-10-08 10:56:55, Error [0x0803b6] MIG Can't retrieve group information for user IIS APPPOOL\.NET v4.5. NetUserGetLocalGroups failed 0x000008AD 2022-10-08 10:56:55, Error [0x0803b6] MIG Can't retrieve group information for user IIS APPPOOL\DefaultAppPool. NetUserGetLocalGroups failed 0x000008AD 2022-10-08 10:56:55, Error [0x0803b6] MIG Can't retrieve group information for user IIS APPPOOL\.NET v2.0. NetUserGetLocalGroups failed 0x000008AD 2022-10-08 10:56:55, Error [0x0803b6] MIG Can't retrieve group information for user IIS APPPOOL\.NET v4.5 Classic. NetUserGetLocalGroups failed 0x000008AD 2022-10-08 10:56:55, Error [0x0803b6] MIG Can't retrieve group information for user IIS APPPOOL\.NET v2.0 Classic. NetUserGetLocalGroups failed 0x000008AD 2022-10-08 10:56:55, Error [0x0803b6] MIG Can't retrieve group information for user IIS APPPOOL\nop. NetUserGetLocalGroups failed 0x000008AD 2022-10-08 10:56:55, Error SP Failure while getting the known folder path for CSIDL_PRINTHOOD (S-1-5-82-3682073875-1643277370-2842298652-3532359455-2406259117): Win32Exception: The system cannot find the file specified. [0x00000002] class UnBCL::String *__cdecl Mig::CFacadeUser::GetKnownFolderLocation(class UnBCL::String *,int *,class UnBCL::String **) 2022-10-08 10:56:55, Error SP Failure while getting the known folder path for CSIDL_PRINTHOOD (S-1-5-80-2652535364-2169709536-2857650723-2622804123-1107741775): Win32Exception: The system cannot find the file specified. [0x00000002] class UnBCL::String *__cdecl Mig::CFacadeUser::GetKnownFolderLocation(class UnBCL::String *,int *,class UnBCL::String **) 2022-10-08 10:56:55, Error SP Failure while getting the known folder path for CSIDL_PRINTHOOD (S-1-5-21-3050672445-3209544092-517134063-1010): Win32Exception: The system cannot find the file specified. [0x00000002] class UnBCL::String *__cdecl Mig::CFacadeUser::GetKnownFolderLocation(class UnBCL::String *,int *,class UnBCL::String **) 2022-10-08 10:56:55, Error SP Failure while getting the known folder path for CSIDL_PRINTHOOD (S-1-5-82-3006700770-424185619-1745488364-794895919-4004696415): Win32Exception: The system cannot find the file specified. [0x00000002] class UnBCL::String *__cdecl Mig::CFacadeUser::GetKnownFolderLocation(class UnBCL::String *,int *,class UnBCL::String **) 2022-10-08 10:56:55, Error SP Failure while getting the known folder path for CSIDL_PRINTHOOD (S-1-5-80-4050220999-2730734961-1537482082-519850261-379003301): Win32Exception: The system cannot find the file specified. [0x00000002] class UnBCL::String *__cdecl Mig::CFacadeUser::GetKnownFolderLocation(class UnBCL::String *,int *,class UnBCL::String **) 2022-10-08 10:56:55, Error SP Failure while getting the known folder path for CSIDL_PRINTHOOD (S-1-5-21-3050672445-3209544092-517134063-500): Win32Exception: The system cannot find the file specified. [0x00000002] class UnBCL::String *__cdecl Mig::CFacadeUser::GetKnownFolderLocation(class UnBCL::String *,int *,class UnBCL::String **) 2022-10-08 10:56:55, Error SP Failure while getting the known folder path for CSIDL_PRINTHOOD (S-1-5-21-3050672445-3209544092-517134063-1001): Win32Exception: The system cannot find the file specified. [0x00000002] class UnBCL::String *__cdecl Mig::CFacadeUser::GetKnownFolderLocation(class UnBCL::String *,int *,class UnBCL::String **) 2022-10-08 10:56:55, Error SP Failure while getting the known folder path for CSIDL_PRINTHOOD (S-1-5-82-4068219030-1673637257-3279585211-533386110-4122969689): Win32Exception: The system cannot find the file specified. [0x00000002] class UnBCL::String *__cdecl Mig::CFacadeUser::GetKnownFolderLocation(class UnBCL::String *,int *,class UnBCL::String **) 2022-10-08 10:56:55, Error SP Failure while getting the known folder path for CSIDL_PRINTHOOD (S-1-5-82-4155437066-4169509114-2127487463-1916158496-2406408509): Win32Exception: The system cannot find the file specified. [0x00000002] class UnBCL::String *__cdecl Mig::CFacadeUser::GetKnownFolderLocation(class UnBCL::String *,int *,class UnBCL::String **) 2022-10-08 10:56:55, Error SP Failure while getting the known folder path for CSIDL_PRINTHOOD (S-1-5-82-271721585-897601226-2024613209-625570482-296978595): Win32Exception: The system cannot find the file specified. [0x00000002] class UnBCL::String *__cdecl Mig::CFacadeUser::GetKnownFolderLocation(class UnBCL::String *,int *,class UnBCL::String **) 2022-10-08 10:56:55, Error SP Failure while getting the known folder path for CSIDL_PRINTHOOD (S-1-5-80-3880718306-3832830129-1677859214-2598158968-1052248003): Win32Exception: The system cannot find the file specified. [0x00000002] class UnBCL::String *__cdecl Mig::CFacadeUser::GetKnownFolderLocation(class UnBCL::String *,int *,class UnBCL::String **) 2022-10-08 10:56:55, Error SP Failure while getting the known folder path for CSIDL_PRINTHOOD (S-1-5-80-344959196-2060754871-2302487193-2804545603-1466107430): Win32Exception: The system cannot find the file specified. [0x00000002] class UnBCL::String *__cdecl Mig::CFacadeUser::GetKnownFolderLocation(class UnBCL::String *,int *,class UnBCL::String **) 2022-10-08 10:56:55, Error SP Failure while getting the known folder path for CSIDL_PRINTHOOD (S-1-5-21-3050672445-3209544092-517134063-1023): Win32Exception: The system cannot find the file specified. [0x00000002] class UnBCL::String *__cdecl Mig::CFacadeUser::GetKnownFolderLocation(class UnBCL::String *,int *,class UnBCL::String **) 2022-10-08 10:56:55, Error SP Failure while getting the known folder path for CSIDL_PRINTHOOD (S-1-5-82-3876422241-1344743610-1729199087-774402673-2621913236): Win32Exception: The system cannot find the file specified. [0x00000002] class UnBCL::String *__cdecl Mig::CFacadeUser::GetKnownFolderLocation(class UnBCL::String *,int *,class UnBCL::String **) 2022-10-08 10:56:55, Error SP Failure while getting the known folder path for CSIDL_PRINTHOOD (S-1-5-82-1036420768-1044797643-1061213386-2937092688-4282445334): Win32Exception: The system cannot find the file specified. [0x00000002] class UnBCL::String *__cdecl Mig::CFacadeUser::GetKnownFolderLocation(class UnBCL::String *,int *,class UnBCL::String **) 2022-10-08 10:56:55, Error SP Failure while getting the known folder path for CSIDL_PRINTHOOD (S-1-5-80-2885764129-887777008-271615777-1616004480-2722851051): Win32Exception: The system cannot find the file specified. [0x00000002] class UnBCL::String *__cdecl Mig::CFacadeUser::GetKnownFolderLocation(class UnBCL::String *,int *,class UnBCL::String **) 2022-10-08 10:56:55, Error SP Failure while getting the known folder path for CSIDL_PRINTHOOD (S-1-5-21-3050672445-3209544092-517134063-1022): Win32Exception: The system cannot find the file specified. [0x00000002] class UnBCL::String *__cdecl Mig::CFacadeUser::GetKnownFolderLocation(class UnBCL::String *,int *,class UnBCL::String **) 2022-10-08 10:57:11, Error MigPlatformStartupOnline caught exception: Win32Exception: Duplicate profile detected for S-1-5-21-3050672445-3209544092-517134063-1023. Abandoning.: The specified user does not have a valid profile. [0x000004E5] class Mig::CUserContext *__cdecl Mig::COnlineWinNTPlatform::AddUserContext(class Mig::CRegistryDataStore *,class UnBCL::String *,class UnBCL::String *,class UnBCL::String *,class UnBCL::String *,class UnBCL::String *,class UnBCL::Array<class UnBCL::String *> *,int,struct _FILETIME,int,int,int,class UnBCL::String *,class UnBCL::String *) 2022-10-08 10:57:11, Error SP pSPDoMainGather: Engine initialization failed with error: 0x00000004 2022-10-08 10:57:11, Error SP CGatherData: Migration phase failed. Status: 4 2022-10-08 10:57:11, Error SP Operation failed: Gather data, scope: EVERYTHING. Error: 0x8007001F[gle=0x000000b7] 2022-10-08 10:57:12, Error SP CSetupPlatform::ResurrectAutomation: Failed to resurrect automation: 0x80070002[gle=0x00000002] 2022-10-08 11:07:23, Error InitDownlevelOCMode caught exception: Win32Exception: Duplicate profile detected for S-1-5-21-3050672445-3209544092-517134063-1023. Abandoning.: The specified user does not have a valid profile. [0x000004E5] class Mig::CUserContext *__cdecl Mig::COnlineWinNTPlatform::AddUserContext(class Mig::CRegistryDataStore *,class UnBCL::String *,class UnBCL::String *,class UnBCL::String *,class UnBCL::String *,class UnBCL::String *,class UnBCL::Array<class UnBCL::String *> *,int,struct _FILETIME,int,int,int,class UnBCL::String *,class UnBCL::String *) 2022-10-08 11:07:23, Error MIG OC Exception: OC::CDownlevelOCStore::CDownlevelOCStore: Engine's InitDownlevelOCMode failed. 2022-10-08 11:07:23, Error SP OC Validator: Failed to gather OC status. Errors are not ignored 2022-10-08 11:07:24, Error [0x0803b6] MIG Can't retrieve group information for user NT SERVICE\SQLTELEMETRY. NetUserGetLocalGroups failed 0x000008AD 2022-10-08 11:07:24, Error [0x0803b6] MIG Can't retrieve group information for user NT SERVICE\SQLSERVERAGENT. NetUserGetLocalGroups failed 0x000008AD 2022-10-08 11:07:24, Error [0x0803b6] MIG Can't retrieve group information for user NT SERVICE\MSSQLSERVER. NetUserGetLocalGroups failed 0x000008AD 2022-10-08 11:07:24, Error [0x0803b6] MIG Can't retrieve group information for user NT SERVICE\SQLServerReportingServices. NetUserGetLocalGroups failed 0x000008AD 2022-10-08 11:07:24, Error [0x0803b6] MIG Can't retrieve group information for user IIS APPPOOL\Classic .NET AppPool. NetUserGetLocalGroups failed 0x000008AD 2022-10-08 11:07:24, Error [0x0803b6] MIG Can't retrieve group information for user IIS APPPOOL\.NET v4.5. NetUserGetLocalGroups failed 0x000008AD 2022-10-08 11:07:24, Error [0x0803b6] MIG Can't retrieve group information for user IIS APPPOOL\DefaultAppPool. NetUserGetLocalGroups failed 0x000008AD 2022-10-08 11:07:24, Error [0x0803b6] MIG Can't retrieve group information for user IIS APPPOOL\.NET v2.0. NetUserGetLocalGroups failed 0x000008AD 2022-10-08 11:07:24, Error [0x0803b6] MIG Can't retrieve group information for user IIS APPPOOL\.NET v4.5 Classic. NetUserGetLocalGroups failed 0x000008AD 2022-10-08 11:07:24, Error [0x0803b6] MIG Can't retrieve group information for user IIS APPPOOL\.NET v2.0 Classic. NetUserGetLocalGroups failed 0x000008AD 2022-10-08 11:07:24, Error [0x0803b6] MIG Can't retrieve group information for user IIS APPPOOL\nop. NetUserGetLocalGroups failed 0x000008AD 2022-10-08 11:07:25, Error [0x0803b6] MIG Can't retrieve group information for user NT SERVICE\SQLTELEMETRY. NetUserGetLocalGroups failed 0x000008AD 2022-10-08 11:07:25, Error [0x0803b6] MIG Can't retrieve group information for user NT SERVICE\SQLSERVERAGENT. NetUserGetLocalGroups failed 0x000008AD 2022-10-08 11:07:25, Error [0x0803b6] MIG Can't retrieve group information for user NT SERVICE\MSSQLSERVER. NetUserGetLocalGroups failed 0x000008AD 2022-10-08 11:07:25, Error [0x0803b6] MIG Can't retrieve group information for user NT SERVICE\SQLServerReportingServices. NetUserGetLocalGroups failed 0x000008AD 2022-10-08 11:07:25, Error [0x0803b6] MIG Can't retrieve group information for user IIS APPPOOL\Classic .NET AppPool. NetUserGetLocalGroups failed 0x000008AD 2022-10-08 11:07:25, Error [0x0803b6] MIG Can't retrieve group information for user IIS APPPOOL\.NET v4.5. NetUserGetLocalGroups failed 0x000008AD 2022-10-08 11:07:25, Error [0x0803b6] MIG Can't retrieve group information for user IIS APPPOOL\DefaultAppPool. NetUserGetLocalGroups failed 0x000008AD 2022-10-08 11:07:25, Error [0x0803b6] MIG Can't retrieve group information for user IIS APPPOOL\.NET v2.0. NetUserGetLocalGroups failed 0x000008AD 2022-10-08 11:07:25, Error [0x0803b6] MIG Can't retrieve group information for user IIS APPPOOL\.NET v4.5 Classic. NetUserGetLocalGroups failed 0x000008AD 2022-10-08 11:07:25, Error [0x0803b6] MIG Can't retrieve group information for user IIS APPPOOL\.NET v2.0 Classic. NetUserGetLocalGroups failed 0x000008AD 2022-10-08 11:07:25, Error [0x0803b6] MIG Can't retrieve group information for user IIS APPPOOL\nop. NetUserGetLocalGroups failed 0x000008AD 2022-10-08 11:07:26, Error SP Failure while getting the known folder path for CSIDL_PRINTHOOD (S-1-5-82-3682073875-1643277370-2842298652-3532359455-2406259117): Win32Exception: The system cannot find the file specified. [0x00000002] class UnBCL::String *__cdecl Mig::CFacadeUser::GetKnownFolderLocation(class UnBCL::String *,int *,class UnBCL::String **) 2022-10-08 11:07:26, Error SP Failure while getting the known folder path for CSIDL_PRINTHOOD (S-1-5-80-2652535364-2169709536-2857650723-2622804123-1107741775): Win32Exception: The system cannot find the file specified. [0x00000002] class UnBCL::String *__cdecl Mig::CFacadeUser::GetKnownFolderLocation(class UnBCL::String *,int *,class UnBCL::String **) 2022-10-08 11:07:26, Error SP Failure while getting the known folder path for CSIDL_PRINTHOOD (S-1-5-21-3050672445-3209544092-517134063-1010): Win32Exception: The system cannot find the file specified. [0x00000002] class UnBCL::String *__cdecl Mig::CFacadeUser::GetKnownFolderLocation(class UnBCL::String *,int *,class UnBCL::String **) 2022-10-08 11:07:26, Error SP Failure while getting the known folder path for CSIDL_PRINTHOOD (S-1-5-82-3006700770-424185619-1745488364-794895919-4004696415): Win32Exception: The system cannot find the file specified. [0x00000002] class UnBCL::String *__cdecl Mig::CFacadeUser::GetKnownFolderLocation(class UnBCL::String *,int *,class UnBCL::String **) 2022-10-08 11:07:26, Error SP Failure while getting the known folder path for CSIDL_PRINTHOOD (S-1-5-80-4050220999-2730734961-1537482082-519850261-379003301): Win32Exception: The system cannot find the file specified. [0x00000002] class UnBCL::String *__cdecl Mig::CFacadeUser::GetKnownFolderLocation(class UnBCL::String *,int *,class UnBCL::String **) 2022-10-08 11:07:26, Error SP Failure while getting the known folder path for CSIDL_PRINTHOOD (S-1-5-21-3050672445-3209544092-517134063-500): Win32Exception: The system cannot find the file specified. [0x00000002] class UnBCL::String *__cdecl Mig::CFacadeUser::GetKnownFolderLocation(class UnBCL::String *,int *,class UnBCL::String **) 2022-10-08 11:07:26, Error SP Failure while getting the known folder path for CSIDL_PRINTHOOD (S-1-5-21-3050672445-3209544092-517134063-1001): Win32Exception: The system cannot find the file specified. [0x00000002] class UnBCL::String *__cdecl Mig::CFacadeUser::GetKnownFolderLocation(class UnBCL::String *,int *,class UnBCL::String **) 2022-10-08 11:07:26, Error SP Failure while getting the known folder path for CSIDL_PRINTHOOD (S-1-5-82-4068219030-1673637257-3279585211-533386110-4122969689): Win32Exception: The system cannot find the file specified. [0x00000002] class UnBCL::String *__cdecl Mig::CFacadeUser::GetKnownFolderLocation(class UnBCL::String *,int *,class UnBCL::String **) 2022-10-08 11:07:26, Error SP Failure while getting the known folder path for CSIDL_PRINTHOOD (S-1-5-82-4155437066-4169509114-2127487463-1916158496-2406408509): Win32Exception: The system cannot find the file specified. [0x00000002] class UnBCL::String *__cdecl Mig::CFacadeUser::GetKnownFolderLocation(class UnBCL::String *,int *,class UnBCL::String **) 2022-10-08 11:07:26, Error SP Failure while getting the known folder path for CSIDL_PRINTHOOD (S-1-5-82-271721585-897601226-2024613209-625570482-296978595): Win32Exception: The system cannot find the file specified. [0x00000002] class UnBCL::String *__cdecl Mig::CFacadeUser::GetKnownFolderLocation(class UnBCL::String *,int *,class UnBCL::String **) 2022-10-08 11:07:26, Error SP Failure while getting the known folder path for CSIDL_PRINTHOOD (S-1-5-80-3880718306-3832830129-1677859214-2598158968-1052248003): Win32Exception: The system cannot find the file specified. [0x00000002] class UnBCL::String *__cdecl Mig::CFacadeUser::GetKnownFolderLocation(class UnBCL::String *,int *,class UnBCL::String **) 2022-10-08 11:07:26, Error SP Failure while getting the known folder path for CSIDL_PRINTHOOD (S-1-5-80-344959196-2060754871-2302487193-2804545603-1466107430): Win32Exception: The system cannot find the file specified. [0x00000002] class UnBCL::String *__cdecl Mig::CFacadeUser::GetKnownFolderLocation(class UnBCL::String *,int *,class UnBCL::String **) 2022-10-08 11:07:26, Error SP Failure while getting the known folder path for CSIDL_PRINTHOOD (S-1-5-21-3050672445-3209544092-517134063-1023): Win32Exception: The system cannot find the file specified. [0x00000002] class UnBCL::String *__cdecl Mig::CFacadeUser::GetKnownFolderLocation(class UnBCL::String *,int *,class UnBCL::String **) 2022-10-08 11:07:26, Error SP Failure while getting the known folder path for CSIDL_PRINTHOOD (S-1-5-82-3876422241-1344743610-1729199087-774402673-2621913236): Win32Exception: The system cannot find the file specified. [0x00000002] class UnBCL::String *__cdecl Mig::CFacadeUser::GetKnownFolderLocation(class UnBCL::String *,int *,class UnBCL::String **) 2022-10-08 11:07:26, Error SP Failure while getting the known folder path for CSIDL_PRINTHOOD (S-1-5-82-1036420768-1044797643-1061213386-2937092688-4282445334): Win32Exception: The system cannot find the file specified. [0x00000002] class UnBCL::String *__cdecl Mig::CFacadeUser::GetKnownFolderLocation(class UnBCL::String *,int *,class UnBCL::String **) 2022-10-08 11:07:26, Error SP Failure while getting the known folder path for CSIDL_PRINTHOOD (S-1-5-80-2885764129-887777008-271615777-1616004480-2722851051): Win32Exception: The system cannot find the file specified. [0x00000002] class UnBCL::String *__cdecl Mig::CFacadeUser::GetKnownFolderLocation(class UnBCL::String *,int *,class UnBCL::String **) 2022-10-08 11:07:26, Error SP Failure while getting the known folder path for CSIDL_PRINTHOOD (S-1-5-21-3050672445-3209544092-517134063-1022): Win32Exception: The system cannot find the file specified. [0x00000002] class UnBCL::String *__cdecl Mig::CFacadeUser::GetKnownFolderLocation(class UnBCL::String *,int *,class UnBCL::String **) 2022-10-08 11:07:41, Error MigPlatformStartupOnline caught exception: Win32Exception: Duplicate profile detected for S-1-5-21-3050672445-3209544092-517134063-1023. Abandoning.: The specified user does not have a valid profile. [0x000004E5] class Mig::CUserContext *__cdecl Mig::COnlineWinNTPlatform::AddUserContext(class Mig::CRegistryDataStore *,class UnBCL::String *,class UnBCL::String *,class UnBCL::String *,class UnBCL::String *,class UnBCL::String *,class UnBCL::Array<class UnBCL::String *> *,int,struct _FILETIME,int,int,int,class UnBCL::String *,class UnBCL::String *) 2022-10-08 11:07:41, Error SP pSPDoMainGather: Engine initialization failed with error: 0x00000004 2022-10-08 11:07:41, Error SP CGatherData: Migration phase failed. Status: 4 2022-10-08 11:07:41, Error SP Operation failed: Gather data, scope: EVERYTHING. Error: 0x8007001F[gle=0x000000b7] 2022-10-08 11:07:41, Error SP COperationQueue::Sort: Could not find an execution phase for 56[gle=0x00000002] 2022-10-08 11:07:41, Error SP ExecuteOperations: Operations cannot be sorted. This is a fatal failure.[gle=0x00000002] 2022-10-08 11:07:41, Error SP ExecuteOperations: Main operation execution failed. Error: 0x8007000D 2022-10-08 11:07:41, Error SP ExecuteOperations: Failed execution phase Finalize. Error: 0x8007000D 2022-10-08 11:07:41, Error MOUPG MoSetupPlatform: Finalize reported failure![gle=0x8007000d] 2022-10-08 11:07:41, Error MOUPG MoSetupPlatform: Using action error code: [0x8007001F][gle=0x8007000d] 2022-10-08 11:07:41, Error MOUPG CDlpActionFinalize::ExecuteSetupPlatformFinalize(1192): Result = 0x8007001F[gle=0x8007000d] 2022-10-08 11:07:41, Error MOUPG CDlpActionFinalize::ExecuteRoutine(514): Result = 0x8007001F[gle=0x8007000d] 2022-10-08 11:07:43, Error MOUPG CDlpActionImpl<class CDlpErrorImpl<class CDlpObjectInternalImpl<class CUnknownImpl<class IMoSetupDlpAction> > > >::Execute(493): Result = 0x8007001F 2022-10-08 11:07:43, Error MOUPG CDlpTask::ExecuteAction(3300): Result = 0x8007001F 2022-10-08 11:07:43, Error MOUPG CDlpTask::ExecuteActions(3454): Result = 0x8007001F 2022-10-08 11:07:43, Error MOUPG CDlpTask::Execute(1631): Result = 0x8007001F 2022-10-08 11:07:43, Error MOUPG CSetupManager::ExecuteTask(2928): Result = 0x8007001F 2022-10-08 11:07:43, Error MOUPG CSetupManager::ExecuteTask(2891): Result = 0x8007001F 2022-10-08 11:07:43, Error MOUPG CSetupManager::ExecuteInstallMode(1110): Result = 0x8007001F 2022-10-08 11:07:43, Error MOUPG CSetupManager::ExecuteDownlevelMode(569): Result = 0x8007001F 2022-10-08 11:07:47, Error MOUPG CSetupManager::Execute(313): Result = 0x8007001F 2022-10-08 11:07:47, Error MOUPG CSetupHost::Execute(454): Result = 0x8007001F
Among of a list of issues, I recognized the duplicate profile error(s) without much sweat as this issue has been persistent from the Windows 7 times.
Now the fix that is discussed here is not for a normal computer user. If you have landed here, searching for a solution for your home computer and haven’t dealt with Windows registry in the past, manually managing it, please stop & seek the help of someone who is familiar with these kind of activities.
Make a backup for complete Windows Registry. This is very important to rollback incase if something goes wrong.
Go to “Computer\HKEY_LOCAL_MACHINE\SOFTWARE\Microsoft\Windows NT\CurrentVersion\ProfileList” node. From the setuperr.log file you already have a profile id that is reported as “duplicate”. Browse through the profile ids and locate the profile that doesn’t exist. For example, my user account for the system is “rajesh” and I had two profile ids, one having the Profile Image Path “C:\Users\rajesh” and the other profile id having profile image path “C:\Users\Rajesh”
I deleted that non-existing profile id from the registry (ie, C:\Users\Rajesh) and restarted upgrade. Everything went ahead smooth and within next 10-15 minutes, Windows 11 booted without issues.
A list of other measures that you could try in case if your upgrade fails are:
Remove all connected external devices other than keyboard & mouse
Uninstall SSD/NVMe managers (software that help you to monitor the SSD drives)
Uninstall 3rd party antivirus software. One of the major reasons for failures
Check for adequate free storage space on your system drive, normally C: drive
Use Windows built-in troubleshoot to fix Windows update errors
During installation, let the installer check for updates and download the necessary
We’ve our Oracle EBS instance hosted from Linux environment. However I post much for the Windows OS as I see there are not many articles targeting Oracle on Windows. I think for better view counts, I should consider posting the articles for both OS.
In my last post about restoring 1g RMAN online backup to 19c non CDB database, I said my ultimate goal was to convert the upgraded database from non CDB to PDB, that is plugged on to an existing CDB. Let us see how to achieve this goal this time.
Before start, there are few mandatory checks you must do to insure a successful migration from Non CDB to PDB. I will list few of them those came as hurdles for me.
Character Set. Make sure that your CDB and the Non CDB database have the same character set. There are few possible conversions. Please check 12c Multitenant Container Databases (CDB) and Pluggable Databases (PDB) Character set restrictions / ORA-65116/65119: incompatible database/national character set ( Character set mismatch: PDB character set CDB character set ) (Doc ID 1968706.1) for more details. My CDB was using Arabic character set and the upgraded non CDB database was using a noncompatible set. So I dropped the CDB and created a new CDB without PDB(s). Dropping a CDB will not be always possible because other PDBs are attached to it.
Available storage space. This could be a real concern incase if you are planning to create a PDB, cross verify & then delete the non CDB database. You will need approximately the same size of your non CDB datafiles size storage available to do this activity. My database was less than 5 GB in size, hence it never occurred to me. If your database has a bigger size, plan accordingly.
Let’s do it now.
From and elevated command prompt (Windows Terminal is not yet matured enough to handle such “heavy” tasks) source the non CDB. Shutdown and startup mount exclusive.
C:\Windows\system32>set ORACLE_SID=KAZEMA
C:\Windows\system32>sqlplus / as sysdba
SQL> shu immediate
SQL> startup mount exclusive
SQL> alter database open read only;
Create manifest file for the non CDB now.
SQL> exec dbms_pdb.describe (pdb_descr_file=>'D:\Oracle19c\kazema_manifest_file.xml');
SQL> shu immediate
Source the CDB now.
C:\Windows\system32>set ORACLE_SID=KAZEMACDB
C:\Windows\system32>sqlplus / as sysdba
SQL> SHOW CON_NAME

CON_NAME
------------------------------
CDB$ROOT
Now, we need to see whether non CDB meets the compatibility requirements. There could be multiple elements those you may have to fix before, the non CDB is ready for a successful migration as PDB. You will have to refer PDB_PLUG_IN_VIOLATIONS view for these details. Go ahead, execute the below code block.
SQL>   SET SERVEROUTPUT ON;
SQL>    DECLARE
       Compatible CONSTANT VARCHAR2(3) :=CASE  DBMS_PDB.CHECK_PLUG_COMPATIBILITY
       (pdb_descr_file => 'D:\Oracle19c\kazema_manifest_file.xml')
       WHEN TRUE THEN 'YES'
       ELSE 'NO'
       END;
       BEGIN
          DBMS_OUTPUT.PUT_LINE(compatible);
       END;
     /
YES
My case I didn’t have incompatibilities blocking possible migration. Your case could be different. If the output is “NO”, run the following query (use SQL Developer for better view)
select * from PDB_PLUG_IN_VIOLATIONS where name='<your non CDB name>';
Fix each and every other ERROR & you can safely ignore the “WARNINGS” for now.
Proceed with creating a new PDB from the manifest file that we have created in the 1st step.
SQL> CREATE PLUGGABLE DATABASE KAZEMA USING 'D:\Oracle19c\kazema_manifest_file.xml' COPY FILE_NAME_CONVERT=('D:\ORACLE19C\DB\ORADATA\KAZEMA\DATAFILE','D:\ORACLE19C\DB\ORADATA\KAZEMA');

Pluggable database created.

SQL> show pdbs;

    CON_ID CON_NAME                       OPEN MODE  RESTRICTED
---------- ------------------------------ ---------- ----------
         2 PDB$SEED                       READ ONLY  NO
         3 KAZEMA                         MOUNTED
Once the PDB has been created, confirm the same & proceed with balance activities. Run “noncdb_to_pdb.sql”
SQL> alter session set container=KAZEMA;

Session altered.

SQL> @$ORACLE_HOME/rdbms/admin/noncdb_to_pdb.sql
Based on the resource available, this might take a while for the script to complete execution. Once completed you can try to open the PDB. Check for Errors and Warnings in the PDB_PLUG_IN_VIOLATIONS view. If there are new ERRORS & WARNINGS fix them.
A typical scenario could list you many things like this (reference image only)
After fix attempts, I am still left with one Warning about sys lock issues. This is mainly due to the password file format 12.2. I hope to find a solution soon for it. Status column states whether the Error/Warning was taken care off.
SQL> alter pluggable database open;

Pluggable database altered.

SQL> SELECT name, open_mode FROM v$pdbs;

NAME
--------------------------------------------------------------------------------
OPEN_MODE
----------
KAZEMA
READ WRITE


1 row selected.

SQL> show pdbs;

    CON_ID CON_NAME                       OPEN MODE  RESTRICTED
---------- ------------------------------ ---------- ----------
         3 KAZEMA                         READ WRITE NO
SQL>
Now you have a non CDB and PDB with the same SID. You can proceed with dropping the non CDB database after cross verifying the concerns.
Foot Note: If you are plugging a database that was hosted in another server/computer after converting, make sure to verify the “local_listener” parameter for the PDB exist.
D:\Oracle19c>sqlplus / as sysdba

SQL*Plus: Release 19.0.0.0.0 - Production on Sun Apr 10 11:18:33 2022
Version 19.14.0.0.0

Copyright (c) 1982, 2021, Oracle.  All rights reserved.


Connected to:
Oracle Database 19c Enterprise Edition Release 19.0.0.0.0 - Production
Version 19.14.0.0.0

SQL> show parameter local_listener

NAME                                 TYPE        VALUE
------------------------------------ ----------- ------------------------------
local_listener                       string      LISTENER_KAZEMACDB
SQL> alter session set container="KAZEMA";

Session altered.

SQL> show parameter local_listener

NAME                                 TYPE        VALUE
------------------------------------ ----------- ------------------------------
local_listener                       string      LISTENER_KAZEMACDB
SQL>
If the local listener is not reachable, PDB level services will fail to register with listener and the applications those depend on such services will fail to establish connections. This applies mostly to Oracle E-Business Suite environments and could be mapped to sophisticated applications that use specific service names to establish connections to the database.
KB5009543 or Cumulative update Jan 2022 for Windows 10 and Windows 11 is currently breaking IKEv2 VPN connections. If you are experiencing an unexpected connection failure with a vague error message like “General processing error”, please follow the below steps.
Go to Program and Features -> Installed Updates and uninstall KB5009543. Reboot the box and the VPN connection should start working normally. Optionally you may disable the Windows Update for a period of time so that the same update will not get installed once again. Please note, Microsoft releases updates to their products quite often to resolve issues those were identified. Few times these updates open new issues, like the one happened with this particular KB.
While there are no straight forward methods available to “stop” Windows updates, you can use multiple methods to disable Windows update completely, which we don’t recommend. One of them is using group policies on the local machine.
If you still consider disabling Windows updates temporarily/long term, please refer this excellent tutorial
We migrated to 11G R2 (11.2.0.4) for our Oracle Applications R12 few years back, yes few years back (2017) & lived with one of the worst experiences…
Connecting Oracle Developer 10g (Forms/Reports) suite to 11G database.
I have scavenged through community articles for long time before giving up. I hardly came across a single fix for the connection time that used to hang up the Developer suite at times…
Today, I decided to find a solution for the nagging SSH connection issues from Windows 11 to our LINUX application servers and realized that we didn’t update the DNS settings for them once after we decommissioned a domain controller. Once the SSH issues were rectified and addressed, my next attempt was to find a solution for “frmcmp_batch” taking long time to start compiling modules & I landed on the below post.
As we are already on 11G R2 11.2.0.4, patching was not required. All I needed was to alter the hidden parameter “_FIX_CONTROL” as mentioned in the article.
SQL> ALTER SYSTEM SET "_FIX_CONTROL"='8560951:ON';
(Use scope=spfile to make this change permanent. This will require you to restart the database.)
I opted to go without spfile for testing & as soon as applied, the “frmcmp_batch” started compiling the modules instantly, against the usual delay that ran into many minutes other times.
Out of curiosity, I tried to connect to the database from Developer 10g & the connection was instant! within a fraction of a second.
So DNS being one of the most important elements establishing successful connections, patches and fixes also play crucial role in providing stable connections. Were you stuck with the same issue? give the solution a try and let us know whether it helped you also.