Starting from Windows 8, Microsoft has clearly switched their target consumers to mobile users and snatched the clean desktop experience from power users.
Windows 10 is basically a huge PHONE OS, however, significant efforts were made by Microsoft to reduce the gap between a mobile OS and pure desktop experience by the addition of a semi effective start button. Yet it satisfy the frustrated me? Not entirely
For example, I have multiple versions of Oracle developer installed in my box, starting from Developer 6i, Developer 10g & Developer 11g in the same box & almost all elements within the developer stacks share the common names like forms developer, reports builder etc. Using the jump list was NEVER my cup of tea as it takes time, efforts to distinguish. Though the new start menu allows one to drag and drop the apps to desktop, send to desktop is a sure missing option which could truly confuse a person who switched from XP/7 recently.
I’m responsible a middle size IT infrastructure and was promoting the usage of classicshell, the free start button/ start menu alternative that brings a kind of Windows XP/7 style start button/menu experience back to both Windows 8.x and Windows 10 OS.
With periodic updates, this freeware remains one of the best solutions for crippled start menu available with Windows 10 OS.
Install it, Open Classic start menu settings, check “Show all settings” & make the few settings as seen with the below images and you are all ready to enjoy a cleaner desktop experience
You can setup the most comfortable start menu style here
Skin allows you to disable the frames around the icons.
Once the above you are all good to start experiencing the classic start menu on your Windows 8/10 box
I’ve been installing and configuring Weblogic 10.3.6 & 12c (recently) and came across a peculiar issue, where the reports server failing to map the keys I’ve specified with cgicmd.dat file.
The best I could recollect from my memories was, I only added the keys to a single instance of cgicmd.dat file, as there are many instances of the same file once after classic domains are created.
Under linux installations you will find the file in 3 different locations once after the domain created and WLS_REPORTS server started.
With my latest installations of 12c & 11g, I had issue getting the keys mapped properly & after loads and loads of googling I decided to add the same key to all available instances of cgicmd.dat one after another.
So I started with the first instance of cgicmd.dat file, that was found under
which is WLS_REPORTS temporary folder. I added the key, restarted the WLS_REPORTS server & the key was mapped as required!
This could be a nasty bug because I don’t remember adding the keys to multiple files while I tried out forms and reports 11g Release 2 almost 2 years back!
The most interesting part of the entire exercise is, once the key mapping happens successfully, you can remove the keys from cgicmd.dat file that in the temporary location and everything works! Could be the magic of cache
So if you come across key mapping issues, you know where to look at for a quick fix.
One of my close associates & a person I respect as a legend, Iudith said the following with one of her recent mails to me:
“Regarding all this WebLogic issue … I have a feeling that Oracle “used a cannon for killing a fly” ……… Maybe that complicated setup creates an environment which can support all kinds of other products,I really don’t know because I have mostly just heard about it.“
From Oracle’s perspectives, this approach may provide them better scalability, however how far such complexities will appease the developer crowd remains a big concern.
While the modernization of Oracle forms and reports, the maximum sought legacy development means remain a frequently sought and discussed topic, Oracle is definitely NOT doing enough to regain the confidence of mortals who spent decades developing, especially by making each and every newer versions difficult to install and setup.
Less said, let us go back to the topic, how to create and configure a standalone report server instance for 12c environment. This is my 3rd post in a row about installing and configuring 12c products related to Forms and Reports
I can’t exactly remember which document says “In-process reports server has better accountability against a standalone reports instance”. I have referred minimum couple of dozen 12c related documents and tens of blogs to setup stuffs. Without arguing whether in-process server or a standalone instance is better to cater the reports services, let me list the activities one have to perform in order to setup
Create a reports tools instance (Mandatory, if you are planning to use the same box for reports development)
Create a reports server instance (OPTIONAL, only if you want to host a standalone reports instance)
Start WLST(Weblogic Scripting Tool) console, and execute the below commands one after another (Make sure the node manager & the Weblogic admin server services are already started)
Once successfully completed, restart the WLS_REPORTS application using the weblogic admin console. Once bitten, twice shy…I always restart the weblogic admin server and other servers to make sure nothing is broken in between…(paranoid I must be)
Restarting the WLS_REPORTS server causes the weblogic server to configure the newly created instances of reports tools and reports instance. A successful completion let you
Start using the reports builder
Access the standalone reports server instance
You need minimal configurations for the standalone reports server instance. Just setup the reports (.rdf files) path, disable the security elements and you are online!
Assuming you have already configured the weblogic server components following the previous posts, switch to the reports instance configuration folder
Well, after dealing with 3 different versions of Forms & Reports 12c with Weblogic 12c, I found that 99.9% of the configurations for deploying Oracle Forms and Reports remain the same across versions. Hence instead of posting new threads towards the configurations, I will try to amend this thread with new instructions if any. Thank you (reader)
A week back I posted the procedures tested at my end (I’m excusing myself with this statement because 12c total setup could be a painful experience and may NOT be successful for many, even after following line by line instructions) here
This time I am going to list few instructions those will help you to deploy your existing forms & reports based applications to newly built 12c environment. The ONE pleasant surprise I came across during the deployment was, if your forms and reports were built and compiled used 11g R2 (not sure about 11g R1), no need to recompile them once again for the 12c deployment.
So last time we finished the topic discussing how to install and configure the 12c database, Weblogic Server, forms & reports and stopped at accessing the Oracle Enterprise Manager for Weblogic server.
If you are familiar with Weblogic Server 10 & Forms and reports 11gR2, creating a classic domain was much simpler compared to 12c. OPMN configurations were automated & once the relevant paths were setup, you are almost ready to start using the infrastructure for applications. However 12c requires more efforts from one to establish the same.
I’ll start with Oracle HTTP Server (OHS instance) that we created during the base_domain configurations. OPMN is not anymore used by Oracle 12c, hence the OHS.
As I always said, I’m not a weblogic guru, just another enthusiast who wants to try out newer products as a part of learning. Most of the stuffs I suggest here are “as how I managed to get it working”. Hence, if you find anything ridiculous or non-standard, please let me know through the comment section.
As you may already aware, forms and reports applications are deployed using own PORTs, for example WLS_FORMS server uses the port 9001 & WLS_REPORTS uses 9002 (default installation). However while you want to deploy an application, the users should be accessing both through a common interface, especially when the reports are called from forms using Web.Show_Document method. An example how the reports are called from a form using the above said method is like following:
“/reports/rwservlet?” assumes the servlet is called from the current root, for example, if you started the forms applications using the default deployment URL, it would look like the below
causing URL not found error because there are NO reports application deployments at http://rajesh-pc:9001/
The one possibility to address this would be by hardcoding the root part of the url, which I never tried. However, exposing the ports of your forms and reports application servers may not be a good idea. Here, OHS instance comes in picture.
All you need to do is to register the forms and reports applications with the OHS and once the OHS instance restarted, you can start calling both forms are reports through the common URL, for example like following
7777 is the default OHS instance port, which you can change to a free port according to your requirements. You may even use port 80 using OHS (I will not discuss about changing OHS port to 80, there are many decent posts already available all over internet)
Let’s start!
Update: 5th June 2016
You may enable the IPV6 after the installation and configuration by removing the registry dword & restarting the box. Using Weblogic console, point “Admin Server”, “WLS_FORMS” & “WLS_REPORTS” servers listen address to the host name of the box you are running them from.
In addition to changing the listening address, edit the host file of your box (X:\Windows\System32\drivers\etc” and add an entry like below
192.168.1.10 mybox.mydomain.xyz mybox
or
192.168.1.10 mybox
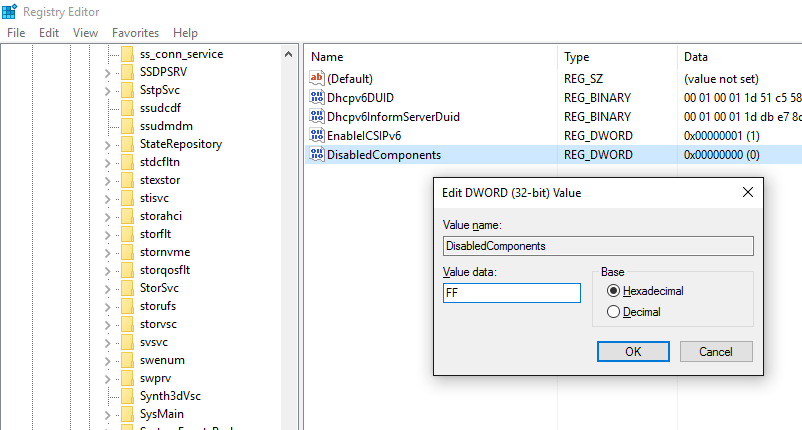
Note#1: IPV6 is becoming the standard now, however many of the Oracle products have serious issues handling the IPV6 stack & you may find reference towards inet4 references raised by java while checking the log files. So we will completely disable the IPV6 stack on our Windows 10 machine. Please read Microsoft documentations to understand what kind of troubles you may get subjected by disabling IPV6
Create a new reg_dword (32Bit) “DisabledComponents”
and just enter “FF” in the hexadecimal value column. Restart the computer
Note#2: If you created a Windows service for node manager using the Weblogic provided install service script, stop all WLS servers and stop the node manager service and delete the service from an elevate command prompt. I came across multiple issues related to java while using the Windows service created using the scripts.
We will use NSSM once again to create the node manager service, using the start node manager script you will find under $DOMAIN_HOME\bin folder
I’ve observed that most of null java exceptions were eliminated by creating the node manager service this way.
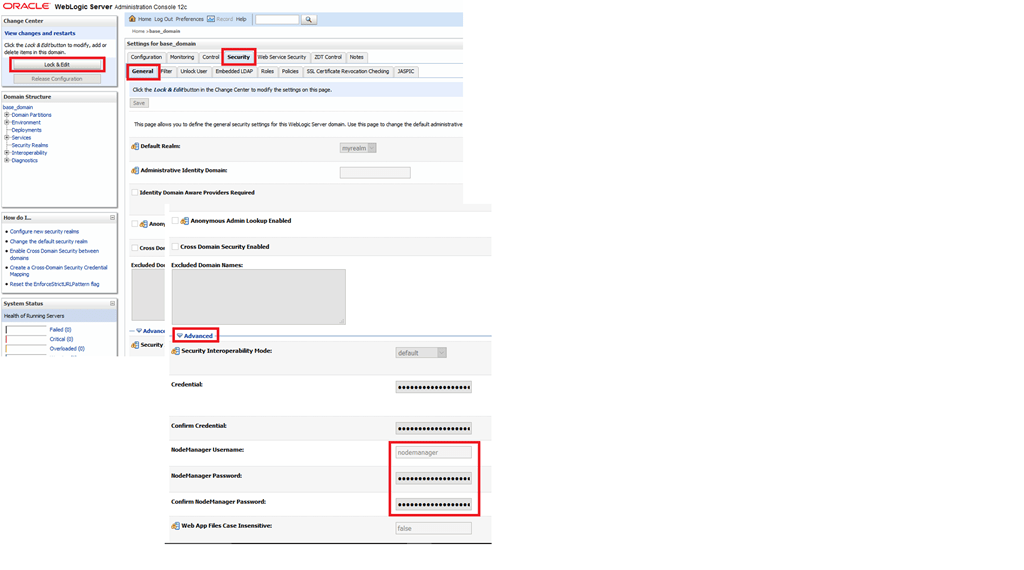
Note#3: Now we will setup a proper username and password for nodemanager because if you want to start the OHS instance manually later, you need to supply password (for the 1st time)
Lock & Edit the domain security values, please refer the image below for details
Provide a meaningful name for the node manager account and supply a password. I used the same password for the total 12c deployment, unless you are setting up a PRODUCTION instance, you may use the common password across the 12c instances for easy administration of objects when required. Shutdown the services (better)
Note#4: Once the node manager properties are changed, start the WLS admin server. Once a WLS classic domain is created, you MUST have a live database connectivity in order to start the WLS admin server. Hence make sure that before you will start the weblogic server, you can connect to the database that holds the repository information for the user domains. Start WLS_FORMS and WLS_REPORTS servers using the weblogic console to insure that the admin server can contact the node manager. The first instance of weblogic server start may take upto 8-10 minutes, so wait patiently
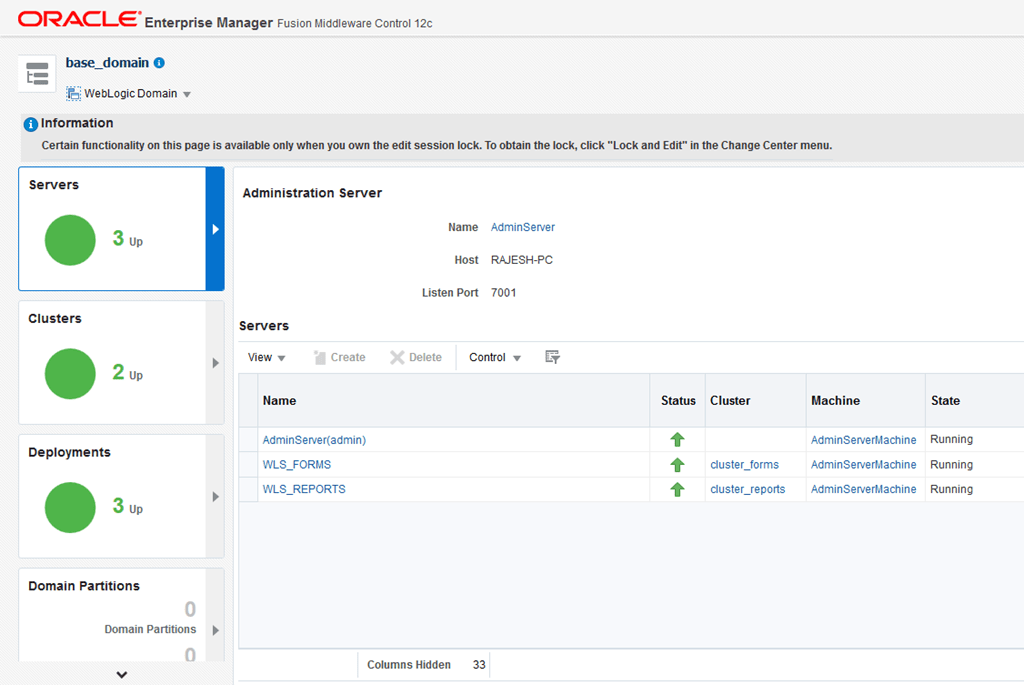
Note#5: Logon to Oracle Enterprise Manager console. If the servers are started properly, you will see “everything” green, else…
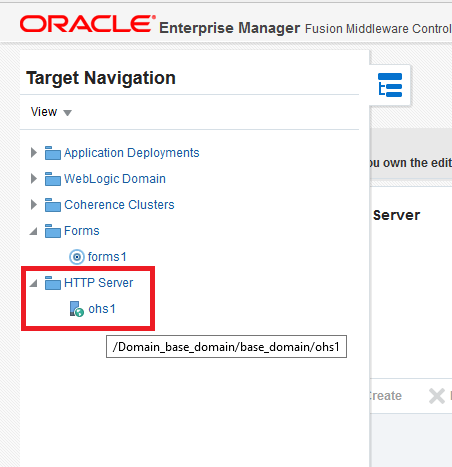
Note#6: Let us try to start the OHS instance for the 1st time, you can navigate to the OHS instance using the target navigation button, check the below image for more details
As I have already started my OHS instance I will see all details for the instance, please check the image below
If your OHS instance is not started yet, use the “Start up” button to start the instance. I had few failures, pointing towards JAVA while tried, most of them were related to the node manager, as described earlier by the beginning of this article.
Note#7: If you managed to start the OHS instance successfully, you have completed the 1st level of configurations for the application deployment. You can modify the listen address, port information etc using the OEM itself. Please check the below image for details. I will NOT try to get into the details of how to this time, though it is highly appealing, due to the fact that I need to stick to the topic (minimum once in a while)
Stop the OHS instance now. We need to tell the OHS instance, what exactly it is going to serve by modifying the configuration files. A bit of manual efforts are required as there are NO GUI provided by Oracle for such setups.
Move to your Oracle Home folder. I have installed Weblogic server in D:\Weblogic\Middleware folder, hence my Oracle home folder is
D:\Weblogic\Middleware\Oracle_Home\
(Adjust your paths accordingly)
Edit forms.conf file in the folder D:\Weblogic\Middleware\Oracle_Home\forms\templates\config\
By default this template file comes with commented examples, like following
You need to uncomment one of the blocks starting from <Location /forms> until </Location> & add properties specific to your deployment, for example, my computer’s name is “RAJESH-PC” and I am using default ports for both forms and reports applications, hence I have the properties set like following
Now we will edit the configuration file for reports
Switch to “D:\Weblogic\Middleware\Oracle_Home\reports\conf” folder & edit “reports_ohs.conf” and add a block like following (alter according to your setup)
Now the OHS instance know about the deployments and once after restarted, you can try to start the forms based application through the OHS instance, rather than calling it against the default port (9001)
Once the OHS instance is updated with the new information, try to start the OHS instance from a command prompt using storeUserConfig parameter
1st run, you will be prompted for node manager password, supply the password you have setup earlier and OHS instance should start without creating a fuzz in usual scenarios
In future if you want to start the OHS instance, unless made changes to the configurations, just run
Above concludes the 1st of level of configurations for Oracle forms based application. You can use Weblogic 12c Enterprise Manager to configure most of the forms environment related parameters like forms path and other, while I am yet to find out relevant configuration areas for reports. I’ve opened a thread with Oracle community inquiring the same and yet to receive any leads.
You can manually modify the formsweb.cfg & default.env files to start with as well
While forms based application hasn’t changed much (other than the OHS part), making the reports working for you could be really a painful experience.
Regardless whether you are going to use the in-process report server or a stand alone instance of the reports, many changes should be made to the configuration files, so that you can call the reports server from a Forms module
Generally we will be modifying n configuration files, I will try my level best to provide the exact locations for the files which you should change according to your installation preferences
rwservlet.properties – Servlet specific properties
rwserver.conf – Server properties
cgicmd.dat – key mapping file
1. As far you are using in-process reports server, nothing much to alter with “rwservlet.properties” file. Basically you should see entries like following in the opened file:
2. rwserver.conf (Please check the below image)
3. cgicmd.dat: Many values we supply to call a report using Web.Show_Document method could potentially expose vital information like the database details & many other. “cgicmd.dat” file helps us to map such values to keys and later use them wherever applicable. With this example, I will demonstrate, how the database username, password and service name are mapped using a key. Please check the image attached below
Once these configurations files are altered, please restart the WLS_REPORTS server using Weblogic admin console. You may optionally restart the WLS_FORMS server as well
Basically these many configuration should let you go online with your application. One of the pleasant stuffs about 12c forms and reports is, you don’t have to recompile the existing forms modules, just copy them to a new folder, update your formsweb.cfg and default.env files, restart the WLS_FORMS server and you are all set to go.
I’ve successfully configured a stand alone report server instance as well. I think I should separate it from this thread and post it as a fresh one to avoid confusions.
I been working from last few weeks to get these whole stuffs in a single place and cannot remember whether I’ve missed anything vital. If you get stuck anywhere, please let me know through the comment section and I will be more than glad to look into such.
Guys, I have different threads towards specific version of Weblogic 12c & Oracle Forms and Reports installation, configuration(s). Please refer the thread specific to the version of Weblogic & Oracle Forms & Reports that you are trying to install.
Update 23rd October 2016
I was trying to answer one of the comments and realized that my database schemas those were created during repo creation were with expired passwords and the “WebLogic Admin Server” will not start. So, you are advised to setup your 12c database with no password expiry, no complex passwords etc (as far you are using the environment for development)
Important:
If for some reasons you cannot update your Windows 10 box, minimum make sure that you have Visual C++ 2012 package installed, which will provide you the much needed “MSVCR110.dll”, without which the Apache HTTP server will not start on Windows. This workaround is not at all an excuse for not patching your Windows box using update services.
Update: 03rd June 2016
I’m revisiting few of the claims which were true during the early builds of Windows 10, however not anymore having the same issues with the latest build & after cumulative updates. My Windows 10 boxes run the following build with all updates in place.
I’ve enabled the IPV6 protocol by deleting the explicit key that I created under TCPIP6 parameters & once after restarting the boxes, was able to start all the weblogic services and OHS instance successfully. However, I have made the following change
Pointed all the servers, “Admin Server”, “WLS_FORMS” and “WLS_REPORTS” to the hostname, instead of leaving the listening address empty. Eg: rajesh-pc. As I mentioned and re-iterating, whole the exercises described are those worked in my lab environment. Any attempts to use them at a production environment could prove you WRONG and disastrous situations may arise by not following Oracle’s guidelines.
This time, I will try to explain how you can setup few 12c products for your testing and developing needs in Windows 10, Microsoft’s latest desktop operating system (The same should be applicable for Windows 8.1 as well)
My scenario
OS: Windows 10 64bit Professional
Memory: 16gb
Processor: i7
Storage: Around 4.6 TB (4 Disks)
Software downloads required for the setup
Oracle database 12c
JDK
Middleware aka Weblogic Server 12c
Forms and reports 12c
You can download the above software packages from Oracle’s repositories
Why Oracle Database 12c?
Unfortunately, Weblogic server 12c doesn’t support database versions below 11.2.0.4, which will require an existing 11g R2 (11.2.0.2) to be upgraded. This upgrade (patch, full installation) is only available for customers with valid support subscriptions, hence the best option available is installing Oracle 12c database in order to setup Weblogic 12c with Forms and Reports 12c
Part 1 – Oracle database 12c Installation
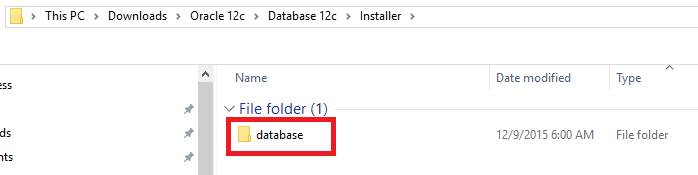
The software package you download will have 2 zip files & You must extract both the zip files to a single folder
For example, as you could see with the above image, I have two zip files for the Oracle database and have created a folder called “Installer”. I extracted the 1st zip file inside the “Installer” folder (by pointing to the extract folder explicitly, else usually the unzip utility will create a folder within “Installer” with the zip filename. Make sure once after the extraction, under “Installer” folder, you have ONLY ONE folder called “database”
Now extract the 2nd zip file to “Installer” folder, and Windows will merge the folders and finally you should see within “database” folder items as listed below
Failing to follow the above will fail your attempts to install the database. You will see few images below those are due to extracting zip files into different folders
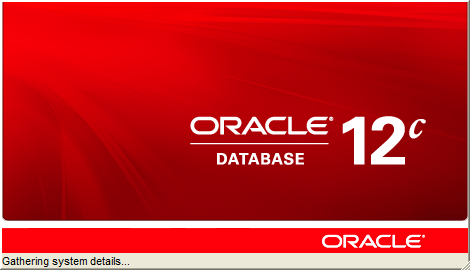
Execute the setup.exe
You don’t have Oracle support, so uncheck the “I wish to…” and smile at the warning that Oracle never forgets to display
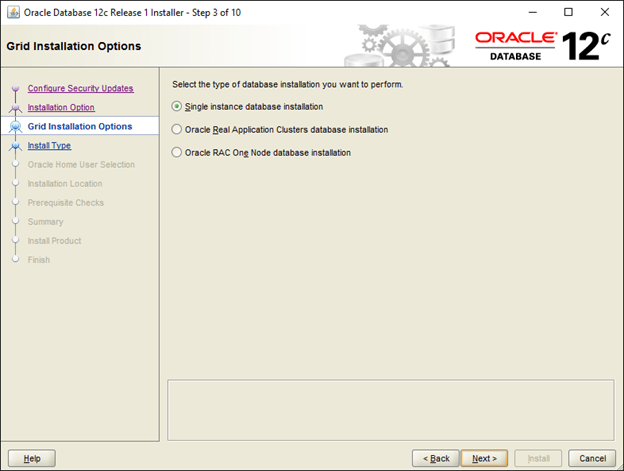
Recently I realized that creating a database once after the Oracle software installation gives me more options to setup archive logs, automated backups etc. So I will proceed with “Install software Only” option
Add the languages you want to use with the database
Oracle has a new approach with who starts the Oracle software in Windows environments and I think it is better to have a dedicated user to start the Oracle services, which provides better security. I created a user called “Oracle” and my password is:
Old fashioned, I prefer the database installation path to start with “Oracle”, hence I chose “D:\Oracle” for the installation. You can accept the default and proceed with the installation
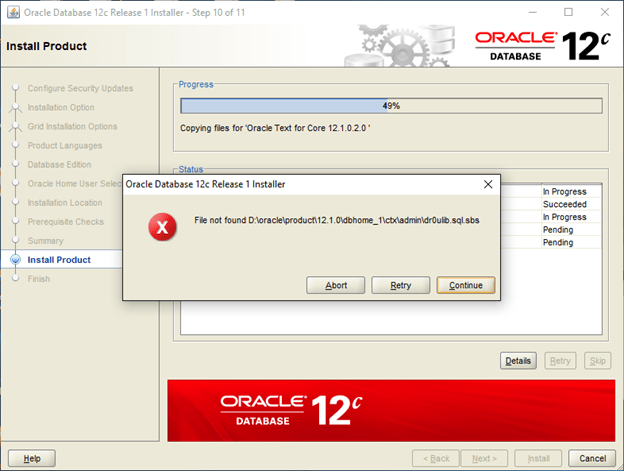
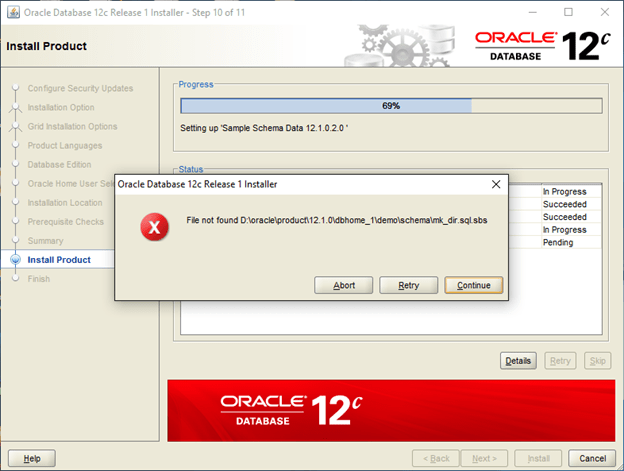
Now, comes the errors related to “missing” files, which are due to the wrong extraction method I have mentioned by the beginning of this post. You get a number of read errors for files with strange names…
Once you extracted the files as suggested into a single folder, the Oracle database software installation should progress without giving any kind of errors, keep accepting the JAVA security prompts
Very easy, no hacking at all involved with the installation. Usually a novice (and ME) could get confused reading Oracle’s documents asking the user to extract the zip files to a single folder ;)
Once the software installed, use DBCA to create a new database.
Update Part 1a (1st of March 2017)
Sorry guys, I started getting couple of inquiries about the database parameters for repository database used by 12c Middleware & as I followed multiple documents to setup my environment, didn’t feel that I should exclusively add the database parameterization with my initial post. So, I am adding it with the post for your references
“Oracle” strongly suggests that the repository for Middleware should have “AL32UTF8” as the character set. Hence, while creating the database, please make sure you select the same for your repo database. If you are migrating a legacy application that has issues with this particular character set, I suggest you create a smaller size database exclusively for the Middleware repo and create another database for your application that uses a different character set.
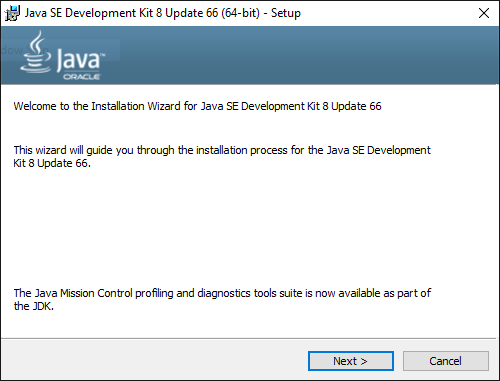
Part 2 – JDK Installation
Download and install JDK 8 (Preferably to a folder like C:\Java, D:\JDK) etc. Shortest the path will help you to easily configure many things at later stages. If you have earlier versions of JRE for some specific reasons, deselect JRE from the feature listing
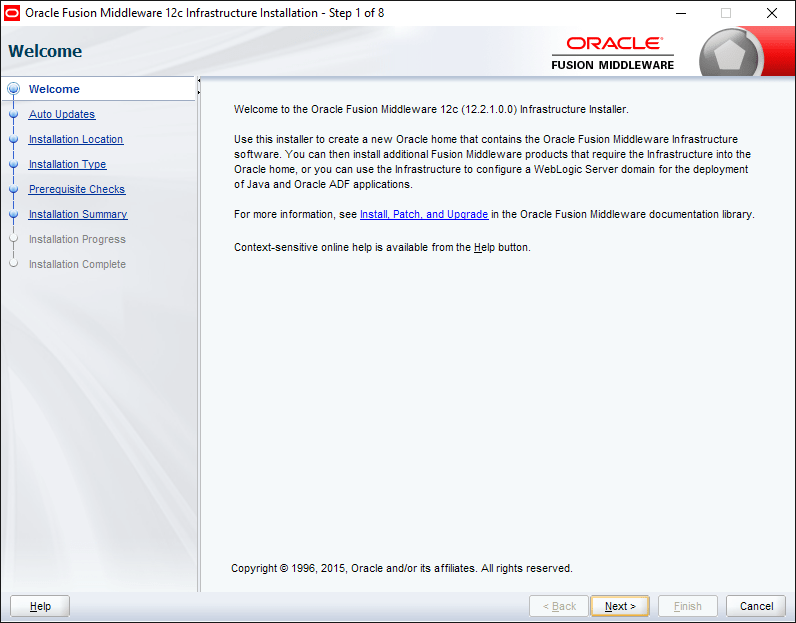
Part 3 – Weblogic 12c Installation
Once again, Weblogic 12c doesn’t require any specific hacks for installation in Windows 10. Switch to the folder from command prompt where you downloaded “fmw_12.2.1.0.0_infrastructure.jar” and call java to install the package. Please check the below image for details
(I’m leaving the images untouched, so that you will able to see possible errors we can make while typing in commands)
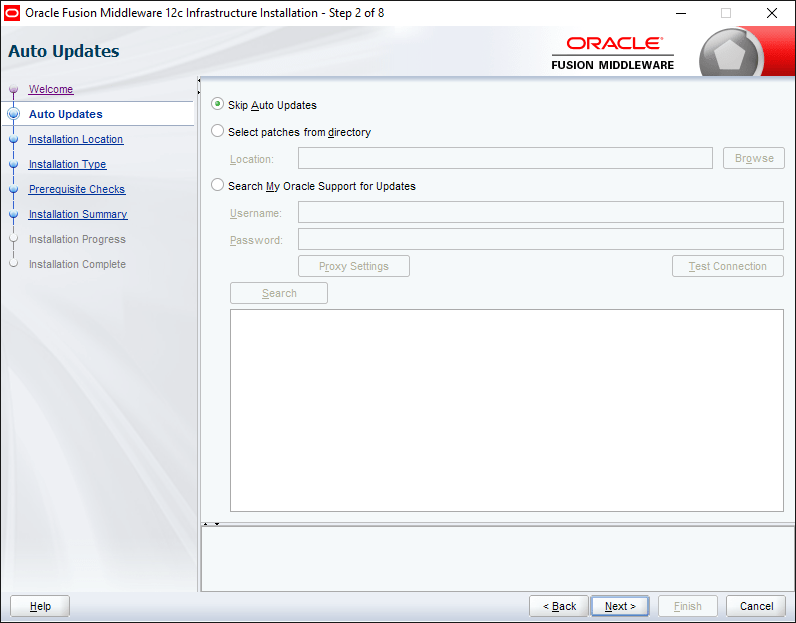
As usual you will skip the updates
Structuring Oracle Home is going to be a logical call, if you are familiar with Oracle’s suggested folder structure, go with it. Usually I install Weblogic in a folder like C:\Weblogic or D:\Weblogic
Now select the first option, Fusion Middleware Infrastructure
Skip the below, and the installation should be completing within few minutes time without making any errors.
Part 4 – Forms & Reports 12c Installation
Forms 12c allows a stand-alone installation, however, our requirement is to deploy applications through weblogic server. Hence we will be doing the standard installation processes facilitating the application deployments.
As usual We will skip auto updates
Make sure you select the same folder where you installed WebLogic server for “Oracle Home”
Select Forms and reports deployment
It could take a while until the installation is completed. Usually the total installation process never errors out. I hope the same for you also :)
Part 5 – Create a REPO(?!)
As I mentioned earlier, I am not a Weblogic geek, Oracle says a database repo is required for Weblogic 12c, so I created one as per their instructions & I suggest you better do that as well ;)
Browse to your “D:\Weblogic\Middleware\Oracle_Home\oracle_common\bin” folder and execute rcu.bat file as “Administrator”
The creation of repo is pretty straight forward
Make sure your database & listener services already started and you can TNSPING, connect to the instance using SQL etc, to insure that the repo creation will NOT fail
Fill in your database instance details (Service name, host name, PORT etc)
If the utility could establish a connection to the database, you will be taken to rest of the configurations in next steps.
By default when you are trying to create your 1st repository (for each new domain, you must create a new repo, there were claims that someone managed to use the same repo with his 2nd domain as well, however, 1st domain being offline) You will be offered to create a new prefix, by default ‘DEV’. You can change it to JON, MARTA or PROD according to your requirement. Just make sure that you note it down or remember it while configuring your forms and reports instance at later stages
Select the components as seen with the image below (The selected are mandatory to configure forms & reports domains)
Use a single password for all the schemas those will be created as a part of the repo creation. I have used the same password across 12c products. For a lab, it is okay, however when you are deploying the solution for production environment, follow the recommendations for passwords. I created a password like “Abcprod123”, it has CAPITAL letter, lowercase letters & numbers
That’s all, you have created a new repo for your new domain that you will create later.
Part 6 – Configure your forms & reports domain.
Most important
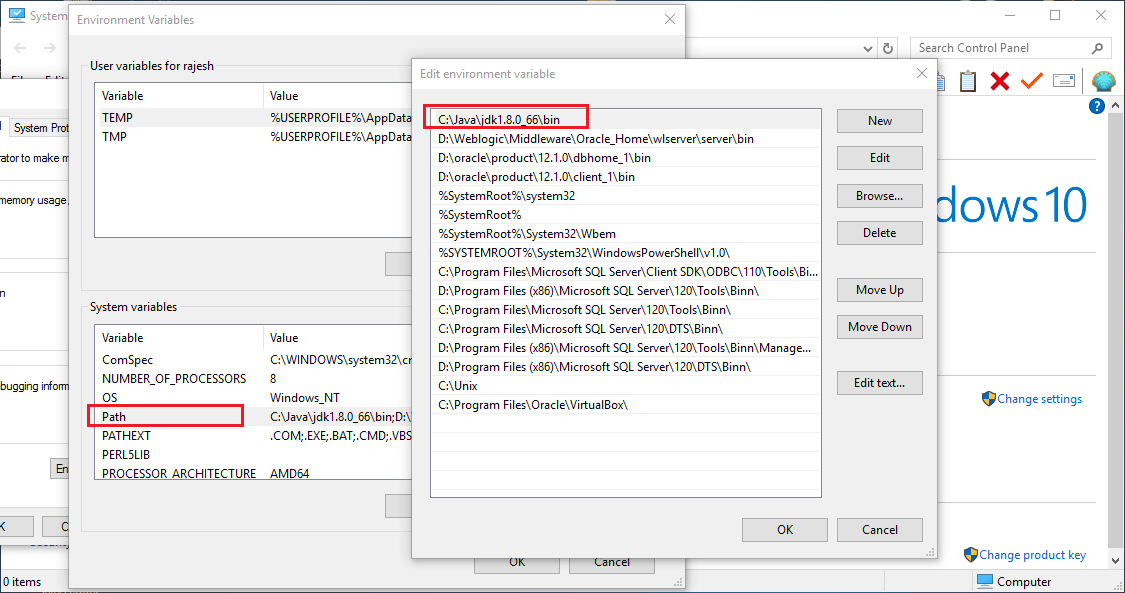
Make sure your PATH environment variable has your JDK\bin folder as the first value, else you will NEVER manage to get your forms and reports builders configured properly, Oracle has made sure of it ;)
Check the below images and cross check your computer’s PATH value
You can start the “config.cmd” either from the start menu or from the “D:\Weblogic\Middleware\Oracle_Home\oracle_common\common\bin” folder (Please change the path according to your installation preferences, for example I opted “D:\WebLogic” for my WebLogic server installation and rest of the paths were created automatically during the installation process)
Select the default “Create a new domain”. You will see that “base_domain” folder is selected by default, which you can change according to your requirement.
Select the component for your domain (Select all the components listed with the image below)
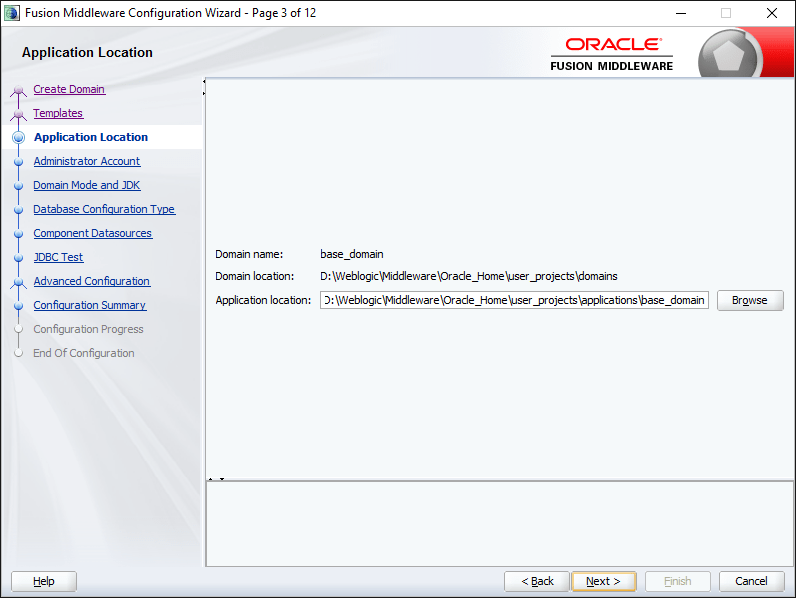
You will be provided a window showing your current domain name, physical location etc
Leave the Weblogic account name as “weblogic” & supply an Alpha Numeric password for the account
Select Production & keep the JDK pointed towards your specific JDK installation, which is automatically selected.
Now you have to supply the repo details you have created earlier. Make sure you are not making mistakes with supplying the details & click “Get RCU Configuration”
You can proceed to next level only once after populating the RCU Configurations, if errors you will not able to proceed
Make sure all the listed elements hare having same Service, HOST, PORT names and the password columns are automatically filled. If any one of the listed row has different value, cancel the installation. It means you made some mistakes while creating the repo.
Once the repo connectivity confirmed, you will be provided a number of components those you could configure as the part of the forms & reports configuration.
Select the components as shown with the image below
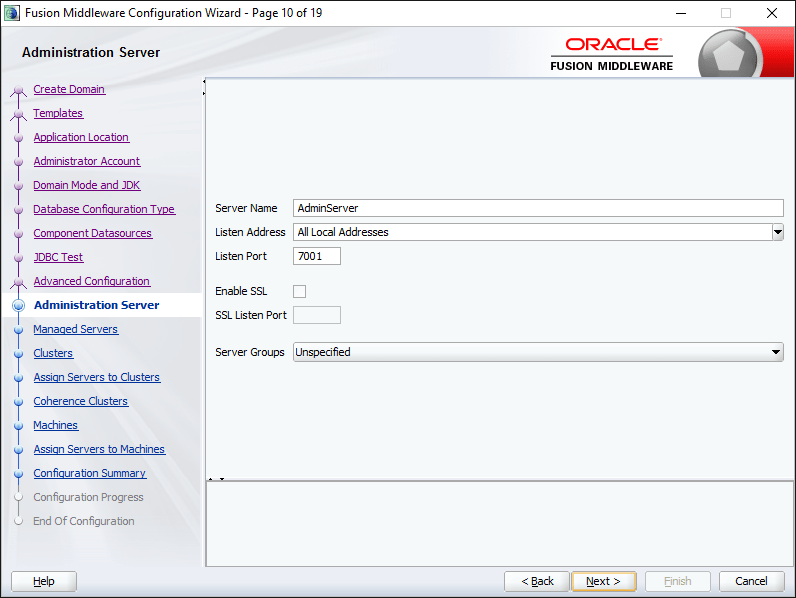
Accept the defaults for Administration Server
Next screen you should be shown two components
WLS_FORM
WLS_REPORTS
Accept the defaults
You need to add the “AdminServer” from the left pan “Servers” to the node under “Machines”
This page, as we select OHS as a component, you should add one OHS instance using the Add Button and give it a meaningful name like “ohs1” or “ohs_1”. Make sure the Component Type is “OHS”
You may enter localhost as Listen address for the ohs instance in the next page.
Now add the “ohs1” component from the “System Components” to “Machines” Node
Click the “Create” button to start configuring the forms & reports domain
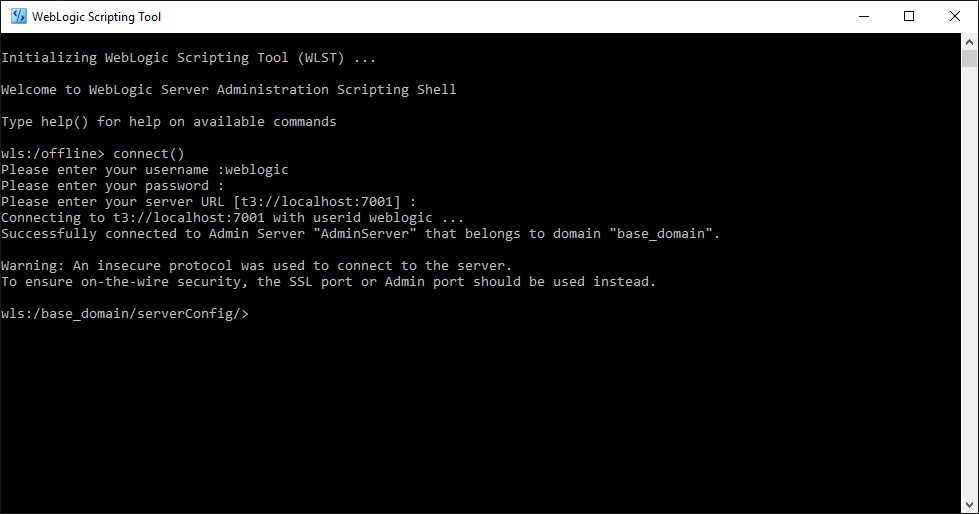
Once the configuration is over, you will be provided a confirmation screen as seen below. Don’t close this window. We need to perform few more stuffs prior finishing the configuration, said you can close this window by clicking the “Finish” button, just make sure that you have copied the URL, and the foot note shown by the bottom of the window. That note clearly asks you to execute a specific command using WebLogic Scripting Tool, for OHS
Start the node manager from your newly created domain\bin folder (Check the below image for details)
Now, you need to start the weblogic server. When prompted, supply your weblogic username and password
Logon to the WebLogic Admin server console and start the WLS_FORMS & WLS_REPORTS servers, this will trigger setting up much of the start menu components for your installed products, else missing.
Keep monitoring the weblogic server window, Once the server enters into RUNNING mode, you will notice that items are getting added to “Oracle FMW 12c Domain -base_domain” Start Menu folder.
Now you have to start the Weblogic scripting tool & run the instructions provided with the last Window of forms and reports configuration
Please see the below image(s) for details
OHS instance should get activated and updated without any issues by the end of the process.
Now you can close the last window of forms & reports configuration and access Weblogic console & Enterprise Manager through the following URL(s)
You can use the EM console to start your OHS instance (OPMN depreciated) as well. Once started, the OHS instance will be configured to start automatically.
Now We will create the Node Manager Service for Windows. Please check the below image for details
I’ve used “NSSM – the Non-Sucking Service Manager” to create the Weblogic Admin Server Service. You can download NSSM from here. Issue a command like nssm.exe install “WebLogic Admin Server” will popup a GUI where you can select the “….\Oracle_Home\user_projects\domains\base_domain\bin\startWebLogic.cmd” as the executable for the service.
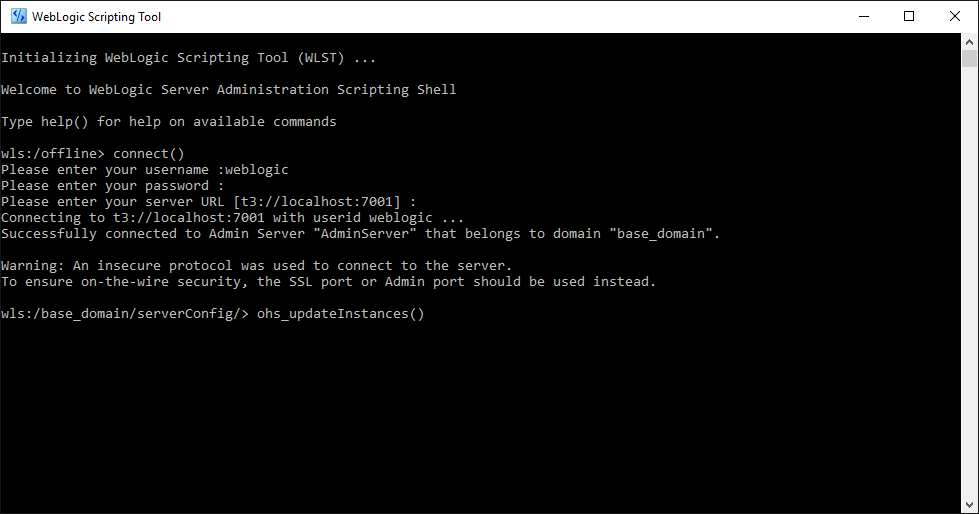
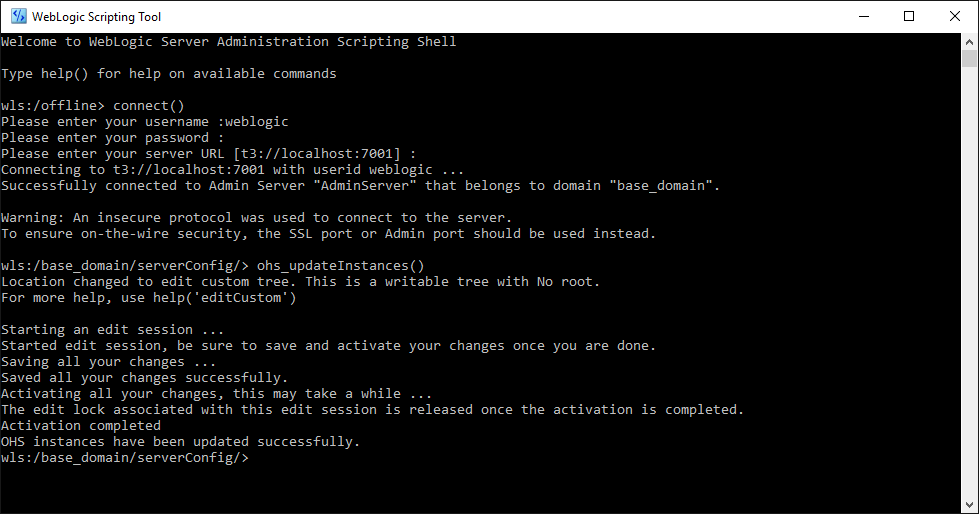
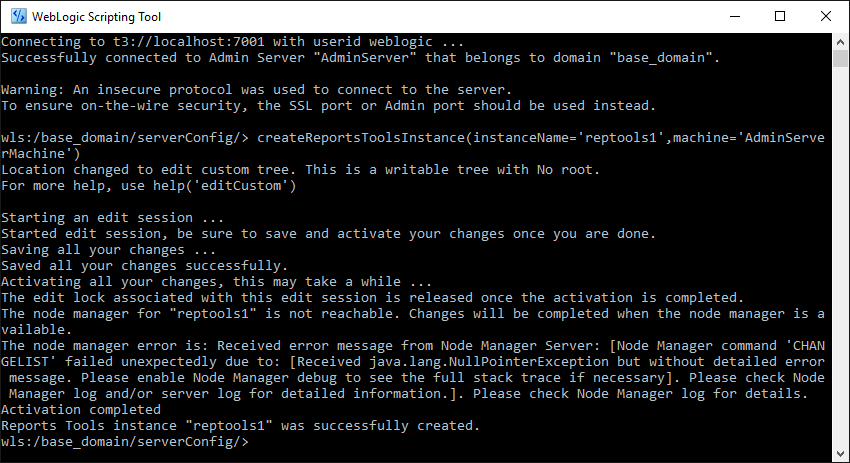
Now, we will configure the last element in this configuration section, Reports Tools instance so that you can start using the report developer 12c. From Weblogic Scripting Tool Console, you can create a new tool instance. Please refer the below image for details.
Restart the WLS_REPORTS server using Weblogic Admin console and the reports tool will be configured once after the WLS_REPORTS enters RUNNING status
While the Forms developer could be invoked from the Start Menu folder “Oracle FMW 12c Domain -base_domain”, calling reports builder is pretty awkward. You have to browse to “…\Oracle_Home\user_projects\domains\base_domain\reports\bin\” and execute the batch file “rwbuilder.bat”. Better, you create a shortcut for the batch file on your desktop.
So, that concludes the 1st level installation and configuration of 12c database, WebLogic, forms & reports. I will get back to the thread, with details about how to configure forms and reports elements and deploy modules at a later time.
Updated 8th November 2019
I just realized that I never linked the configurations thread with this post and doing it right now. You can access the thread that explains how to setup/configure Weblogic Classic Domain for deploying Oracle Forms & Reports application through the below link
This is my first post for the year 2016. Actually I have more drafts than posts this time with me and I truly hope that I will able to finish all of them in few weeks time. I’m sure you are interested about Oracle 12c products on Windows platform. Stay tuned, am on it
Coming back to the topic, I have a decent desktop computer that could be called a “half server” with the following configurations
i7 processor 2nd generation
16GB DDR3 memory
Around 4.5-5 terabyte of storage
windows 10 64Bit Professional
I came across VMWare always 8 years back, liked it, and used it until they started charging for everything. Then Oracle VirtualBox (Earlier JAVA VirtualBox) started giving tough fight and it has become quite famous among developer communities where NOT many were truly able to afford VMWare’s paid software.
VMWare is altogether a different standard made for sophisticated environments, hence we will never compare both the products here. Our intention is to point you towards the advantages of using Virtual Machines that could less clutter your rig, give you better exposure to different technologies and a bit of networking etc
So our product of interest for this post is Oracle VirtualBox and we will see how we can utilize our existing desktops/laptops to run multiple virtual machines at the same time and thus utilize the available hardware to the maximum extends
So prior attempting to virtualize your existing computer, you need to know what kind of hardware you have and whether your computer meets minimum requirements to support virtualization.
So today is 3rd January 2016 & if your computer is 4 years old or less, 99.9% chances that your rig sure supports virtualization. Most of BIOS comes with the virtualization enabled by default.
Yet we should make sure that our computers support virtualization. Read the instructions provided here to find out whether your current processor supports virtualization OR
Just install Oracle VirtualBox and try to create a VM. You will immediately come to realize whether your rig really supports virtualization ;)
Well, that’s the brute force way of doing stuffs, adapt the one that defines you. If you are using Windows 10, I’ve noticed that many default installations enable Hyper-V by default. You need to disable it from add remove windows features console, so that you can create 64Bit VMs using Oracle VirtualBox. This post explains how to enable it, just do the opposite to disable it
Before anything else, you need to identify your processor, it’s capabilities. A nice comparison is available here for i3, i5 & i7 processors and definitely, the author favors i7 processors. Please spend few minutes to read about the differences between these three different processors.
What the difference between Core i3, i5, i7: Hyper-Threading
A thread in computing terms is a sequence of programmed instructions that the CPU has to process. If a CPU has one core, it can process only one thread at once, so can only do one thing at once (as before, it’s actually more complex than this, but the aim here is to keep it simple and understandable).
Hence, a dual-core CPU can process two threads at once, a quad-core four threads at once. That’s twice or four times the work in the same amount of time.
Hyper-Threading is a clever way to let a single core handle multiple threads.
A Core i3 with Hyper-Threading can process two threads per core which means a total of four threads can run simultaneously. The current Core i5 range doesn’t have Hyper-Threading so can also only process four cores. i7 processors do have it, so can process eight threads at once. Combine that with 8MB of cache and Turbo Boost Technology, and you can see why it’s good to choose a Core i7 over an i5 or i3.
Now, you should know how much physical memory you have. More, the merrier. Starting with Windows 7, computers started shipping with a minimum of 4GB as a standard. So, 4GB is enough for your OS and proposed virtualization? It’s going to be a tight fit. I will suggest an additional 4GB minimum, making the total physical memory 8GB so that you won’t have to sacrifice performance.
Finally the storage. Most of the branded PCs and laptops are coming with 500GB HDD as standard & extending the storage of a laptop is complex than of a desktop computer. For the later, all you need is another HDD which you can plug to one of the available SATA ports and configure. With a laptop, you may need to replace the HDD with a higher capacity one or use an external HDD for your additional storage requirements.
My current Virtualizations are mostly for Oracle technologies. I am a forms and reports developer, doing a certain level of .NET development & manage Oracle EBS R12 instances (“NOT a DBA”). Further I try almost all the database, weblogic versions & currently learning ASMM & RMAN. I have never attempted other areas of Oracle technologies, so my VMs run
Oracle EBS R12 cloned instances
Oracle database(s)
Oracle weblogic server(s) with forms and reports (supported)
My EBS R12 VM has the following configuations
8GB memory out of 16GB physical, 4 processor out of 8 logical processors & almost 850GB of storage out of 4.5 terabyte total storage. Our instance has 400GB database size, 175GB application instance & the VM responds to requests instantaneously once after scheduled jobs are completed after a restart of the application. Usually I find the application responding better after 3 hours of settling down & the performance is assured throughout days and weeks until a restart.
My Weblogic, database VMs have the following configurations
4GB memory out of 16GB physical, 4 processor out of 8 logical processors & almost 250 GB of storage out of 4.5 terabyte total storage. I have my weblogic VM running 11gR2 64bit database as well. I get instant responses from both the Weblogic server and Oracle database 11gR2 from a client system, whenever accessed
Recommendations
Even though you can run multiple VMs at the same time, I would suggest, based on your hardware, limit them. Example
When I run my EBS R12 VM (8GB memory, 4 processors) my HOST computer is left with only 8GB free memory and 4 logical processors. If I start a Windows XP VM (2GB memory, 2 processors) to check the application performance, I feel my rig start slowing down and couple of times my computer shutdown with a high thermal point.
So make sure that you do tweaking to your VMs in order to make sure that your HOST doesn’t breakdown due to overload.
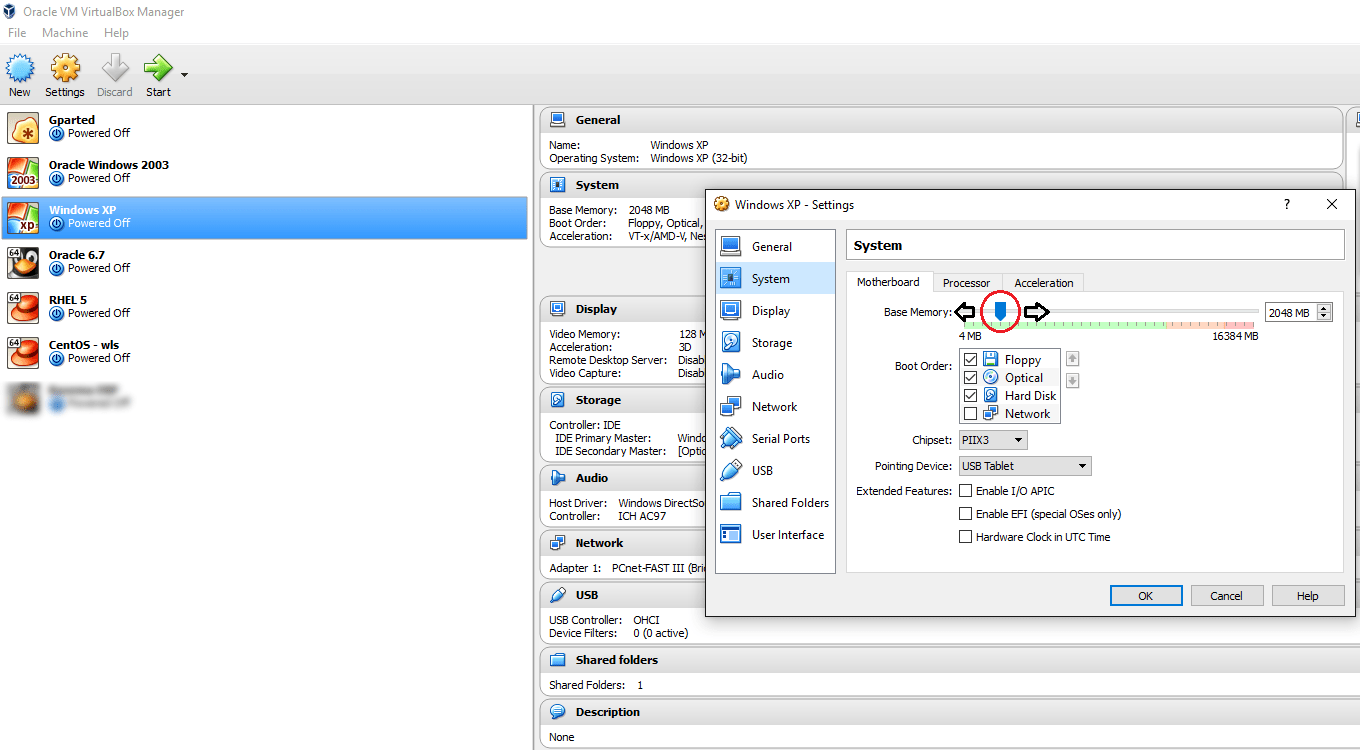
I always make sure that my HOST always has half of the hardware resources reserved for it, ie, 8GB memory, 4 processors regardless how many VMs I run at the same time! This is by using the VirtualBox console to alter the parameters of VMs before they are started
All the settings for the VMs could be altered using the settings, like increasing or decreasing the memory, processors, adding and removing storage devices etc.
Below you watch how fast my VM running EBS r12 responds to requests from another VM running Windows XP
Advantages of using Virtualization
The most important advantage for me is: I’ve a less cluttered HOST, said, I am NOT installing all the technologies to one OS, breaking it with conflicting versions of services and libraries and processing load.
Other advantages
I can backup (copy) my entire “machine” and restore it during a total mess up or loss of data, rather than rebuilding the entire computer
I get a sand-boxed environment & without fearing my attempts will break my main OS, continue the experiments
I can make a VM, for example, running Oracle Enterprise Linux, copy and keep the OS installed disk somewhere and copy it to new VMs whenever required! Say, you install the OS only once and whenever you need to create a new VM with same OS, just duplicate the disk that has the OS! (Make sure you make a backup of the OS disk prior installing and configuring additional software into it)
Finally my suggestions for you, in case if you are considering to build your 1st VM using Oracle VirtualBox
Majority of the Oracle geeks prefer Linux against Windows for database, weblogic deployments. So if you are NOT familiar with Linux, I suggest you start learning, regardless whether you FEEL very comfortable with it or NOT. You may be joining a firm that has reservations towards Windows OS running Oracle products, especially Oracle DBAs who have valid points like block corruptions, difficulties to recover from a crash are complex in the case of Windows OS.
Install OS in a separate disk. 40GB dynamic size should be more than enough for any recent Linux distros. Avoid Linux 7 if you are truly new to Linux. Oracle Linux 6.7 should be your friend.
Install 64Bit OS, so that you can take the advantage of your 64Bit processor and physical memory
Install Oracle supported Linux distros (RHEL, OEL & certain versions of Debian. CentOS is not at all supported)
Install the complete desktop, you are hardly going to complete the installations on pure CLI mode.
Add SCSI interface to your VM and for Oracle database etc, use SCSI disks. I had a huge argument with VirtualBox guys about the performance difference between SATA VDI disks and SCSI VDI disks. I found the SCSI VDI disks performing better, however I was dismissed saying as far both the types are created on the same HDD, it must be more psychological :O
Use 1TB 7200 RPM disks in the place of 2TB 5400 RPM disks. Later ones are best for data storage, when the previous ones give you better I/O. Create fixed size VDI for databases & applications, that means you will NOT able to increase the size of the disk once after created, however, it gives you faster I/O and better performance.
Update your OS. As soon as the VM is built, update your OS prior installing database, weblogic etc. RHEL will NOT allow you to update the packages without subscription, hence Oracle Enterprise Linux should be your best choice of Linux distro. Please note, you shouldn’t use Oracle Linux in a production environment without acquiring sufficient licenses. Whatever I suggest here are limited for study/evaluation purposes and I don’t encourage any kind of illegal usage of software!
Use Oracle’s pre-install packages to install database, EBS etc prerequisites rather than trying to download individual components from different download sites.
Use shared folders between HOST and Guest (VM) so that you don’t have to sacrifice storage. Not just that, when you want to keep the backup of some files from the VM, the shared folders will make it as easy as possible
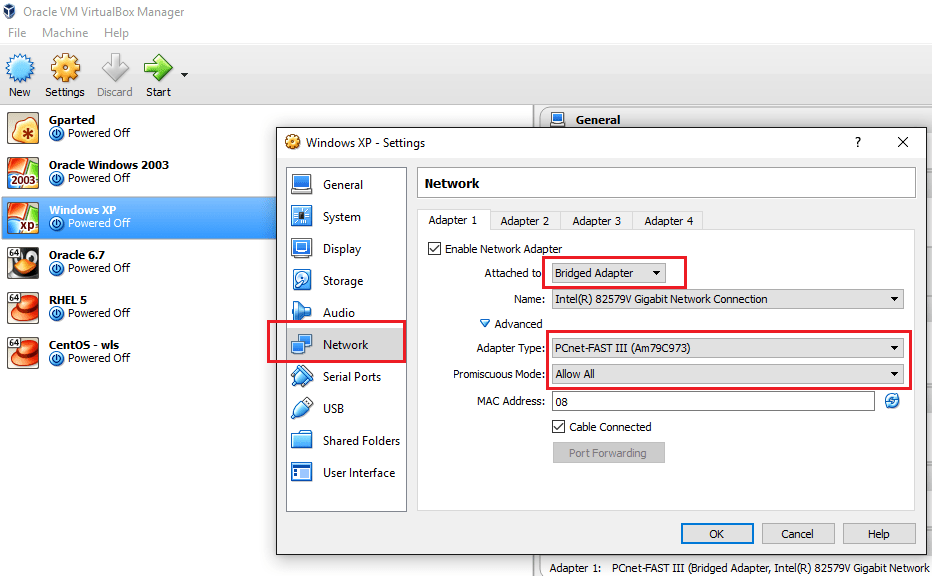
Use bridged network, with Promiscuous Mode “Allow All” so that you can communicate with the VM from network
Disable IPV6, firewall, SELinux on your Linux VM
If you creating a Windows VM, I’m sure you better know how to configure your guest so that you can access it from a network.
Finally recommendations for a DESKTOP computer to try virtualization
i7 processor + good quality heat sink. Your HOST and VMs are going to create loads of heat!
16GB Memory (DDR4 is the new standard, do not ignore it)
1×2 TB HDD
Few years back, such a configuration looked impossible for me, well, I saved bit by bit and made my dream computer. I’m sure you can also do it :) & trust me, a good computer opens a new world for you.
All the best and wish you all a very successful year ahead!