This post was last updated on 24th March 2025. One of the visitors commented that VBS was disabled by turning off Tamper Protection. I received a confirmation from other visitor, using Windows 11 Home Edition.

This post was last updated on 5th February 2025 to confirm that the below hacks are not applicable for Windows Home Editions. If we come across any, will duly share them. Cheers!
This post was last updated on 27th January 2025 to include additional information with another laptop HP Probook 450 G10 running Windows 11 23H2 and VBS was already enabled when we received this device at work. I observed the below while disabling VBS on the same.
- No need to disable Kernel DMA Support
- Secure boot disabled
To disable VBS, this time I approached the below sequence
- Disabled Core Isolation->Memory Integrity->Reboot
- Ran Device Guard Readiness script with switch “Disabled” (Explained below)->Reboot. Accepted the prompts to disable both Credential Guard & VBS opt-outs and VBS was disabled completely.
This post was last updated on 15th January 2025 to include my experiments with a new Dell G16 7630 gaming laptop that I changed my six years old laptop with. For the same, I have disabled 2 things on BIOS prior continuing with other attempts from the OS.
- Kernel DMA Support
- Secure Boot
Once again, the methods that I listed below should only be referred as workaround solutions and you must let Microsoft handle such stuffs the best ways it suits to offer maximum security and stability for your devices.
I use virtual machines almost everyday & recently I took the risk of upgrading my finely tuned Windows 11 23H2 development laptop to 24H2 using my insider account. The upgrade was smooth without any troubles and none of the existing software that I use reported issues. Then I wanted to use my virtual machines!
As usual, multiple security related features are added or enhanced in 24H2 build and many of them are totally depending upon Hyper-V, Microsoft’s own virtualization platform. So, after a successful upgrade to 24H2, don’t be surprised if your find Hyper-V running in the background while so called “Windows Features are still disabled for it”. Read more about VBS here.
As our primary objective is to disable the VBS so that we can go back with our virtual machines, you should know the most disappointing thing at this point, there are no toggle switches available to completely disable VBS. You have to toggle few switches, run some scripts, fiddle around with group policy etcetera to get the task done.
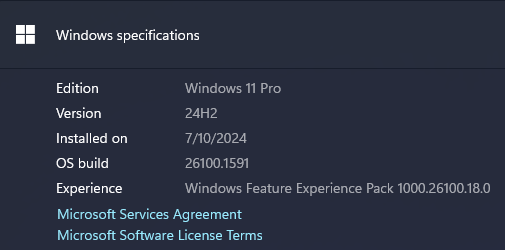
You can use good old “System Information” to check whether VBS is running/enabled. I’ve enabled VBS once again to demonstrate how to disable it for this article. Please note, depending upon your hardware, you may see few or more details than that are visible in the picture below.

As per the system information gathered, my computer is currently enabled with VBS. This laptop has a TPM 2.0 chip & UEFI secure boot disabled.

Based on whether the secure boot is enabled, disabling VBS can become pretty complex. I will share some links to Microsoft articles explaining how to deal with such situations as well.
First we will see how to disable the virtualization based security when the secured boot is disabled. Go to “Settings->Privacy & Security->Device Security”
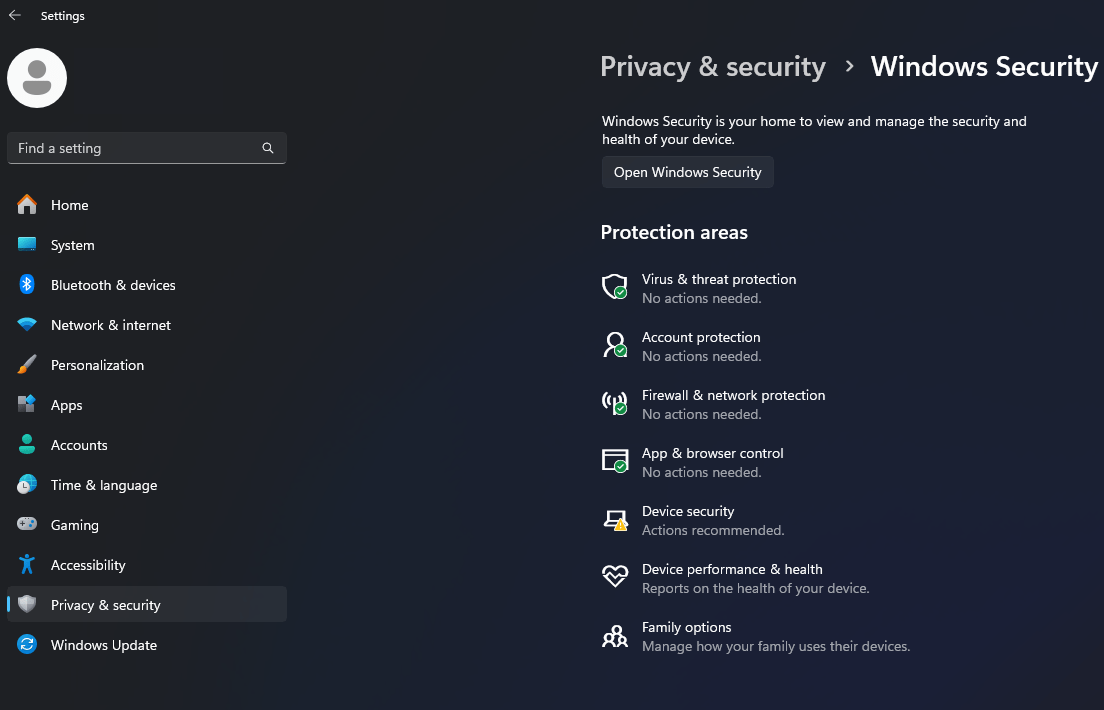

Toggle the Memory integrity to turned off.

Reboot & check whether the VBS is disabled. If not, proceed to next step.
Go to this link Download Device Guard and Credential Guard hardware readiness tool from Official Microsoft Download Center, download the archive file and extract it to a folder.
Before trying to execute the PowerShell script, make sure the execution policy has been set as “unrestricted”. Without, the script will execute and show some information, that wouldn’t really tell you what went wrong.

Now open an elevated command prompt/PowerShell, switch to the path where you have extracted the file that you downloaded earlier. If you are using PowerShell, switch to the path first then type the first couple of letters, for example “DG” and tap the tab key, that will fetch the full name of the script. Ignore the error messages.


Accept the prompts & restart your computer. Restarting is a must after every attempt. There will be two prompts asking you whether to disable two different features, which should be accepted. The first prompt asks for Credential Guard opt-out confirmation, that you should accept by pressing “F3” key.

The same will be confirmed in the next screen.

Now “Virtualization Based Security” opt-out will be presented. Once you again press “F3” to proceed.


Much of the times, this should resolve the issue & VBS should be disabled.
If the VBS is not yet disabled, try setting up the Group policy. I truly hope you know what you are doing!
Open group policy editor, Local Computer Policy->Computer Configuration->Administrative Templates->System->Device Guard->Turn On Virtualization Based Security->Disabled

Now restart your computer once again. Check whether the VBS is disabled or not.
Still having troubles? Let’s check few more things.
Run “System Information” once again & check the elements as marked in the image below.

If VBS is still running and “A hypervisor has been detected. Features required for Hyper-V will not displayed” is shown, it means Hyper-V is still running after the above exercises. We can try to disable Hyper-V from the boot now.
Open powershell/Terminal as Administrator & execute the following command.
bcdedit /enum | findstr -i hypervisorlaunchtypeIf running the command returns nothing, it means hypervisor is turned off in the boot & fixing the VBS looks almost impossible (in case if all the above were already tried). On the other hand, if it returns one of the below
- hypervisorlaunchtype Auto
- hypervisorlaunchtype On
Then you still have a chance to fix the VBS issues. Execute the below command in the same powershell session.
bcdedit /set hypervisorlaunchtype offReboot and check the system information window once again and you should see something similar to below image.

If VBS is shown as “Not Enabled” or “Not Running”, then you are all good. Now, the million dollar question is, should you disable Hyper-V at all? Windows is building many features on top of Hyper-V that will provide a sandboxed environment for the OS. Tomorrow, Microsoft might decide not to let the users disable Hyper-V using hacks. Regardless, let us all hope Oracle VirtualBox or VMWare tweaks their hypervisors so that they can coexist with Hyper-V and still ensure the same performance.
Let’s see what Copilot has to tell us about the potential risks associated with disabling VBS

References
- https://superuser.com/questions/1778061/green-turtle-snail-mode-slow-performance-indicator-on-virtualbox-vm
- https://www.elevenforum.com/t/virtualization-based-security-cannot-be-disabled-in-23h2.25259
- https://learn.microsoft.com/en-us/windows/security/identity-protection/credential-guard/configure?tabs=gpo#disable-credential-guard
- https://www.elevenforum.com/t/enable-or-disable-hyper-v-in-windows-11.4177/
- https://learn.microsoft.com/en-us/troubleshoot/windows-client/application-management/virtualization-apps-not-work-with-hyper-v
- https://answers.microsoft.com/en-us/windowserver/forum/all/features-required-for-hyper-v-will-not-be/3be3baeb-2d32-4a2a-8b8f-93501e620338?page=2
- https://learn.microsoft.com/en-us/answers/questions/1693500/hyper-v-processes-still-running-after-being-disabl
- https://community.broadcom.com/vmware-cloud-foundation/discussion/disabling-hyper-v-hypervisor-on-windows-11-pro-host-to-get-vmware-17s-cpl0-vs-ulm-monitor-mode
- https://pureinfotech.com/install-windows-subsystem-linux-2-windows-10/
- https://learn.microsoft.com/en-us/answers/questions/1336873/how-to-solve-wsl-service-createinstance-createvm-h