I am going to migrate a database called “OPMS” from SQL Server 2008 R2 express edition to Oracle database 11g R2 64Bit. You can safely try the same with Oracle 19c multitenant database also.
Please note, the JDBC driver fails to connect to the SQL Server using Windows Authentication, hence you must define a login with for your database, change the instance authentication methods to mixed in order to establish a successful connection.
As you could see with the above image, I don’t have any connections to Oracle database defined.
For the database migration, We must define two connections. One connection using SYSTEM user & the 2nd connection using MWREP user that we will create in like following
DROP USER MWREP CASCADE
/
CREATE USER MWREP IDENTIFIED BY mwrep
DEFAULT TABLESPACE BAYAN
TEMPORARY TABLESPACE TEMP1
QUOTA UNLIMITED ON BAYAN
/
GRANT DBA,CONNECT,RESOURCE TO MWREP
Once the migration is over, you may drop this repository safely. Hence don’t worry about the grants given to the new user. I failed to successfully get the things done properly without DBA role assigned to this migration schema
I’ve struggled hours to understand why the “tables” were not created as a part of the migration process which said “Successfully completed” after the execution and my probing through the log files pointed towards a schema OPMS not existing in indirect wordings.
(I’m pretty sure that I missed something & the intended schema was NOT created during the migration process run. Regardless, creating the Schema manually gives many tuning choices like tablespace selection, quota setting etc)
So, to get the migration work successfully, you need to create a schema with the the same name of your SQL Database. In my example the SQL database name is “OPMS”, the same I pre-defined with the Oracle database, although the script generated by the migration has DDL for creating the user against default tablespace “USERS”. Well, I didn’t want my OPMS schema using “USERS” tablespace…
I created the OPMS user as below
DROP USER OPMS CASCADE
/
CREATE USER OPMS IDENTIFIED BY opms
DEFAULT TABLESPACE BAYAN
TEMPORARY TABLESPACE TEMP1
QUOTA UNLIMITED ON BAYAN
/
GRANT DBA,CONNECT,RESOURCE TO OPMS
I am all set to start the migration now, so should be you!
Created a new connection for user “System”
Created another connection for “MWREP” user, which will hold the migration repository
Now we have to create the migration repository. Right click on the MWREP connection and expand Migration Repository, then Associate Migration repository
Progress
Finished
If the repository association fails for any reasons, you have restart by dropping the migration schema that you have created and go through the steps once again.
As I have completed creating the migration repository, next step is to connect the SQL developer to MS SQL Server (in my case SQL Server 2008 R2 Express edition)
So you have all the 3 connections required for the migration now.
As soon as you connect the MWREP, you will notice that Migration Windows showing an entry like seen with the below image
Now we will start the migration.
The welcome screen provides you an overview of the activities those will be completed for the SQL database migration. Move ahead
By default your migration repository will be selected, however cross check it and click “Next”
Provide a meaningful name for your Project and Select output directory
Make sure you have selected the correct Source database
The default database for the currently connected SQL database user will be selected by default for capturing. Confirm and click next
Under the convert step (6), make necessary changes. Refer the image for more details
A number of objects will be selected, unless you are pretty confident about objects you don’t want to migrate, leave the default selection intact.
Select the “System” connection for Target Database
Make sure you select SQL connection for source and MWREP connection as target in the move data step (9)
Click finish & the migration immediately starts. Depending upon the size of your source database it may take while for the process to create and move data between the technologies.
Progress
Create a connection to Oracle database for the newly created (We created the OPMS schema prior the migration) schema & verify whether the objects were created by the migration process.
This is my first post for the year 2016. Actually I have more drafts than posts this time with me and I truly hope that I will able to finish all of them in few weeks time. I’m sure you are interested about Oracle 12c products on Windows platform. Stay tuned, am on it
Coming back to the topic, I have a decent desktop computer that could be called a “half server” with the following configurations
i7 processor 2nd generation
16GB DDR3 memory
Around 4.5-5 terabyte of storage
windows 10 64Bit Professional
I came across VMWare always 8 years back, liked it, and used it until they started charging for everything. Then Oracle VirtualBox (Earlier JAVA VirtualBox) started giving tough fight and it has become quite famous among developer communities where NOT many were truly able to afford VMWare’s paid software.
VMWare is altogether a different standard made for sophisticated environments, hence we will never compare both the products here. Our intention is to point you towards the advantages of using Virtual Machines that could less clutter your rig, give you better exposure to different technologies and a bit of networking etc
So our product of interest for this post is Oracle VirtualBox and we will see how we can utilize our existing desktops/laptops to run multiple virtual machines at the same time and thus utilize the available hardware to the maximum extends
So prior attempting to virtualize your existing computer, you need to know what kind of hardware you have and whether your computer meets minimum requirements to support virtualization.
So today is 3rd January 2016 & if your computer is 4 years old or less, 99.9% chances that your rig sure supports virtualization. Most of BIOS comes with the virtualization enabled by default.
Yet we should make sure that our computers support virtualization. Read the instructions provided here to find out whether your current processor supports virtualization OR
Just install Oracle VirtualBox and try to create a VM. You will immediately come to realize whether your rig really supports virtualization ;)
Well, that’s the brute force way of doing stuffs, adapt the one that defines you. If you are using Windows 10, I’ve noticed that many default installations enable Hyper-V by default. You need to disable it from add remove windows features console, so that you can create 64Bit VMs using Oracle VirtualBox. This post explains how to enable it, just do the opposite to disable it
Before anything else, you need to identify your processor, it’s capabilities. A nice comparison is available here for i3, i5 & i7 processors and definitely, the author favors i7 processors. Please spend few minutes to read about the differences between these three different processors.
What the difference between Core i3, i5, i7: Hyper-Threading
A thread in computing terms is a sequence of programmed instructions that the CPU has to process. If a CPU has one core, it can process only one thread at once, so can only do one thing at once (as before, it’s actually more complex than this, but the aim here is to keep it simple and understandable).
Hence, a dual-core CPU can process two threads at once, a quad-core four threads at once. That’s twice or four times the work in the same amount of time.
Hyper-Threading is a clever way to let a single core handle multiple threads.
A Core i3 with Hyper-Threading can process two threads per core which means a total of four threads can run simultaneously. The current Core i5 range doesn’t have Hyper-Threading so can also only process four cores. i7 processors do have it, so can process eight threads at once. Combine that with 8MB of cache and Turbo Boost Technology, and you can see why it’s good to choose a Core i7 over an i5 or i3.
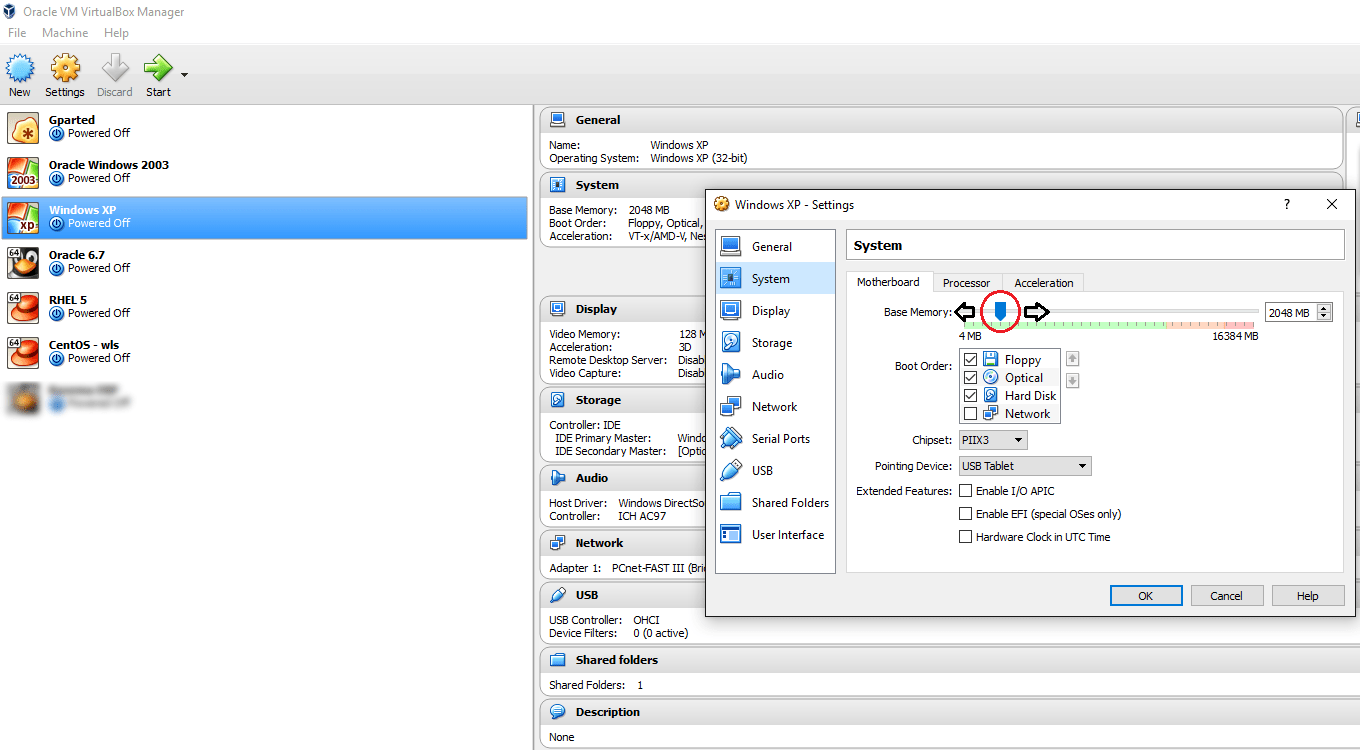
Now, you should know how much physical memory you have. More, the merrier. Starting with Windows 7, computers started shipping with a minimum of 4GB as a standard. So, 4GB is enough for your OS and proposed virtualization? It’s going to be a tight fit. I will suggest an additional 4GB minimum, making the total physical memory 8GB so that you won’t have to sacrifice performance.
Finally the storage. Most of the branded PCs and laptops are coming with 500GB HDD as standard & extending the storage of a laptop is complex than of a desktop computer. For the later, all you need is another HDD which you can plug to one of the available SATA ports and configure. With a laptop, you may need to replace the HDD with a higher capacity one or use an external HDD for your additional storage requirements.
My current Virtualizations are mostly for Oracle technologies. I am a forms and reports developer, doing a certain level of .NET development & manage Oracle EBS R12 instances (“NOT a DBA”). Further I try almost all the database, weblogic versions & currently learning ASMM & RMAN. I have never attempted other areas of Oracle technologies, so my VMs run
Oracle EBS R12 cloned instances
Oracle database(s)
Oracle weblogic server(s) with forms and reports (supported)
My EBS R12 VM has the following configuations
8GB memory out of 16GB physical, 4 processor out of 8 logical processors & almost 850GB of storage out of 4.5 terabyte total storage. Our instance has 400GB database size, 175GB application instance & the VM responds to requests instantaneously once after scheduled jobs are completed after a restart of the application. Usually I find the application responding better after 3 hours of settling down & the performance is assured throughout days and weeks until a restart.
My Weblogic, database VMs have the following configurations
4GB memory out of 16GB physical, 4 processor out of 8 logical processors & almost 250 GB of storage out of 4.5 terabyte total storage. I have my weblogic VM running 11gR2 64bit database as well. I get instant responses from both the Weblogic server and Oracle database 11gR2 from a client system, whenever accessed
Recommendations
Even though you can run multiple VMs at the same time, I would suggest, based on your hardware, limit them. Example
When I run my EBS R12 VM (8GB memory, 4 processors) my HOST computer is left with only 8GB free memory and 4 logical processors. If I start a Windows XP VM (2GB memory, 2 processors) to check the application performance, I feel my rig start slowing down and couple of times my computer shutdown with a high thermal point.
So make sure that you do tweaking to your VMs in order to make sure that your HOST doesn’t breakdown due to overload.
I always make sure that my HOST always has half of the hardware resources reserved for it, ie, 8GB memory, 4 processors regardless how many VMs I run at the same time! This is by using the VirtualBox console to alter the parameters of VMs before they are started
All the settings for the VMs could be altered using the settings, like increasing or decreasing the memory, processors, adding and removing storage devices etc.
Below you watch how fast my VM running EBS r12 responds to requests from another VM running Windows XP
Advantages of using Virtualization
The most important advantage for me is: I’ve a less cluttered HOST, said, I am NOT installing all the technologies to one OS, breaking it with conflicting versions of services and libraries and processing load.
Other advantages
I can backup (copy) my entire “machine” and restore it during a total mess up or loss of data, rather than rebuilding the entire computer
I get a sand-boxed environment & without fearing my attempts will break my main OS, continue the experiments
I can make a VM, for example, running Oracle Enterprise Linux, copy and keep the OS installed disk somewhere and copy it to new VMs whenever required! Say, you install the OS only once and whenever you need to create a new VM with same OS, just duplicate the disk that has the OS! (Make sure you make a backup of the OS disk prior installing and configuring additional software into it)
Finally my suggestions for you, in case if you are considering to build your 1st VM using Oracle VirtualBox
Majority of the Oracle geeks prefer Linux against Windows for database, weblogic deployments. So if you are NOT familiar with Linux, I suggest you start learning, regardless whether you FEEL very comfortable with it or NOT. You may be joining a firm that has reservations towards Windows OS running Oracle products, especially Oracle DBAs who have valid points like block corruptions, difficulties to recover from a crash are complex in the case of Windows OS.
Install OS in a separate disk. 40GB dynamic size should be more than enough for any recent Linux distros. Avoid Linux 7 if you are truly new to Linux. Oracle Linux 6.7 should be your friend.
Install 64Bit OS, so that you can take the advantage of your 64Bit processor and physical memory
Install Oracle supported Linux distros (RHEL, OEL & certain versions of Debian. CentOS is not at all supported)
Install the complete desktop, you are hardly going to complete the installations on pure CLI mode.
Add SCSI interface to your VM and for Oracle database etc, use SCSI disks. I had a huge argument with VirtualBox guys about the performance difference between SATA VDI disks and SCSI VDI disks. I found the SCSI VDI disks performing better, however I was dismissed saying as far both the types are created on the same HDD, it must be more psychological :O
Use 1TB 7200 RPM disks in the place of 2TB 5400 RPM disks. Later ones are best for data storage, when the previous ones give you better I/O. Create fixed size VDI for databases & applications, that means you will NOT able to increase the size of the disk once after created, however, it gives you faster I/O and better performance.
Update your OS. As soon as the VM is built, update your OS prior installing database, weblogic etc. RHEL will NOT allow you to update the packages without subscription, hence Oracle Enterprise Linux should be your best choice of Linux distro. Please note, you shouldn’t use Oracle Linux in a production environment without acquiring sufficient licenses. Whatever I suggest here are limited for study/evaluation purposes and I don’t encourage any kind of illegal usage of software!
Use Oracle’s pre-install packages to install database, EBS etc prerequisites rather than trying to download individual components from different download sites.
Use shared folders between HOST and Guest (VM) so that you don’t have to sacrifice storage. Not just that, when you want to keep the backup of some files from the VM, the shared folders will make it as easy as possible
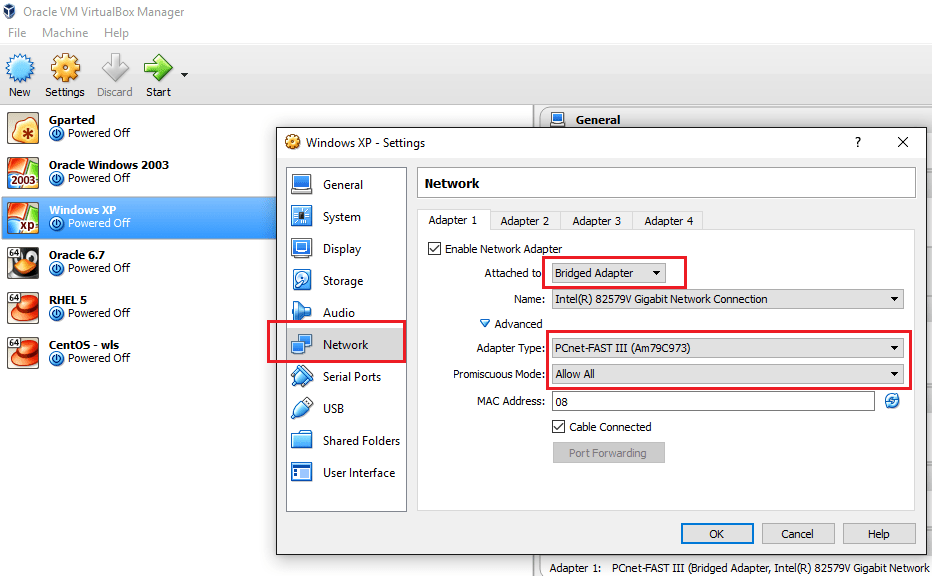
Use bridged network, with Promiscuous Mode “Allow All” so that you can communicate with the VM from network
Disable IPV6, firewall, SELinux on your Linux VM
If you creating a Windows VM, I’m sure you better know how to configure your guest so that you can access it from a network.
Finally recommendations for a DESKTOP computer to try virtualization
i7 processor + good quality heat sink. Your HOST and VMs are going to create loads of heat!
16GB Memory (DDR4 is the new standard, do not ignore it)
1×2 TB HDD
Few years back, such a configuration looked impossible for me, well, I saved bit by bit and made my dream computer. I’m sure you can also do it :) & trust me, a good computer opens a new world for you.
All the best and wish you all a very successful year ahead!
Okay, my last few posts were all about VB.Net & utilities for Windows domain administrators. Doesn’t mean that I stopped being a Oracle bouy ;) I still earn my salary for the Oracle job I do everyday at work and once after managing to purchase a legal copy of Visual Studio 2013 Professional Edition, I am committed to develop few sample applications using VB.Net & Oracle database.
The installation procedure mentioned below are applicable for Windows 10 also. So enjoy! I just finished installing the 11G R2 64Bit database in my computer running Windows 10 64Bit professional.
I believe if someone is attempting to install Oracle database in a laptop or desktop machine, it is purely for limited development requirements or learning.
A many who are new to Oracle database may not able to install the software on many versions of Microsoft client OS like Windows 7 or 8 until certain levels of hacks are made.
Ignore what “I know everything” geeks screaming across tech forums, asking you questions like “DID YOU READ THE CERTIFICATION MATRIX”
You don’t have the time, neither do I.
Let us install the Oracle database 11g R2 this time on a Windows 8.1 (Update 1) dell laptop with following configuration 8GB memory, 1TB Hdd, Windows 8.1 update 1 64Bit Other oracle software installed
Developer Suite 6i
Developer Suite 10g
Download the installation files from Oracle repositories
There are two files to download, a total of 2GB
Extract the zip files and move the files inside a single folder
Once extracted, you have something like below
Now Switch to the second folder, which reads as “win64_11gR2_database_2of2”
Open up the “components” folder (D:\Oracle11gR2_64Bit\win64_11gR2_database_2of2\database\stage\Components)
There will be four sub-folders within “Components” folder, copy them toD:\Oracle11gR2_64Bit\win64_11gR2_database_1of2\database\stage\Components folder
That’s all. Just start the installation process. Make sure you have changed the virtual memory settings of your box prior the installation (If you already have developer suite 10g, you already changed it) Start the installation by executing “setup.exe” You will get one warning, about not meeting the recommended environment requirements (/me chuckles). We didn’t check the 32Bit version of Oracle Database 11g R2, however the method should be same. Hope you enjoyed another post from us