A year back, following the Oracle’s blog, got excited and engaged with a tedious task to setup a Vision instance for Oracle R12 12.1.3 using the templates.
Against all the warnings and negative responses, I did manage to setup Oracle VM Manager and other repositories using Oracle Virtual Box and put the Vision instance online.
The efforts were unjustified as the tasks involved were supposed to be carried out by a seasoned DBA with advance level Linux knowledge. Apparently I lost the appetite to continue with the solution and discarded the entire setup along with the data repositories.
Recently, I came across the below article
http://www.pythian.com/blog/build-ebs-sandbox-1hr/
which explained a different approach towards setting up a Vision instance using the same Oracle templates for R12 12.1.3 and decided to give it a try.
I must say, John Piwowar @ pythian has put everything in place, so that a novice like me could follow the instructions without making any kind of mistakes and get the vision instance up and running.
Once the vision instance was up and running, I started wondering whether I could try something further. Oracle’s template based approach was involving two independent virtual machines serving two different roles
- One server providing the database node
- Second server providing the application node
At work I am used to deal with a single server hosting both database and application nodes which makes few things like server administration, OS patching etc easier.
Hence I started pondering the possibilities of merging both database and application servers into a single server.
Right now, after around 48 hours, I have successfully managed to merge both the nodes into a single server (virtual) and online with the Vision instance & I am going to share the entire procedures in detail so that you can also!
PART-1 Collect and arrange your stuff
Minimum Requirements
- A desktop/laptop machine with minimum 4GB free RAM for the virtual machine. That means you must have 6-8GB base memory
- Loads of free storage space. If your fixed disk doesn’t have minimum 500GB free disk space, I recommend you to buy a 1T external HDD (the read/write speed may be compromised, USB3 could be a minor exception)
- Access to a very fast internet connection to download the templates from Oracle e-delivery portal
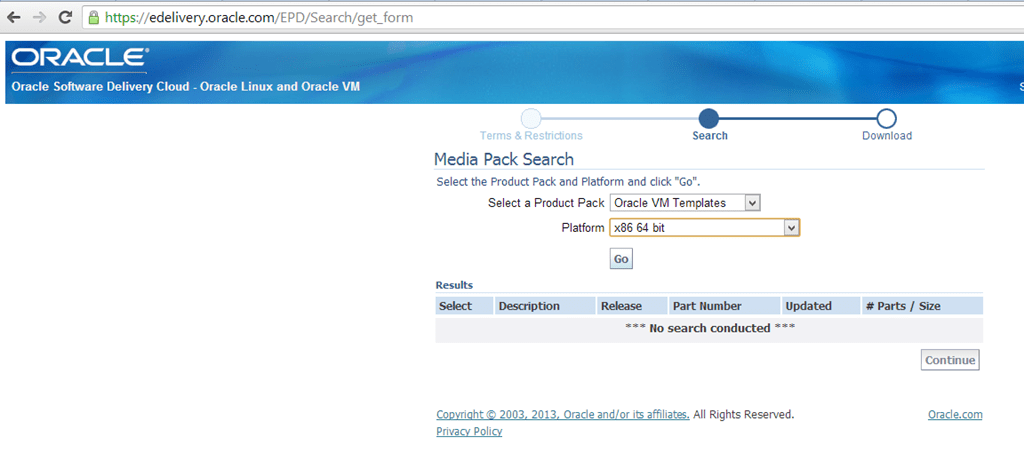
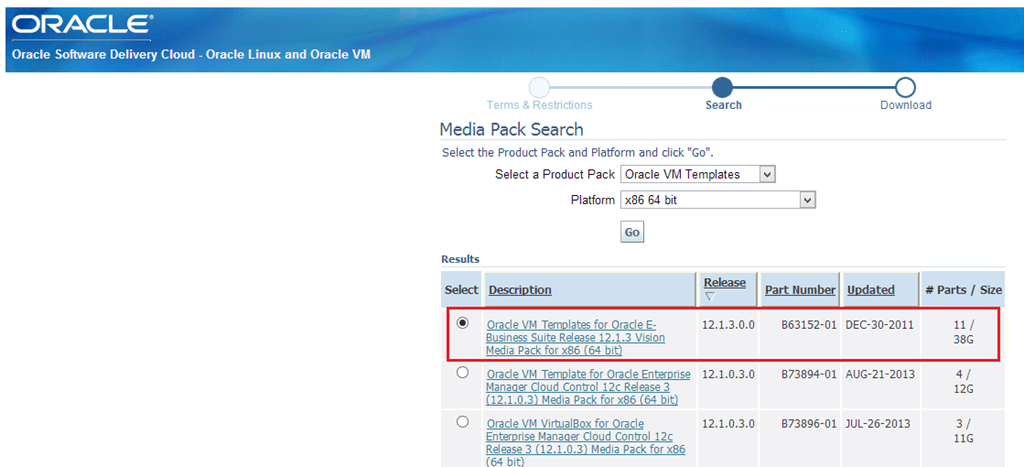
You have to download 11 files, 38GB by continuing
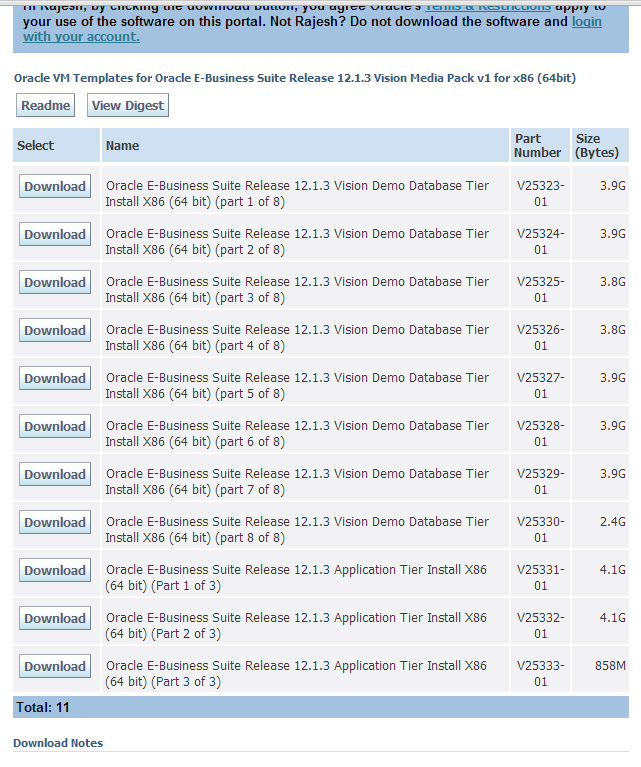
Pythian post describes a method to use wget to download all the files listed, using a file list input parameter, from a OSx/Linux host.
I downloaded the above files from a Windows machine, and must say it was a painful process.
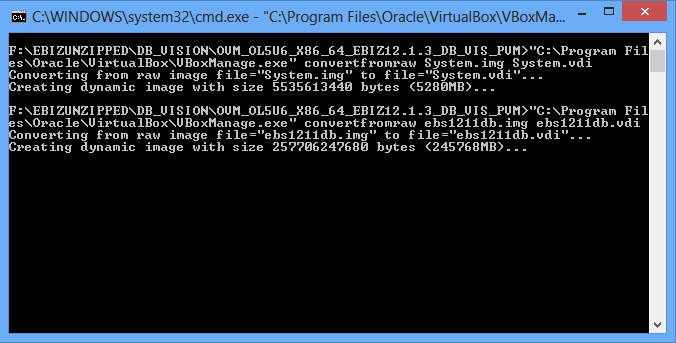
PART-2 Convert the template files into .img and then .vdi files
I am not going to repeat the steps which are already clearly narrated with pythian article. Only suggest that, don’t use a Windows machine and 7zip to do all the unzip and joining the files. You use a Linux Virtual machine to do those jobs. It would be faster, and it would be the best. I created a Oracle Linux 6 VirtualBox to do those jobs by sharing the downloads folder with the Virtual Machine.
PART-3 Backup everything!
So once the img files are converted as .VDI files, the most import thing is to backup the .VDI files to somewhere else! Yes, you may corrupt the sources available inside the .VDI files while attempting to setup the Vision instance. If you don’t have a backup, you have to go through the painful process of unzipping, combining and converting the .img files to .VDI formats. Trust me, this exercise could easily run into 4-6 hours time, depending upon the efficiency of your hardware.
PART-4 1st Gear, slow start
Create a folder called “myvision” (name it anything)
Copy both System.vdi and ebs1211db.vdi (While converting the .img files I gave the .VDI files the same image names) from your database template folder or backup folder to “myvision” folder
The actual size of ebs1211db.vdi over Windows environment will be approximately 220GB, which will be few GB smaller over Linux environment.
As we are planning to host both the dB and Application tier from a single server, we MUST increase the size of ebs1211db.vdi
Let me explain why, prior going ahead
Oracle’s approach towards the VM setup was purely involving two servers(virtual) and both database & application files are placed on /u01 mount point
ie, Database server has a mount point called /u01 and so does the application server
All the clone scripts available for both database & applications servers have certain scripts hardcoded with /u01 as base path. Hence, one could get into useless activities of editing scripts to change the hardcoded base path values to adjust the cloning (Which was done successfully)
PART-5 2nd Gear, Resize ebs1211db.vdi
Fortunately, ebs1211db.vdi doesn’t have multiple partitions. Hence resizing the volume is pretty easier using Virtual Box command line tools & free linux tools like Gparted
Switch to command prompt (if you are on Windows 7 & 8 make it elevated)
Switch to “myvision” folder
C:\Users\rthampi>cd D:\myvision
Issue the following command
D:\myvision>”C:\Program Files\Oracle\VirtualBox\VBoxManage.exe” modifyhd ebs1211db.vdi –resize 460800
With the above command, the ebs1211db.vdi size will be modified as 450GB! and this is done in a fraction of moment
Refer below link for more details like how to use Gparted for resizing a .VDI file which is used with a Linux host
http://derekmolloy.ie/resize-a-virtualbox-disk/
PART-6 3rd Gear, We are on the go
Release ebs1211db.vdi from the Gparted Virtual Machine. Let us start creating a Virtual Machine using Oracle’s VirtualBox. Please note we are using the latest version of VirtualBox, if you are not, please update prior you move ahead with rest of the exercises
Please check the VM configurations I made for my Vision Instance Server with the below image
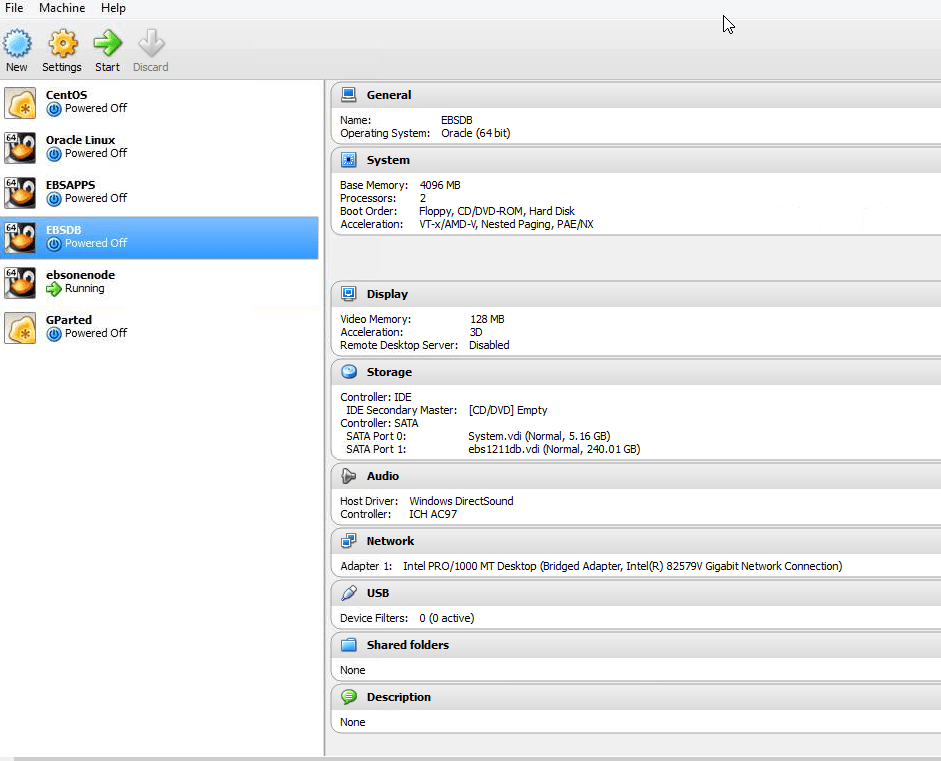
You can see that I have attached both System.vdi & ebs1211db.vdi files under SATA
Now, most important: You must have a .iso image or a physical DVD/CD for a recent release of Oracle/CentOS/RHEL linux, as we have to alter few attributes of the Virtual Machine we are going to put online.
Oracle has created the VM compiling a XEN kernel, which will not work under VirtualBox & you will fail to boot your Vision Instance VM, unless the kernel pointers are changed and recompiled.
Don’t worry it is pretty easy
Follow pythian article until the new kernel installation part
If you have just downloaded the templates from Oracle, you have the latest release of Oracle Linux embedded with System.img/.vdi file, and you don’t have to install a new kernel.
As root
#rpm –qa | grep kernel
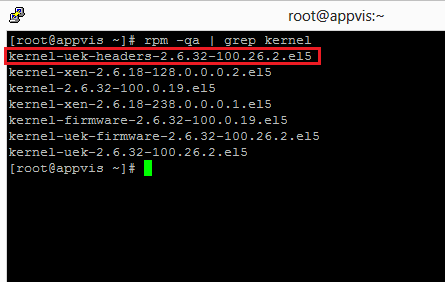
If your uek kernel version matches as one provided with the image or higher, you can safely move ahead with creating a new initrd entry. As root issue the following command
#mkinitrd -v -f /boot/initrd-2.6.32-100.26.2.el5.img 2.6.32-100.26.2.el5
Reboot your Virtual Machine, after removing the Linux media from the CD rom drive (or detach the linux iso image)
If you were following pythian post attentively, your new virtual machine MUST boot, without throwing any errors and prompt you for a login
The default password for root is “ovsroot”
I hope you did change the /etc/fstab entry for “/u01” mounting point prior rebooting the server as mentioned last time and that you have changed the
/etc/sysconfig/oraclevm-template entry to RUN_TEMPLATE_CONF=YES
If you haven’t, please do & restart the Virtual Machine. Optionally you can set a static IP to your box, so that you can start using a ssh client like putty, which will genuinely make many things easier while setting up the server at later stages.
Once the server restarted, you will notice that Oracle will automatically start the cloning process based on the “RUN_TEMPLATE_CONF=YES” entry
Throughout, we were using a hostname “appvis”, hence all the instructions, workarounds will utilize the same hostname. Please adjust the hostname according your preferences
Configuring Oracle E-Business Suite…
Configuring network interface.
Network device: eth0
Hardware address: 08:00:27:18:A4:CEEnter static IP address: 192.168.0.30
Enter netmask: [255.255.255.0]
Enter gateway: 192.168.0.1
Enter DNS server: 192.168.0.1Shutting down interface eth0: [ OK ]
Shutting down loopback interface: [ OK ]Configuring network settings.
IP configuration: Static IP addressBringing up loopback interface: [ OK ]
Bringing up interface eth0: [ OK ]Enter hostname (e.g, host.domain.com): appvis.rhome.com
Network configuration changed successfully.
IP configuration: Static IP address
IP address: 192.168.0.30
Netmask: 255.255.255.0
Gateway: 192.168.0.1
DNS server: 192.168.0.1
Hostname: appvis.rhome.comDatabase node related prompts
Enter the APPS password : apps
Provide the values required for creation of the new Database Context file.
Target System Hostname (virtual or normal) [appvis] :<<press ENTER>>
Target Instance is RAC (y/n) [n] : n<<press ENTER>>
Target System Database SID : VIS
Target System Base Directory : /u01/E-BIZ
Target System utl_file_dir Directory List : /usr/tmp
Number of DATA_TOP’s on the Target System [1] :<<press ENTER>>
Target System DATA_TOP Directory 1 [/u01/E-BIZ/db/apps_st/data] : /u01/E-BIZ/db/apps_st/data
Target System RDBMS ORACLE_HOME Directory [/u02/E-BIZ/db/tech_st/11.1.0] : /u01/E-BIZ/db/tech_st/11.2.0.2
Do you want to preserve the Display [atgtxk05:0.0] (y/n) : n
Target System Display [appvis:0.0] :<<press ENTER>>
Do you want the the target system to have the same port values as the source system (y/n) [y] ? : n
Target System Port Pool [0-99] : 42
Make a note of the System Port Pool you have entered here, as we must use the same while setting up the Application tier, in order to establish a connection to the database & perform the cloning process
Sit back and let the cloning process for database to complete. It may take a while. Once the cloning process is over, the database will be started.
After a successful completion of cloning, the server will come back to a logon prompt
login as “oracle” and the default password is “oracle”
You will be asked to change the password for user oracle and APPS, ignore the prompts this time.
PART-7 4thd Gear, Free on the roads, hacking the Application tier
As I mentioned, what we are going to do is a pure hack, against Oracle’s design structure.
The first step is to create a soft link, which is mandatory for cloning the Application tier
Login as root
cd /usr/lib
cp libXtst.so.6 libXtst.so.6.backup
rm libXtst.so.6
ln -s /usr/X11R6/lib/libXtst.so.6.1 /usr/lib/libXtst.so.6
Refer the following link for more details
Shutdown the database
#cd /u01/
#./stopdb.sh
Shutdown the Virtual Machine
#init 0
Copy the ebs1211apps.vdi to “myvision” folder now
Change the settings for your new virtual machine and attach ebs1211apps.vdi under SATA
Start the server
As your server starts you will notice that the database server getting started during the boot process itself. I’ll explain the methods to disable the automatic startup later with this post
Once the logon prompt appears, login as root (password: ovsroot)
Let us mount the newly added ebs1211apps.vdi (/dev/sdc1) to a mount point
As root
#mkdir /u02
#mount –t ext3 /dev/sdc1 /u02
The real hacks will take place now
Copy the /u02/E-BIZ/apps folder to /u01/E-BIZ/
As root
#cp –avr /u02/E-BIZ/* /u01/BIZ/
(I slept a whole night after starting the copying process, hence hardly have any idea how long it took, however I am sure you can finish one English movie during the copying period)
A total of 29GB will be copied to /u01/BIZ/apps folder
Once the copy process is over, we are ready to try the Application tier clone.
As root, issue the following command
#perl /u01/E-BIZ/apps/apps_st/comn/clone/bin/adcfgclone.pl appsTier
As prompted with the Database tier clone, a number of prompts you must answer, commonly the following
Enter the APPS password : apps
Target System Hostname (virtual or normal) [appvis] : <ENTER to take default>
Target System Database SID : VIS
Target System Database Server Node [appvis] : gkar
Target System Database Domain Name [rhome.com] : <ENTER to take default>
Target System Base Directory : /u01/E-BIZ
Target System Tools ORACLE_HOME Directory [/u01/E-BIZ/apps/tech_st/10.1.2] : <ENTER to take default>
Target System Web ORACLE_HOME Directory [/u01/E-BIZ/apps/tech_st/10.1.3] : <ENTER to take default>
Target System APPL_TOP Directory [/u01/E-BIZ/apps/apps_st/appl] : <ENTER to take default>
Target System COMMON_TOP Directory [/u01/E-BIZ/apps/apps_st/comn] : <ENTER to take default>
Target System Instance Home Directory [/u01/E-BIZ/inst] : <ENTER to take default>
Target System Root Service [enabled] : <ENTER to take default>
Target System Web Entry Point Services [enabled] : <ENTER to take default>
Target System Web Application Services [enabled] : <ENTER to take default>
Target System Batch Processing Services [enabled] : <ENTER to take default>
Target System Other Services [disabled] : <ENTER to take default>
Do you want to preserve the Display [atgtxk-09:0.0] (y/n) : n
Target System Display [appvis:0.0] : <ENTER to take default>
Do you want the the target system to have the same port values as the source system (y/n) [y] ? : n
Target System Port Pool [0-99] : 42
UTL_FILE_DIR on database tier consists of the following directories.
1. /usr/tmp
2. /usr/tmp
3. /u01/E-BIZ/db/tech_st/11.2.0.2/appsutil/outbound/VIS_appvis
4. /usr/tmp
Choose 1, default
The cloning will kick start now, and resume until 89% prior ending up with a FATAL error
–Minor update (if it is already NOT too late) 08-October-2013
I was trying to do a cloning & realized that the cloning process terminates with various errors and most of the errors were due to write permissions.
I was able to complete the cloning processes (dbTier & appsTier) individually by changing the permissions on folders like
Prior cloning the database tier
As root
chown –R oracle:dba /u01/E-BIZ/db
chmod –R 777 /u01/E-BIZ/db
As user “oracle”
perl adcfgclone.pl dbTier
and prior cloning the apps tier
As root
chown –R oracle:dba /u01/E-BIZ/apps
chmod –R 777 /u01/E-BIZ/apps
chown –R oracle:dba /tmp
chmod –R 777 /tmp
As user “oracle”
perl adcfgclone.pl appsTier
and after the clone, resetting the ownership of /tmp back to root
chown –R root:root /tmp
chmod –R 777 /tmp
Hence the below mentioned error “could be” addressed by changing few OS level rights as mentioned above.
This error is caused by missing “adautocfg.sh” file in the folder /u01/E-BIZ/inst/apps/VIS_appvis/admin/scripts which the auto configuration tries to access.
Without this file in this particular directory, the cloning process will never complete successfully. So we have to find a solution for it (I am not a APPS DBA and genuinely do not have any idea why the heck this file is missing in this particular location. All I could do is a guess work and it is towards avoiding the oracle template configuration wizard part, which initiates few functions. I’ll check it one of the following days and update this post accordingly)
As root
#cd /u01/E-BIZ/inst/apps/VIS_appvis/admin/scripts
#touch adautocfg.sh#vi adautocfg.sh
and paste the following (Yes you can do it, just change the VIS_appvis with your CONTEXT name)
#!/bin/sh
# dbdrv: none#
# $Header: adautocfg_ux.sh 120.4 2008/02/19 04:28:02 sbandla ship $
#
# ###############################################################
#
# This file is automatically generated by AutoConfig. It will be read and
# overwritten. If you were instructed to edit this file, or if you are not
# able to use the settings created by AutoConfig, refer to Metalink Note
# 387859.1 for assistance.
#
# ################################################################
CTX_FILE=”/u01/E-BIZ/inst/apps/VIS_appvis/appl/admin/VIS_appvis.xml“
promptmsg=””
myparams=””
appspass=””for myarg in $*
doarg=`echo $myarg | sed ‘s/^-//’`
case $arg in
appspass=*)
appspass=`echo $arg | sed ‘s/appspass=//g’`
shift
;;
nocustom)
myparams=”$myparams $arg”
shift
;;
noversionchecks)
myparams=”$myparams $arg”
shift
;;
promptmsg=*)
promptmsg=`echo $arg | sed ‘s/promptmsg=//g’`
shift
;;
*) echo “$0: unrecognized action specified”
exit 1
esac
doneif test “${appspass}x” = “x”; then
if test “${promptmsg}” != “hide”; then
stty -echo
printf “Enter the APPS user password:”
read appspass
printf “\n”
stty echo
else
read appspass
fi
fimyparams=”$myparams promptmsg=hide”
{ echo $appspass; } | /u01/E-BIZ/apps/apps_st/appl/ad/12.0.0/bin/adconfig.sh -co ntextfile=$CTX_FILE $myparams
error_code=$?
exit $error_code
Save the file and exit.
Let us try to re-initiate the application tier cloning process once again
As root
#perl /u01/E-BIZ/apps/apps_st/comn/clone/bin/adcfgclone.pl appsTier
The cloning process must complete without throwing any further errors and you will be asked whether the application should be started by the end of the cloning process. You can go ahead with starting the application tier.
However, you will notice, the apache HTTP will fail to start, as the CONTEXT FILE will have entries, which were not properly put in place during our last clone process as it has ended up with a FATAL error.
Let us edit the CONTEXT file and correct those entries now.
(This situation arises only if the cloning is done as user root)
As root
#vi /u01/E-BIZ/inst/apps/VIS_appvis/appl/admin/VIS_appvis.xml
Search for the string
/s_appsuser
replace s_appsuser values “root” with “oracle” and s_appsgroup with “oinstall”
Save the file and exit vi editor
Shutdown the application tier:
/u01/E-BIZ/inst/apps/VIS_appvis/admin/scripts/adstpall.sh apps/apps
Shutdown the database tier:
/u01/E-BIZ/db/tech_st/11.2.0.2/appsutil/scripts/VIS_appvis/addlnctl stop VIS
/u01/E-BIZ/db/tech_st/11.2.0.2/appsutil/scripts/VIS_appvis/addbctl.sh stop immediate
Once the database server shutdown
As root
#chown -R oracle:oinstall /u01
#chmod –R 775 /u01
Restart database
/u01/E-BIZ/db/tech_st/11.2.0.2/appsutil/scripts/VIS_appvis/addlnctl start VIS
/u01/E-BIZ/db/tech_st/11.2.0.2/appsutil/scripts/VIS_appvis/addbctl start
Now, proceed with auto configure so that the new changes will take place with changed user & group settings with the CONTEXT FILE
/u01/E-BIZ/inst/apps/VIS_appvis/admin/scripts/adautocfg.sh
Provide the apps password and sit back. It hardly takes few minutes to reset everything. Once the auto configuration part completes, go ahead with starting the application node
Now you can access the application through http://appvis.rhome.com:8042/
Incase if you are not sure about the http port, open up “VIS_appvis.xml” CONTEXT FILE and scan through, you will find it with url address area
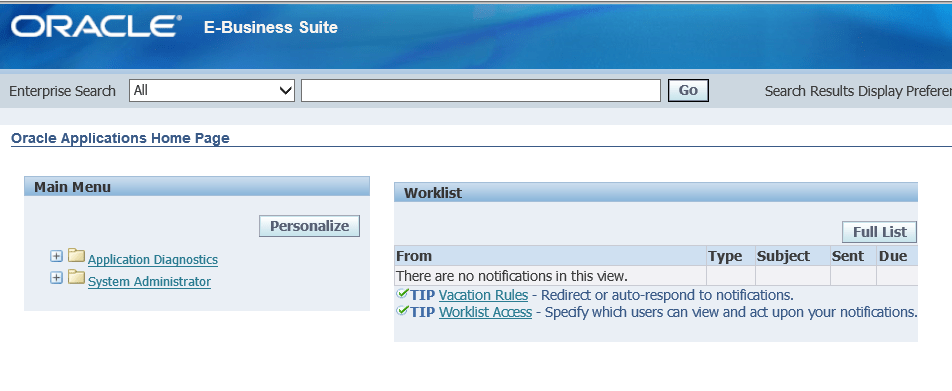
Use sysadmin/sysadmin to logon and enjoy!!!
PART-8 5th Gear, Smooth Sailing, Restarting and online
As a system administrator I literally don’t like the idea of starting resource hungry services until the boxes are completed booted up and online. I prefer to start certain services myself and make sure that whatever were started manually completed the startup process successfully.
As root switch to “/etc/init.d” folder
chmod –x ebizdb
and you are done! The database will not startup next time while you are starting your Vision instance.
Go to these folders for starting database and application nodes
Database
/u01/E-BIZ/db/tech_st/11.2.0.2/appsutil/scripts/VIS_appvis
Application
/u01/E-BIZ/inst/apps/VIS_appvis/admin/scripts
Day 3 – Adding Desktop to Oracle’s basic server (system.vdi)
I personally prefer to have a proper GUI, coming from an entirely Windows environment, that is a MUST for many times, regardless whether I am working with Linux or Windows systems
Here are the few things I have done to get the GNOME desktop installed with the basic Oracle linux Server embedded with the Oracle VM templates for Oracle R12 12.1.3
(Please make sure, from your Oracle linux box you have access to internet. Do you a ping www.google.com and confirm you are getting replies)
(Please shutdown both database and application prior proceeding)
(Please increase the size of System.vdi file PRIOR experimenting with any of the below exercises, and be careful while you would use Gparted to do it. Make a backup for system.vdi file and follow the thread provided above with the post to resize the partition (it is easy, I assure))
As root
#cd /etc/yum.repos.d
#wget http://public-yum.oracle.com/public-yum-el5.repoThis will install the public yum repository from Oracle
#yum update
It may take a while to download and upgrade the entire system and your Linux release will be upgrade to 5.9 (Tikanga)
#cat /etc/redhat-release
Now reboot your box, login as root once again
#yum grouplist
#yum groupinstall “X Window System” “GNOME Desktop Environment”
Around 380MB data will be downloaded and GNOME Desktop will be installed. Sit back and relax
Try to start the Desktop now
As root
#startx
X will crash and you will be provided certain error messages, which are NOT what we want. Hence let us go ahead and “correct” X
#X –config xorg.conf.new
X will start, however, a blank screen with ‘X’ shaped cursor and Ctrl+Alt+Backspace doesn’t kill it (minimum in my case)
Reset the terminal from VirtualBox menu and logon to the box as root once again
#cd /etc/X11
#mv xorg.conf xorg.conf.backup
#startx
Am sure you will be very much pleased to the GUI starting up. However, you don’t have a browser yet, so
#yum install firefox
This will install Firefox 17 (latest from the Oracle public yum repository)
If you want to start the GNOME automatic during the box startup, you need to edit /etc/inittab file
#vi /etc/inittab
and change the line
“id:3:initdefault:”
with
“id:5:initdefault:”
Save the file and exit the editor
Now a final reboot
#init 6
Once the box rebooted, you will be provided a graphical interface for the login process. Login and enjoy your GUI
However, if you would try to install the VirtualBox guest addons you will end up with FATAL errors, reporting missing headers. So you should, as root install the missing header files
#yum install kernel-uek-devel
A 6mb download will install the missing headers and, now you can safely complete the VirtualBox guest addons
regards
for windows7bugs
rajesh