I would like reiterate something Anoop has mentioned in his article. If you are using Microsoft SCCM or Windows Update Services (WU), then you must enable the local group policy as he has mentioned clearly in his post.
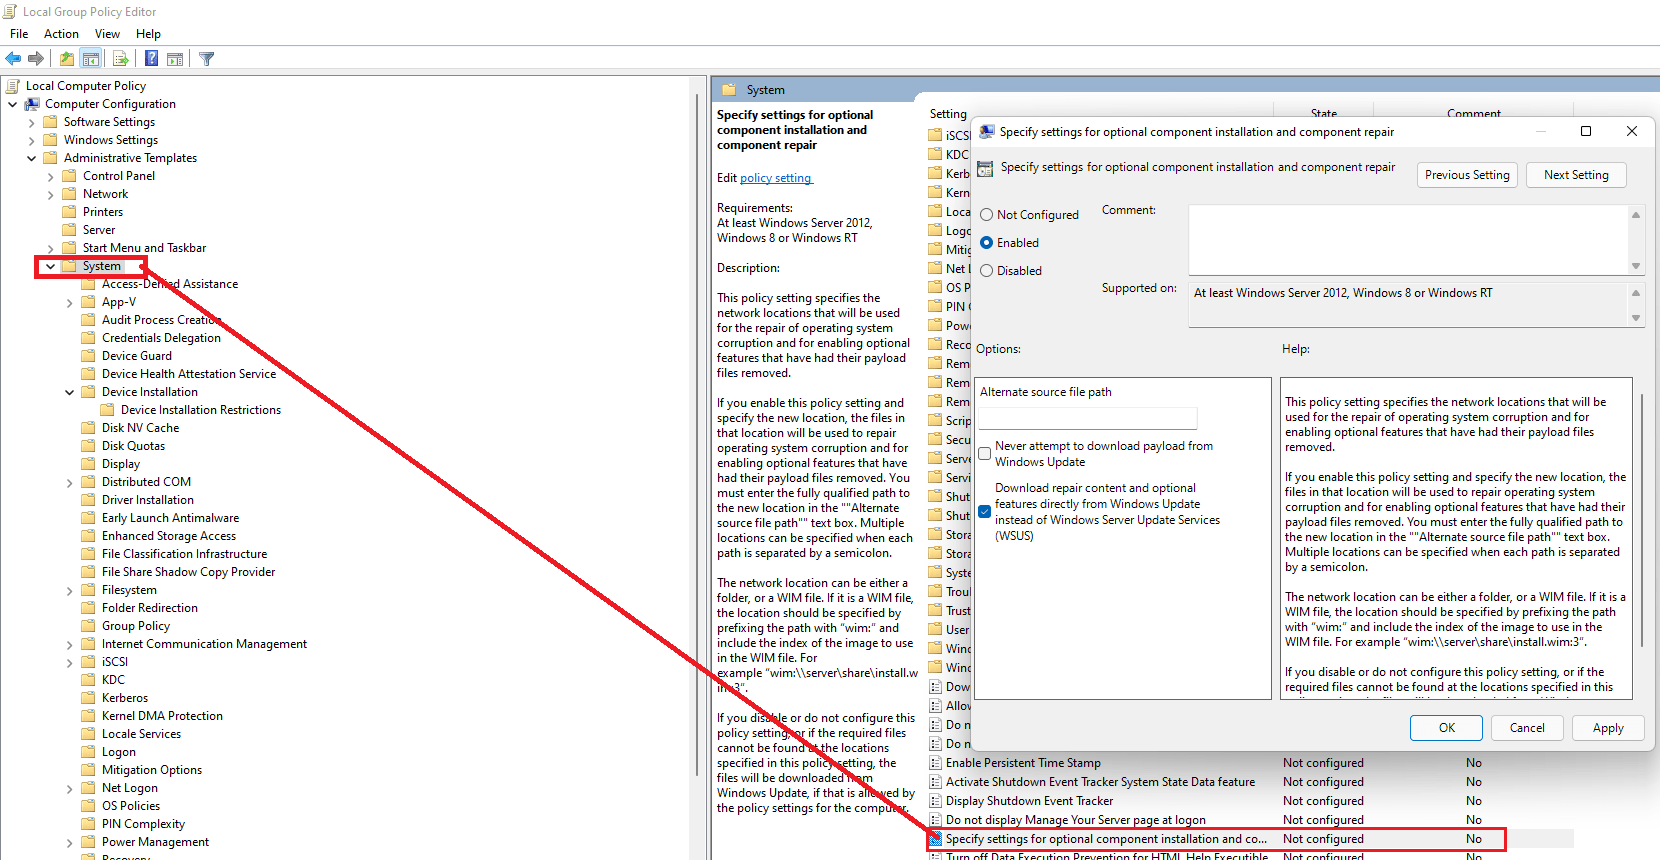
The image attached by Anoop could be bit confusing for the local group policy setup, hence I am uploading one with better visibility. The path is “Computer Configuration->Administrative Templates->System” & you need to open “Specify settings for optional component installation and component repair”
No need to reboot the computer for installing RSAT components. Follow Anoop’s thread and be a happy Administrator!
There are situations, especially while using Windows 10 gen OS (Windows 2016+ Servers included) a user might not able to type inside
Windows Search Textbox
WIFI Password Textbox
For some strange reasons, typing inside these text boxes are supported by “CTF Loader”(C:\Windows\System32\ctfmon.exe)” & that is loaded into computer’s memory normally after a restart/reboot.
This is facilitated by one of the Windows Tasks & certain attempts like using KMSPICO tool to activate Microsoft software, which is ILLEGAL and many times breaks this Task.
So, how do we fix it? There are two different approaches
Rebuild the Task
Using Registry
We’ll see both methods in detail now.
1# Rebuild the Task
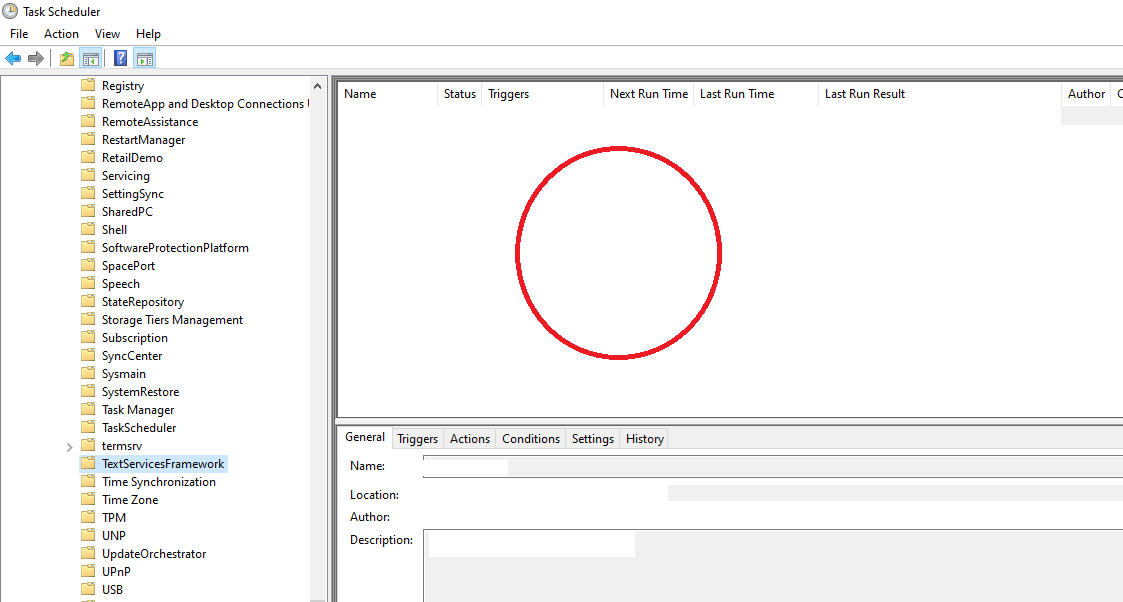
If the KMSpico tool or other reason corrupts the Task, you will not find any entries in the folder “TextServicesFramework”
Edited image for demo.
when an intact task should look like below
So how do we recreate this task, that is a custom handler?
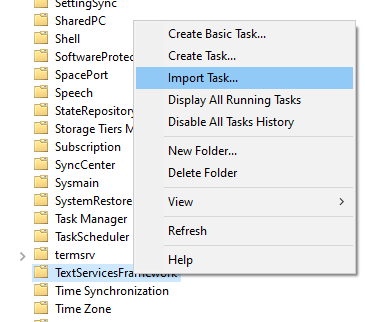
Browse to “C:\WINDOWS\System32\Tasks\Microsoft\Windows\TextServicesFramework” & check whether you can find a file “MsCtfMonitor” inside the folder. If you cannot find the file in this folder, copy the file from another Windows machine that has the same version.
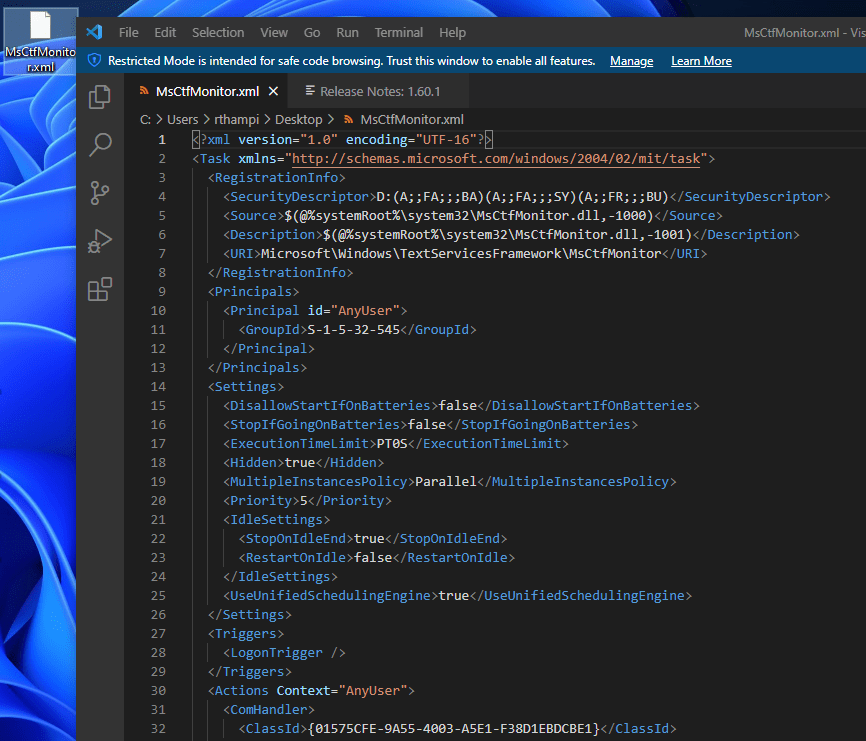
Copy the file to desktop and add the extension “.xml” to it.
Opening the file with notepad or another text editor should look like the following:
Go back to Task Scheduler and right click on “TextServiceFramework” and select “Import Task”
Point to the xml file that you have created in the desktop & apply. This should create a new task under the folder “TextServiceFramework”
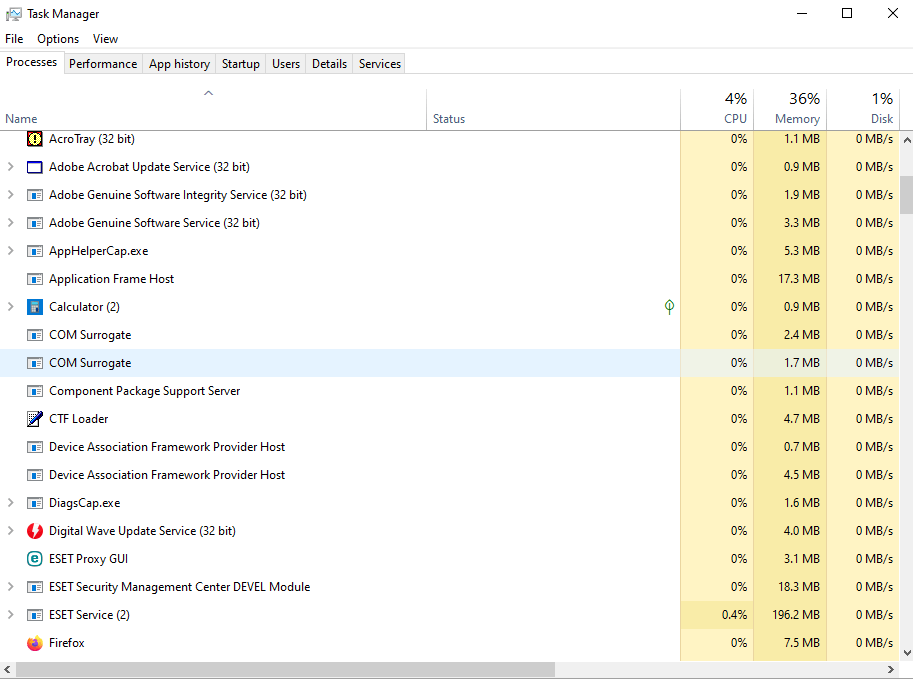
Restart and confirm you can type in the search box and WIFI password text boxes. Alternatively you can use the Task Manager to check whether “CTF Loader” has been loaded.
2# Registry
Remember, registry entries might get removed through updates/new versions. However, as a temporary measure you can use the following hack to address the keyboard issues.
Make a full backup for the Registry. You must know, tampering registry could force you to a fresh installation of the OS!
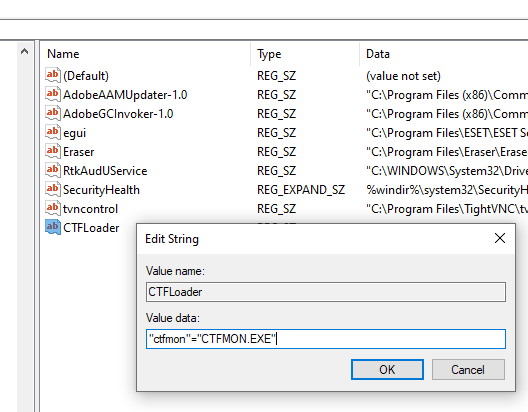
Once a full backup for the Registry is made, browse to “Computer\HKEY_LOCAL_MACHINE\SOFTWARE\Microsoft\Windows\CurrentVersion\Run”
Create a new string key and call it anything that you want. Example
I have called the string key as “CTFLoader” and for the Value make sure to enter “ctfmon”=”CTFMON.EXE”
Reboot the computer and check whether the typing issues resolved. Alternatively use Task Manager to check whether CTF Loader has been loaded.
Although both fix the typing issues, the right way is to recreate the missing Task. Choose wisely & don’t pirate! We know many interesting software are pricely and many of us cannot afford them. There are free alternatives for maximum pirated software like
And many more software that you need for Office/School/Home works! Piracy not only breaks the businesses that develop them, helps cyber criminals to unleash attacks like Ransomware through serial number generators and patches.
There are times when you come across the error “Windows cannot connect to the printer” (error 0x000003e3) while trying to connect to a “shared“ printer that is connected to another Windows 10 computer.
Quite possible that the drivers installed on the source machine is either not compatible with the client/target machine or not getting copied to the target machine. Now, install the correct version of printer driver to the target machine and try to connect again. There could be few other items you must check and insure for a successful connection.
Make sure both the computers network property shows the connection as either domain or private.
Make sure you have File & Printer sharing enabled for the network
I apologize for not including the datapatch part with the post. I don’t know how did I miss it entirely, which is not me usually. Amending the datapatch part by the bottom of the article.
Much of the times I use latest Oracle technologies for learning & they hardly make to any of the PRODUCTION environments those I support at work. Recently I wanted to see how to patch Oracle 19c installation on Windows and to be frank, it was buttery smooth.
Let us quickly see how to apply a patch to a Windows installation of Oracle 19c database.
Shutdown all instances & Windows services for Oracle. Make sure you have taken adequate number of backups for the database(s).
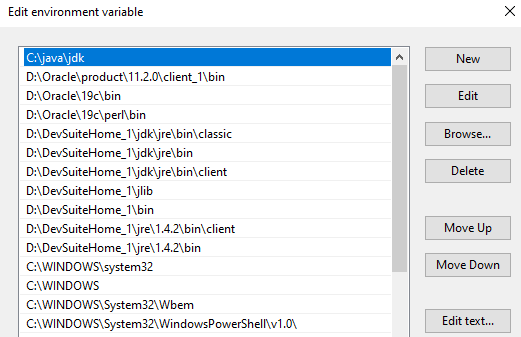
Check you computer’s PATH variable. Insure you have %ORACLE_HOME%\perl\bin, in my case “D:\Oracle\19c\perl\bin” as the first entry for PERL.
This is how the PATH information before I make the above changes to it.
Here 11g 32Bit client is the first Oracle software in the PATH, we will modify it like below
Once the patching done, you can rollback the PATH variable according to your requirements.
Visit Oracle support and download the patch, the latest patch for Oracle Database 19c is “32409154”. Patch is only available to customers with a valid support contract.
Extract the archive.
I’ve extracted the archive within the Download folder and the path is
As usual, based on your computer’s hardware capabilities, the patch would finish sooner or later. There will be 2 prompts those you need to say Yes in order to progress the patching.
Once OPatch completes, it is time for us to execute datapatch for the databases that are going to get upgraded to the latest version that you just patched.
Make sure that you have restarted the Windows Services for Oracle. Patching restarts the database, regardless I would suggest you to shutdown and restart the database once after Oracle services are restarted. Ensure the PDBs are opened.
Move to $ORACLE_HOME/OPatch folder & execure “datapatch.bat -verbose”
PS D:\Oracle19c\OPatch> .\datapatch.bat -verbose
SQL Patching tool version 19.3.0.0.0 Production on Wed Mar  9 18:32:28 2022
Copyright (c) 2012, 2019, Oracle.  All rights reserved.

Log file for this invocation: D:\Oracle19c\cfgtoollogs\sqlpatch\sqlpatch_12584_2022_03_09_18_32_28\sqlpatch_invocation.log

Connecting to database...OK
Gathering database info...done

Note:  Datapatch will only apply or rollback SQL fixes for PDBs
       that are in an open state, no patches will be applied to closed PDBs.
       Please refer to Note: Datapatch: Database 12c Post Patch SQL Automation
       (Doc ID 1585822.1)

Bootstrapping registry and package to current versions...done
Determining current state...done

Current state of interim SQL patches:
  No interim patches found

Current state of release update SQL patches:
  Binary registry:
    19.11.0.0.0 Release_Update 210417094636: Installed
  PDB CDB$ROOT:
    No release update patches installed
  PDB PDB$SEED:
    No release update patches installed
  PDB SCT:
    No release update patches installed

Adding patches to installation queue and performing prereq checks...done
Installation queue:
  For the following PDBs: CDB$ROOT PDB$SEED SCT
    No interim patches need to be rolled back
    Patch 32409154 (Windows Database Bundle Patch : 19.11.0.0.210420 (32409154)):
      Apply from 19.1.0.0.0 Feature Release to 19.11.0.0.0 Release_Update 210417094636
    No interim patches need to be applied

Installing patches...
Patch installation complete.  Total patches installed: 3

Validating logfiles...done
Patch 32409154 apply (pdb CDB$ROOT): SUCCESS
  logfile: D:\Oracle19c\cfgtoollogs\sqlpatch\32409154\24073904/32409154_apply_SCTCDB_CDBROOT_2022Mar09_18_33_46.log (no errors)
Patch 32409154 apply (pdb PDB$SEED): SUCCESS
  logfile: D:\Oracle19c\cfgtoollogs\sqlpatch\32409154\24073904/32409154_apply_SCTCDB_PDBSEED_2022Mar09_18_39_19.log (no errors)
Patch 32409154 apply (pdb SCT): SUCCESS
  logfile: D:\Oracle19c\cfgtoollogs\sqlpatch\32409154\24073904/32409154_apply_SCTCDB_SCT_2022Mar09_18_39_19.log (no errors)
SQL Patching tool complete on Wed Mar  9 18:45:01 2022
PS D:\Oracle19c\OPatch>
Now we have to check for invalid objects. My database didn’t have any objects, it was a default installation with 0 custom objects in the SCT. However, if you were having a PRODUCTION database, you must confirm that there are no invalid objects post patching. We will see how to accomplish this at next step.
C:\Windows\system32>SET ORACLE_HOME=D:\Oracle19c

C:\Windows\system32>sqlplus / as sysdba

SQL*Plus: Release 19.0.0.0.0 - Production on Wed Mar 9 18:54:54 2022
Version 19.11.0.0.0

Copyright (c) 1982, 2020, Oracle.  All rights reserved.


Connected to:
Oracle Database 19c Enterprise Edition Release 19.0.0.0.0 - Production
Version 19.11.0.0.0

SQL> @?/rdbms/admin/utlrp.sql

Session altered.


TIMESTAMP
--------------------------------------------------------------------------------
COMP_TIMESTAMP UTLRP_BGN              2022-03-09 18:55:49

DOC>   The following PL/SQL block invokes UTL_RECOMP to recompile invalid
DOC>   objects in the database. Recompilation time is proportional to the
DOC>   number of invalid objects in the database, so this command may take
DOC>   a long time to execute on a database with a large number of invalid
DOC>   objects.
DOC>
DOC>   Use the following queries to track recompilation progress:
DOC>
DOC>   1. Query returning the number of invalid objects remaining. This
DOC>      number should decrease with time.
DOC>         SELECT COUNT(*) FROM obj$ WHERE status IN (4, 5, 6);
DOC>
DOC>   2. Query returning the number of objects compiled so far. This number
DOC>      should increase with time.
DOC>         SELECT COUNT(*) FROM UTL_RECOMP_COMPILED;
DOC>
DOC>   This script automatically chooses serial or parallel recompilation
DOC>   based on the number of CPUs available (parameter cpu_count) multiplied
DOC>   by the number of threads per CPU (parameter parallel_threads_per_cpu).
DOC>   On RAC, this number is added across all RAC nodes.
DOC>
DOC>   UTL_RECOMP uses DBMS_SCHEDULER to create jobs for parallel
DOC>   recompilation. Jobs are created without instance affinity so that they
DOC>   can migrate across RAC nodes. Use the following queries to verify
DOC>   whether UTL_RECOMP jobs are being created and run correctly:
DOC>
DOC>   1. Query showing jobs created by UTL_RECOMP
DOC>         SELECT job_name FROM dba_scheduler_jobs
DOC>            WHERE job_name like 'UTL_RECOMP_SLAVE_%';
DOC>
DOC>   2. Query showing UTL_RECOMP jobs that are running
DOC>         SELECT job_name FROM dba_scheduler_running_jobs
DOC>            WHERE job_name like 'UTL_RECOMP_SLAVE_%';
DOC>#

PL/SQL procedure successfully completed.


TIMESTAMP
--------------------------------------------------------------------------------
COMP_TIMESTAMP UTLRP_END              2022-03-09 18:55:50

DOC> The following query reports the number of invalid objects.
DOC>
DOC> If the number is higher than expected, please examine the error
DOC> messages reported with each object (using SHOW ERRORS) to see if they
DOC> point to system misconfiguration or resource constraints that must be
DOC> fixed before attempting to recompile these objects.
DOC>#

OBJECTS WITH ERRORS
-------------------
                  0

DOC> The following query reports the number of exceptions caught during
DOC> recompilation. If this number is non-zero, please query the error
DOC> messages in the table UTL_RECOMP_ERRORS to see if any of these errors
DOC> are due to misconfiguration or resource constraints that must be
DOC> fixed before objects can compile successfully.
DOC> Note: Typical compilation errors (due to coding errors) are not
DOC>       logged into this table: they go into DBA_ERRORS instead.
DOC>#

ERRORS DURING RECOMPILATION
---------------------------
                          0


Function created.


PL/SQL procedure successfully completed.


Function dropped.


PL/SQL procedure successfully completed.

SQL> alter session set container=PDB$SEED;

Session altered.

SQL> alter session set "_oracle_script"=TRUE;

Session altered.

SQL> alter pluggable database pdb$seed close immediate instances=all;

Pluggable database altered.

SQL> alter pluggable database pdb$seed OPEN READ WRITE;

Pluggable database altered.

SQL> @?/rdbms/admin/utlrp.sql

Session altered.


TIMESTAMP
--------------------------------------------------------------------------------
COMP_TIMESTAMP UTLRP_BGN              2022-03-09 19:06:20

DOC>   The following PL/SQL block invokes UTL_RECOMP to recompile invalid
DOC>   objects in the database. Recompilation time is proportional to the
DOC>   number of invalid objects in the database, so this command may take
DOC>   a long time to execute on a database with a large number of invalid
DOC>   objects.
DOC>
DOC>   Use the following queries to track recompilation progress:
DOC>
DOC>   1. Query returning the number of invalid objects remaining. This
DOC>      number should decrease with time.
DOC>         SELECT COUNT(*) FROM obj$ WHERE status IN (4, 5, 6);
DOC>
DOC>   2. Query returning the number of objects compiled so far. This number
DOC>      should increase with time.
DOC>         SELECT COUNT(*) FROM UTL_RECOMP_COMPILED;
DOC>
DOC>   This script automatically chooses serial or parallel recompilation
DOC>   based on the number of CPUs available (parameter cpu_count) multiplied
DOC>   by the number of threads per CPU (parameter parallel_threads_per_cpu).
DOC>   On RAC, this number is added across all RAC nodes.
DOC>
DOC>   UTL_RECOMP uses DBMS_SCHEDULER to create jobs for parallel
DOC>   recompilation. Jobs are created without instance affinity so that they
DOC>   can migrate across RAC nodes. Use the following queries to verify
DOC>   whether UTL_RECOMP jobs are being created and run correctly:
DOC>
DOC>   1. Query showing jobs created by UTL_RECOMP
DOC>         SELECT job_name FROM dba_scheduler_jobs
DOC>            WHERE job_name like 'UTL_RECOMP_SLAVE_%';
DOC>
DOC>   2. Query showing UTL_RECOMP jobs that are running
DOC>         SELECT job_name FROM dba_scheduler_running_jobs
DOC>            WHERE job_name like 'UTL_RECOMP_SLAVE_%';
DOC>#

PL/SQL procedure successfully completed.


TIMESTAMP
--------------------------------------------------------------------------------
COMP_TIMESTAMP UTLRP_END              2022-03-09 19:06:22

DOC> The following query reports the number of invalid objects.
DOC>
DOC> If the number is higher than expected, please examine the error
DOC> messages reported with each object (using SHOW ERRORS) to see if they
DOC> point to system misconfiguration or resource constraints that must be
DOC> fixed before attempting to recompile these objects.
DOC>#

OBJECTS WITH ERRORS
-------------------
                  0

DOC> The following query reports the number of exceptions caught during
DOC> recompilation. If this number is non-zero, please query the error
DOC> messages in the table UTL_RECOMP_ERRORS to see if any of these errors
DOC> are due to misconfiguration or resource constraints that must be
DOC> fixed before objects can compile successfully.
DOC> Note: Typical compilation errors (due to coding errors) are not
DOC>       logged into this table: they go into DBA_ERRORS instead.
DOC>#

ERRORS DURING RECOMPILATION
---------------------------
                          0


Function created.


PL/SQL procedure successfully completed.


Function dropped.


PL/SQL procedure successfully completed.

SQL> alter pluggable database pdb$seed close immediate instances=all;

Pluggable database altered.

SQL> alter pluggable database pdb$seed OPEN READ ONLY;

Pluggable database altered.

SQL> alter session set "_oracle_script"=FALSE;

Session altered.

SQL> alter pluggable database pdb$seed close immediate instances=all;

Pluggable database altered.

SQL> alter pluggable database pdb$seed OPEN READ ONLY;

Pluggable database altered.

SQL> alter session set container=SCT;

Session altered.

SQL> @?/rdbms/admin/utlrp.sql

Session altered.


TIMESTAMP
--------------------------------------------------------------------------------
COMP_TIMESTAMP UTLRP_BGN              2022-03-09 18:56:35

DOC>   The following PL/SQL block invokes UTL_RECOMP to recompile invalid
DOC>   objects in the database. Recompilation time is proportional to the
DOC>   number of invalid objects in the database, so this command may take
DOC>   a long time to execute on a database with a large number of invalid
DOC>   objects.
DOC>
DOC>   Use the following queries to track recompilation progress:
DOC>
DOC>   1. Query returning the number of invalid objects remaining. This
DOC>      number should decrease with time.
DOC>         SELECT COUNT(*) FROM obj$ WHERE status IN (4, 5, 6);
DOC>
DOC>   2. Query returning the number of objects compiled so far. This number
DOC>      should increase with time.
DOC>         SELECT COUNT(*) FROM UTL_RECOMP_COMPILED;
DOC>
DOC>   This script automatically chooses serial or parallel recompilation
DOC>   based on the number of CPUs available (parameter cpu_count) multiplied
DOC>   by the number of threads per CPU (parameter parallel_threads_per_cpu).
DOC>   On RAC, this number is added across all RAC nodes.
DOC>
DOC>   UTL_RECOMP uses DBMS_SCHEDULER to create jobs for parallel
DOC>   recompilation. Jobs are created without instance affinity so that they
DOC>   can migrate across RAC nodes. Use the following queries to verify
DOC>   whether UTL_RECOMP jobs are being created and run correctly:
DOC>
DOC>   1. Query showing jobs created by UTL_RECOMP
DOC>         SELECT job_name FROM dba_scheduler_jobs
DOC>            WHERE job_name like 'UTL_RECOMP_SLAVE_%';
DOC>
DOC>   2. Query showing UTL_RECOMP jobs that are running
DOC>         SELECT job_name FROM dba_scheduler_running_jobs
DOC>            WHERE job_name like 'UTL_RECOMP_SLAVE_%';
DOC>#

PL/SQL procedure successfully completed.


TIMESTAMP
--------------------------------------------------------------------------------
COMP_TIMESTAMP UTLRP_END              2022-03-09 18:56:36

DOC> The following query reports the number of invalid objects.
DOC>
DOC> If the number is higher than expected, please examine the error
DOC> messages reported with each object (using SHOW ERRORS) to see if they
DOC> point to system misconfiguration or resource constraints that must be
DOC> fixed before attempting to recompile these objects.
DOC>#

OBJECTS WITH ERRORS
-------------------
                  0

DOC> The following query reports the number of exceptions caught during
DOC> recompilation. If this number is non-zero, please query the error
DOC> messages in the table UTL_RECOMP_ERRORS to see if any of these errors
DOC> are due to misconfiguration or resource constraints that must be
DOC> fixed before objects can compile successfully.
DOC> Note: Typical compilation errors (due to coding errors) are not
DOC>       logged into this table: they go into DBA_ERRORS instead.
DOC>#

ERRORS DURING RECOMPILATION
---------------------------
                          0


Function created.


PL/SQL procedure successfully completed.


Function dropped.


PL/SQL procedure successfully completed.

SQL>
Use SQL Developer & check whether there are any invalid objects. In addition to invalid objects, you must check plugged in database violations also. We will see how to in next few steps.
You need to check PDB violations on both root and pdb containers (CDB$ROOT, SCT (my pdb name)). Warnings could be addressed later, TYPE “ERROR” should be immediately addressed before you open the PDB for read write operations.
Fix the errors following instructions available from either Oracle support or blog posts (better & less complex)
Simple & neat right? Share your experience in the comments area.
Today we will see how to setup FileZilla FTP server with TLS. Well there are many documents explaining it, however, as usual I am going one step ahead and explain few elements those are missed by most of those posts.
Once installed (accept the defaults, letting FileZilla run as a Windows service) you can start configuring it for PASSIVE mode transfers and TLS.
As you could see, the installation sets port 21 as default listening port for FTP. If you choose to, can change it an available port. Usually you don’t have to do it.
If your FTP server/desktop machine has multiple IP addresses, you may assign a particular IP for the FTP Server under “IP Bindings”
Leaving it to default will not hurt you, usually.
Setting up Passive Mode can be bit tricky, especially when you are going to let users from internet to access your FTP server. Let us consider you have a router that is the gateway for all your computers in the network. So any communication that is leaving your network passes through this router. This is called a NAT network. Getting a FTP server to respond to a request from internet could be quite confusing for someone who doesn’t understand the NAT properly (I don’t, all the time)
Usually such a requirement is handled by forwarding the requests received by the router to one of the servers or computers hosting the FTP or other services.
Here for FileZilla, the router should forward port 21 to the server that is hosting the FTP server, to that the communication and transfer could happen. So basically, your router should have an entry like below. With the given example, FTP Server software is installed on a computer that has STATIC IP address 192.168.1.200, hence the below entry. Please make sure that all your computers/servers those host services have STATIC IP addresses.
Please note, based on the manufacturer, Applications & Gaming tab will be labelled differently. You need to check the router manual to find out where exactly you can locate “Single Port Forwarding”. If you are lucky enough, you may able to pick FTP from an available dropdown list, like the one I have. Else, just create one entry like the one you could see with this image for FTP.
Now you need to configure the ports for Passive mode, which most of the modern FTP clients will try to use for the transfer. I believe, without configuring the passive mode, FileZilla FTP server fails to establish connections.
Here you could see that I am using a custom port range for Passive mode. Most of the people who successfully configured FileZilla recommend using the port range between 50000-51000. You can try the ranges like 50000-50100 or like the one I have, which is approximately a 1000 ports.
Next couple of points are going to be vital for users from internet. I have a static IP address from ISP, hence for the area External IP address, I can use it safely. However, this may not be the case of most home users, as ISP provide them dynamic IP addresses which keep on change once in a pre-planned interval. So http://www.noip.com is your friend and I suggest you create a ddns.net hostname for yourself before proceeding. You can use their client software to keep update your host IP address against ddns.net hostname. You can use your hostname, eg: johwick3.ddns.net in the place of external IP address.
OR
You can try the “Retrieve external IP address from” option as well. I cannot guarantee the success rate.
The other important setting on this page is “Don’t use External IP for local connections”. You must not uncheck this box in case if your FTP server has external IP configured and expecting both local and external users to access the server.
Once set, you need to open the range of ports on your router. This time you need to access the page “Port range forwarding” and create an entry like the seen below.
This completes the initial level settings for the FTP server. Let us configure TLS in the next step. This involves creating a self signed certificate and secret key (secret key is not mandatory). Luckily FileZilla has built-in ability to create a self-signed certificate for you!
Once you are on the FTP over TLS settings page, you can use generate new certificate button to bring this window up. Fill in correct information & generate the certificate. FileZilla will automatically setup the certificate for you. “Save key and certificate to this file:” should be chosen wisely. Your certificate is accessed from this location, so make sure that you will generate the certificate in a location/folder which is not accidently prone to get deleted.
Now we will create a new user & setup few details for the testing.
In the above step, I have created a user with read only privileges and assigned a single directory access. As long as you want your users NOT to upload files to your FTP server, this setup is sufficient for a normal user. Please refer FileZilla documents for in-depth knowledge about creating groups and users.
Finally, we will configure Windows Firewall in order to establish the connection. Please note, I am against disabling firewall and other security suites those are installed/configured on any environment, unless for testing. You must NOT disable them permanently. If your browsing and other internet activities are limited to reputed websites and services, I can insure that you don’t need a commercial product to protect your Windows box. The built in Defender suite does a wonderful job protecting your computer. Follow the below images to create an incoming rule for the FTP traffic in the very server/computer on with you have install FileZilla FTP server.
Please note, there is no need to open the port 990 that is used for TLS. Unfortunately while I was trying everything, included the port in my setup. You only need to allow TCP Ports 21 & the range 50000-51000 (or the port range that you prefer to use)
That’s all take for setup. We can try to connect to our FTP server now!
Download and install FileZilla FTP Client/Or one of the other FTP clients available (You may not succeed to connect to FTP server using Windows built in command line FTP, as it doesn’t support TLS)
As you could see from the quick connections area, I have connected to FTP server from both local and internet & both attempts were successful.
I hope, if you are desperately looking for FileZilla FTP server setup guidelines, this post helps.
One of the most complicated “problems” I have had with Windows 10 was, using built-in “Movies & TV” instead of my favorite VLC Player, just because the later “fails” to play 5.1 surround sound, which I love
It looks like Microsoft Windows “Movies & TV” by default enables HDMI audio passthrough, thus surround sound is channeled rightfully.
Let us see a typical scenario:
Your PC is connected to a SmartTV that has Android TV (on HDMI Port 2)
Your TV is connected to AVR on ARC using HDMI (on HDMI Port 3)
Your PC shows your TV as your default “Speaker”
You setup 5.1 surround sound (unfortunately, you cannot test the setup us Windows doesn’t do the HDMI audio passthrough, instead the applications those are equipped with HDMI audio passthrough)
You try to play your video clip that has AC-3 6 channel audio, using VLC. What you hear is stereo only & toggling through the AVR’s different Audio formats do not do anything.
Now, here is the catch. By default VLC doesn’t enable HDMI passthrough. If you are using VLC 3.x.x versions, you can easily turn on the HDMI audio passthrough from Tools ->Preferences -> Audio
Select either “Enabled (AC3/DTS only) or Enabled. Switch to the one works for you.
Added on 20th January 2025 once after realizing my fine setup has stopped playing 5.1 channel sound! The AVR’s mode was changed by kids from “Direct” to something else. Please make sure your receiver has the “Direct” mode set to let the above settings work.
Try to play the video again. One of the interesting factor I recognized that, once the HDMI/SPDIF audio passthrough enabled, VLC doesn’t care whether your speaker setup is surround (5.1, 7.1, x.x) or not. It just does the audio channel routing.
No 5.1 channel sounds while trying to setup a on-board “RealTek” audio output? Just forget about 5.1 & setup the speaker as 7.1 channel. For some reasons, Selecting the speaker as 5.1 causes the processor to channel the rear audio to “side speakers” which are actually not “existing” in 5.1 setup.
Google Drive (now Backup and Sync from Google) desktop software is for personal use & terminates the software execution as soon as the user logs off from the computer. We needed a solution for a server in which we were using Google drive for legacy database backups. Following the instructions @ http://www.myrtec.com.au/kb/331-running-google-drive-as-a-windows-service, we were able to setup a Windows service executing the drive executable, which looked bit dirty from different angles as we were using some stone age software to run the Service.
and, were able to design a far better solution. Here how it works:
Install & setup Google Drive (Backup and Sync) software (your box/Server)
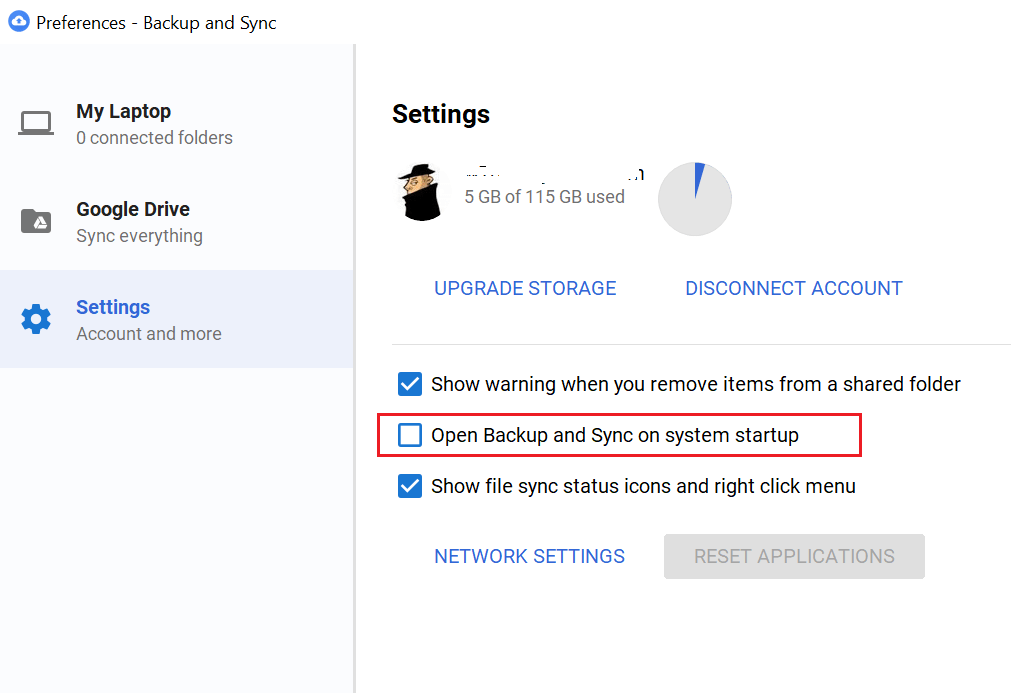
Go to settings & disable “Open Backup and Sync” on system startup
Now, you can safely quit the Backup and Sync software (Right click, quit)
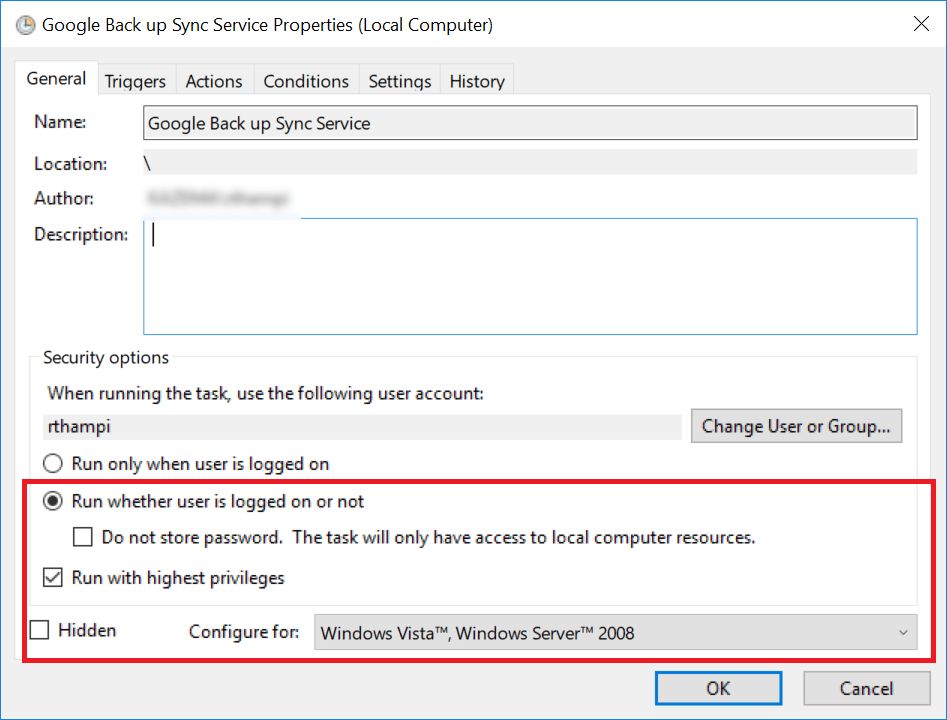
Fire up Windows Task Scheduler and create a task, let us called it “Google backup and sync”
Make sure the tasks runs without the user being logged in.
Depending upon the startup load on the server (If your server/box many services which require maximum memory and processor, delay starting the this new task by few minutes)
It is advisable to setup the startup path for the task. Just copy and paste the executable path.
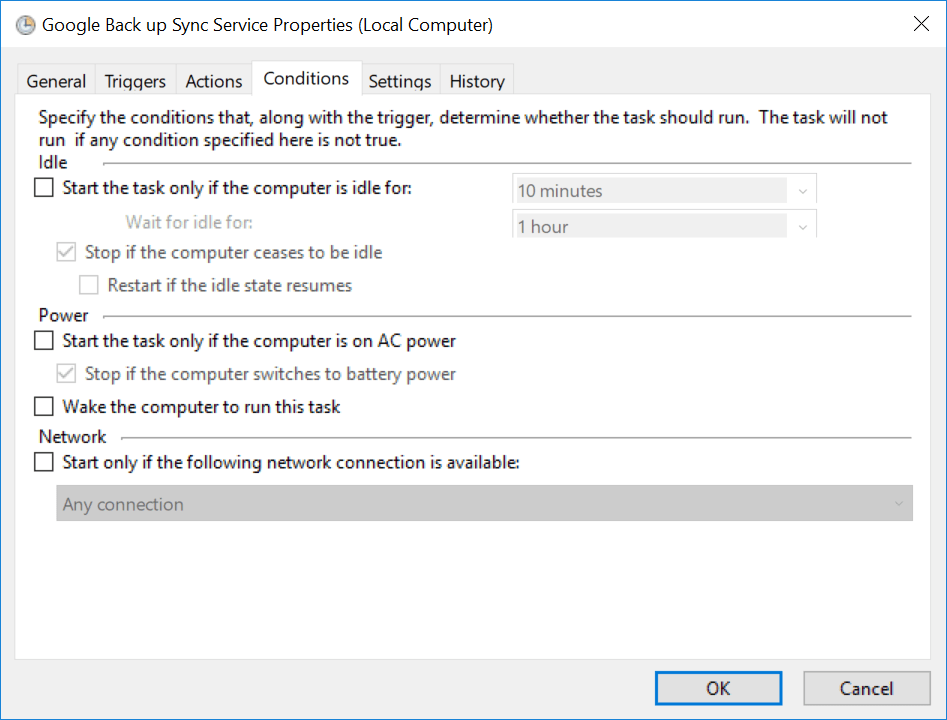
Most importantly, if you are using a laptop, make sure you are setting up whether the drive sync task should start while the laptop is on battery power.
Once all these settings, you will be asked to provide the current user password. If you have a password policy, remember to change the password for the task once after you change the account password.
That’s all. Right click and execute the task and monitor the task manager, you should see two instances of google drive sync exe file. Now, logging off shouldn’t terminate the google backup and sync.
I hope this post makes it easier for you to setup Google backup and sync for Windows servers.
Yesterday I was contacted by one of the visitors after referring my posts about Classic ASP connection to Oracle databases in general & I revisited this “area” after a long time. It took a while for me to setup everything, however the results were pretty awesome. So here comes one more post about Classic ASP with Oracle database, this time Oracle 12c 64Bit.
OS: Windows 10/64Bit Windows Server OS
Prerequisites
Setup IIS for publish classic ASP with Oracle 12c database
Software requirement(s):
Oracle client 32Bit, 12c (for best connectivity)
Launch IIS and create a new application pool, as shown with the image.
Now go to the advanced settings for the application pool that you have created & switch “Enable 32-Bit Applications” from “false” to “True”
Connection possibilities
There are two ways to connect to Oracle database from Classic ASP
Using DSN (Data Source Name)
DSN less connections. Here we will use the Oracle tnsnames.ora file to identify and connect to the database. We have to insure that the TNS_HOME directory is set at the environment level, or the client that is used is 1st entry in the environment variable “PATH” for Oracle products in case of multi Oracle homed hosts.
Create a DSN
Classic ASP could interact with only 32Bit environment, hence the IIS server hosting machine must have the latest Oracle 32-Bit client installed (older clients may not connect to later databases properly). As I am writing this post, Oracle 12c 12.2.0 is the latest client available.
Logged with an account having “Administrator” privileges, Open ODBC Data Source (32-bit)
Please note, my box has multiple Oracle products, hence don’t get confused by the names in next few screens.
If your installation for the Oracle client was correct, you should able to see an entry for the Oracle driver like the one you could see the image above.
Click “Finish”. This will pop up another window. Under the “System DSN” tab we have to create our new DSN
Provide a name of your choice for the “Data Source Name” and “Description”
Make sure you have the “TNS Service Name” already available with the listener.ora file. Oracle 12c passwords are case sensitive. Hence make sure you are going to provide the case sensitive password while testing the connection.
If you don’t have previous experiences with creating net service names, please follow the instructions below.
Start “Net Configuration Assistant” from the Oracle Home and follow the images below.
Read the help texts available, especially if you are new to Oracle
Provide the service name, which is your database name usually.
Provide the FQDN (fully qualified domain name), ie, your computer name like “rajesh-pc.abc.com” in case if you are connected to a domain, else just the name of your computer, like “rajesh-pc”
I would suggest doing a test, if you are sure that all the details provided are correct & no need to test, you can skip this step
By default the configuration tool would suggest you the Oracle service name as new net service name, which you can change to any name. Just make sure that you will remember it.
Now let us test the new service name we have just created.
Once the Net Service Name is created, we will see both the scenarios using 2 different asp files, both using different connection approaches
<html>
<head>
<title>Connecting to an Oracle database using ODBC and DSN connection</title>
</head>
<body>
<%
SET myConn=SERVER.createobject("adodb.connection")
myConn.Open "DSN=BAC;" & _
"Uid=APPS;" & "Pwd=APPS"
SQLStr="SELECT BANK_ID, BANK_NAME, BANK_TYPE FROM BAC_BANKS"
SET result=adoCon.execute(SQLStr)
IF NOT result.EOF thEN
response.write("<h2>Oracle ASP Example</h2>")
response.write("<p>Connecting to the Oracle11g database using ODBC & without a DSN</p>")
response.write("<table BORDER=3 BGCOLOR=#0099CC><tr><th>BANK ID</th>" & _
"<th>Name</th><th>TYPE</th>")
WHILE NOT result.EOF
response.write("<tr><td>" & result("BANK_ID") & "</td>")
response.write("<td>" & result("BANK_NAME") & "</td>")
response.write("<td>" & result("BANK_TYPE") & "</td></tr>")
result.movenext()
WEND
response.write("</table>")
ELSE
response.write("<p>Error retrieving bank data!!</p>")
END IF
adoCon.Close()
%>
</body>
</html>
2. Connecting to 12c without DSN
<% Dim adoCon 'Holds Connection Dim rsViewRecords 'Holds Record Set
'Initiate connection
Set adoCon = Server.CreateObject("ADODB.Connection")
if Err.Number <> 0 then Response.Clear() response.Write "<hr>ORASESSION Error<br>" & err.number & " — " & err.Description & "<hr>" response.End end if
SQLStr="SELECT BANK_ID, BANK_NAME, BANK_TYPE FROM BAC_BANKS" SET result=adoCon.execute(SQLStr) IF NOT result.EOF thEN response.write("<h2>Oracle ASP Example</h2>") response.write("<p>Connecting to the Oracle11g database using ODBC & without a DSN</p>") response.write("<table BORDER=3 BGCOLOR=#0099CC><tr><th>BANK ID</th>" & _ "<th>Name</th><th>TYPE</th>") WHILE NOT result.EOF response.write("<tr><td>" & result("BANK_ID") & "</td>") response.write("<td>" & result("BANK_NAME") & "</td>") response.write("<td>" & result("BANK_TYPE") & "</td></tr>") result.movenext() WEND response.write("</table>") ELSE response.write("<p>Error retrieving bank data!!</p>") END IF adoCon.Close() %>
Hope this helps few “Classic ASP” guys out there ;)
I started this blog when I started using Windows 7 initial release and was struck with end number of issues, mostly related networking.
I am turning my attention towards Windows OS, minimum for a while as I am dealing with another Windows OS, that is crap like no other times…Windows Server 2016, which, looks and feels like Windows 10 with server OS capacities (to certain extends). A totally screwed up Server OS which has half of the settings over modern layout and rest on the legacy
This time I am going to discuss about a peculiar situation that arises once after removing “Remote Desktop Services“ from Windows Server 2016 & trying to initiate a normal RDP session with the server.
It just won’t connect. That’s all. You check for the usual stuffs everywhere and realize that everything is set fine, firewall, permissions. Yet, you won’t able to connect.
After trying to fix “few” things myself, I gave up and started searching for some answers. One of the most interesting things I learned about Windows Server 2016 is, there are hardly any forums discussing anything at all about this particular OS. 99% of the results I am provided were either for Windows Server 2008 or 2012 & for few situations not a single result for 2016!
& by the bottom of the page found a link to Dell site where a solution was provided for Windows Server 2012 R2 to recreate the RDP-TCP registry values. As I was dealing with a VM, which is already backup, I decided to give it a try
I’m copying the instructions here, for the reasons that the above link may not be available after a while.
1. Recreate the default RDP Listener
How to recreate the RDP listener.
1. Export the following registry key:
HKEY_LOCAL_MACHINE\SYSTEM\CurrentControlSet\Control\Terminal Server\WinStations\RDP-Tcp
2. Delete the following registry key:
HKEY_LOCAL_MACHINE\SYSTEM\CurrentControlSet\Control\Terminal Server\WinStations\RDP-Tcp
3. Copy and paste the below text into notepad, and save the file as RDP-Tcp.reg. Additionally, if the operating system is 2012 R2, another file will be required with the contents of the second box.