Few weeks back one DBA told me there is no need to setup HugePages as we are not using 40+GB SGA & we had it enabled from the initial days of 11g migration from 10g (10.2.0.3). Well, here is how you can setup HugePages for your Oracle database instance.
A brief explanation that might help you to decide whether you should enable HugePages or not is quoted from Tim Hall’s article below.
“For large SGA sizes, HugePages can give substantial benefits in virtual memory management. Without HugePages, the memory of the SGA is divided into 4K pages, which have to be managed by the Linux kernel. Using HugePages, the page size is increased to 2MB (configurable to 1G if supported by the hardware), thereby reducing the total number of pages to be managed by the kernel and therefore reducing the amount of memory required to hold the page table in memory. In addition to these changes, the memory associated with HugePages can not be swapped out, which forces the SGA to stay memory resident. The savings in memory and the effort of page management make HugePages pretty much mandatory for Oracle 11g systems running on x86-64 architectures.“
Recently I had a short Twitter exchange with Tim Hall about the subject & He mentioned that he always enables it.
Please refer the article from below link, it is by Tim Hall, a geek in this field and the owner of https://oracle-base.com
Exercises explained in this article is applicable to 19c also (verified as working). Please make sure that your version of Oracle database supports these settings before attempting. Please do not copy this to PRODUCTION environments without enough testing.
One of the major annoyances with Oracle EBS CDB/PDB environment settings I found that, I cannot connect to the PDB (for EBS) from the CDB environment (default). I always have to source the PDB environment in order to connect the PDB and do my stuffs.
As usual, I am doing this for my LAB & you may not copy this to your PRODUCTION environment.
So this what I get when I try to connect to PDB from CDB environment.
oracle@erp-devp.xyz.com:/u01/oratest/DEVP/db/tech_st/19.0.0/network/admin>tnsping DEVP

TNS Ping Utility for Linux: Version 19.0.0.0.0 - Production on 22-MAR-2022 14:59:03

Copyright (c) 1997, 2021, Oracle.  All rights reserved.

Used parameter files:
/u01/oratest/DEVP/db/tech_st/19.0.0/network/admin/DEVP_erp-devp/sqlnet.ora

TNS-03505: Failed to resolve name
The easiest solution was to add an additional entry for the PDB within the $TNS_ADMIN tnsnames.ora file. Let us see how to. Please note these might get overwritten when you run autoconfig.
Save the file & you are ready to go. Notice carefully the service name and instance name values for “DEVP” and “DEVPCDB”. The PDB will have own name for the service, however the instance name will point towards the CDB name & this is the way it should be.
oracle@erp-devp.xyz.com:/home/oracle>tnsping DEVP

TNS Ping Utility for Linux: Version 19.0.0.0.0 - Production on 22-MAR-2022 15:06:20

Copyright (c) 1997, 2021, Oracle.  All rights reserved.

Used parameter files:
/u01/oratest/DEVP/db/tech_st/19.0.0/network/admin/DEVP_erp-devp/sqlnet.ora


Used TNSNAMES adapter to resolve the alias
Attempting to contact (DESCRIPTION = (ADDRESS = (PROTOCOL=tcp)(HOST=erp-devp.xyz.com)(PORT=1526)) (CONNECT_DATA = (SERVICE_NAME=DEVP)(INSTANCE_NAME=DEVPCDB)))
OK (0 msec)
oracle@erp-devp.xyz.com:/home/oracle>
That’s all. Regardless whether it is EBS or not, you can keep adding the PDB details into the tnsnames.ora file & if the service is registered with the listener, will able to connect without sourcing the specific environment variables.
Few “years” back, while it was almost impossible to install Oracle 10g on Windows 7/8, I made some attempts & managed to install 32Bit versions of 10g 10.2.0.3.x successfully. A particular release 10.2.0.4 had helluva of issues, mainly TNS related & I can see many visits to that thread even today! I believe, those visitors are not coming over there for 10g, instead for TNS.
On Windows, the below is a typical situation & we’ll see the primary reasons for the same.
Microsoft Windows [Version 10.0.22000.556]
(c) Microsoft Corporation. All rights reserved.

C:\Windows\system32>sqlplus / as sysdba

SQL*Plus: Release 19.0.0.0.0 - Production on Mon Mar 21 07:59:29 2022
Version 19.11.0.0.0

Copyright (c) 1982, 2020, Oracle.  All rights reserved.

ERROR:
ORA-12560: TNS:protocol adapter error


Enter user-name:
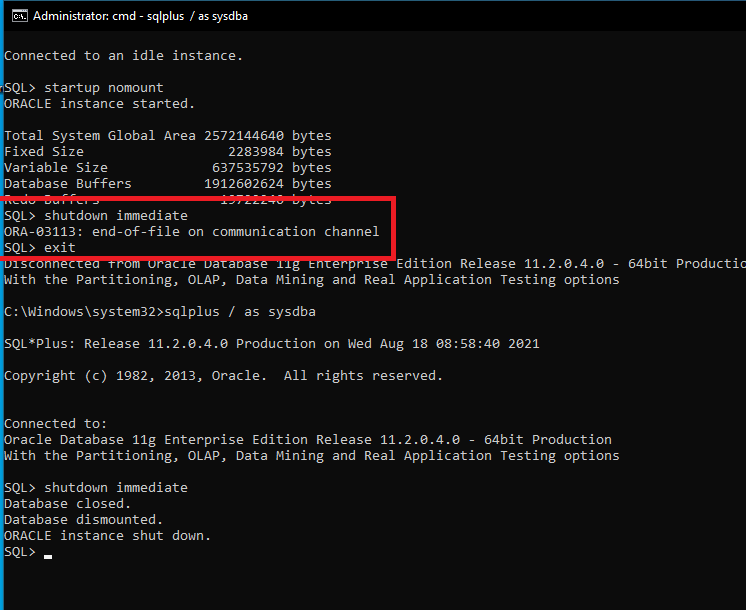
On Windows, everything is another service. So we’ll start with checking whether the “Oracle” service for the database instance has started.
I’m using Oracle database on my laptop mostly for learning purposes, hence the service startup is set as “Manual”. This gives me control over the resources consumed by the database. Not just the service, I have setup the instance to start manual to insure Oracle service doesn’t open the database automatically. Latest Windows OS that use quick boot will save the state of the service, hence you might find your database readily available once after a reboot, although you set everything as manual :)
Let’s see what happens after starting the “Oracle Service”.
Well, that fixes one of the many reasons for the dreaded ORA-12560: TNS:protocol adapter error! As soon I am hit with another, will amend this post.
I think I have mentioned few times already that I am not a certified (Certifitted as we call it sarcastically due to the pure ignorance of much of them) DBA, yet I love executing experiments with Oracle database technology and come up with some hacks, tricks etc. As usual, whatever you read ahead is NOT recommended for PRODUCTION environment and if you end up setting up something that works finally for your PRODUCTION instance, well you are sole responsible for it.
For this experiment, we will use one 19c database with multitenant structure installed on Windows 10/11. Before you attempt the below, please make sure that you have taken the backup of control file trace, spfile copy as pfile and a full backup of database using RMAN
Control file backup trace.
SQL>alter database backup controlfile to trace as 'D:\folder_name\control.txt';
SPfile to Pfile (This file should be available at $ORACLE_HOME\database\ folder)
SQL>create pfile from spfile;
Creating pfile is not mandatory incase if you are restoring the backup to same host and the paths are intact. Pfile becomes useful when you are restoring the database to another host with same directory structure.
Shutdown the database & delete the datafile from paths. For example, my datafiles were in the following paths.
There were three paths from which I needed to delete the data files. From CDB root, PDB seed and PDB itself. You should get a clear idea of the exact locations for your data files from the control file trace export.
Once after deleting the files, start the database at nomount state. The latest version of databases allow you to execute many SQL commands from RMAN itself, however, I always prefer SQL prompt for SQL activities. Suite yourself.
SQL>startup nomount
From another command/terminal window connect to RMAN
D:\RMAN>rman target /

Recovery Manager: Release 19.0.0.0.0 - Production on Sat Mar 12 11:47:15 2022
Version 19.11.0.0.0

Copyright (c) 1982, 2021, Oracle and/or its affiliates.  All rights reserved.

connected to target database: SCTCDB (not mounted)
Restore the control file from latest backup
RMAN> restore controlfile from 'D:\RMAN\BKPCONTROL_FILE.CTL_SCTCDB_20220312';

Starting restore at 12-MAR-22
using target database control file instead of recovery catalog
allocated channel: ORA_DISK_1
channel ORA_DISK_1: SID=498 device type=DISK

channel ORA_DISK_1: restoring control file
channel ORA_DISK_1: restore complete, elapsed time: 00:00:01
output file name=D:\ORACLE19C\DB\ORADATA\SCTCDB\CONTROL01.CTL
output file name=D:\ORACLE19C\DB\ORADATA\SCTCDB\CONTROL02.CTL
Finished restore at 12-MAR-22
Now try to mount the database.
RMAN> alter database mount;

released channel: ORA_DISK_1
Statement processed
Once the database mounted, let us see what the schema reprorts
RMAN> report schema;
Populate catalog from the backup.
RMAN> catalog start with 'D:\RMAN';

searching for all files that match the pattern D:\RMAN

List of Files Unknown to the Database
=====================================
File Name: D:\RMAN\BKPCONTROL_FILE.CTL_SCTCDB_20220312

Do you really want to catalog the above files (enter YES or NO)? YES
cataloging files...
cataloging done

List of Cataloged Files
=======================
File Name: D:\RMAN\BKPCONTROL_FILE.CTL_SCTCDB_20220312
Once the above completes successfully, we can proceed with restoring the backup.
RMAN> run
2> {allocate channel ch1 device type disk;
3> restore database;
4> switch datafile all;
5> switch tempfile all;
6> release channel ch1;
7> }

allocated channel: ch1
channel ch1: SID=252 device type=DISK

Starting restore at 12-MAR-22

channel ch1: starting datafile backup set restore
channel ch1: specifying datafile(s) to restore from backup set
channel ch1: restoring datafile 00004 to D:\ORACLE19C\DB\ORADATA\SCTCDB\UNDOTBS01.DBF
channel ch1: reading from backup piece D:\RMAN\SCT_SCTCDB_ LVL0_040O6TG6_1_1
channel ch1: piece handle=D:\RMAN\SCT_SCTCDB_ LVL0_040O6TG6_1_1 tag=DAILYFULL_DB_LVL0_BKP
channel ch1: restored backup piece 1
channel ch1: restore complete, elapsed time: 00:00:03
channel ch1: starting datafile backup set restore
channel ch1: specifying datafile(s) to restore from backup set
channel ch1: restoring datafile 00003 to D:\ORACLE19C\DB\ORADATA\SCTCDB\SYSAUX01.DBF
channel ch1: reading from backup piece D:\RMAN\SCT_SCTCDB_ LVL0_020O6TG5_1_1
channel ch1: piece handle=D:\RMAN\SCT_SCTCDB_ LVL0_020O6TG5_1_1 tag=DAILYFULL_DB_LVL0_BKP
channel ch1: restored backup piece 1
channel ch1: restore complete, elapsed time: 00:00:15
channel ch1: starting datafile backup set restore
channel ch1: specifying datafile(s) to restore from backup set
channel ch1: restoring datafile 00005 to D:\ORACLE19C\DB\ORADATA\SCTCDB\PDBSEED\SYSTEM01.DBF
channel ch1: reading from backup piece D:\RMAN\SCT_SCTCDB_ LVL0_050O6TG9_1_1
channel ch1: piece handle=D:\RMAN\SCT_SCTCDB_ LVL0_050O6TG9_1_1 tag=DAILYFULL_DB_LVL0_BKP
channel ch1: restored backup piece 1
channel ch1: restore complete, elapsed time: 00:00:15
channel ch1: starting datafile backup set restore
channel ch1: specifying datafile(s) to restore from backup set
channel ch1: restoring datafile 00009 to D:\ORACLE19C\DB\ORADATA\SCTCDB\SCT\SYSTEM01.DBF
channel ch1: reading from backup piece D:\RMAN\SCT_SCTCDB_ LVL0_030O6TG5_1_1
channel ch1: piece handle=D:\RMAN\SCT_SCTCDB_ LVL0_030O6TG5_1_1 tag=DAILYFULL_DB_LVL0_BKP
channel ch1: restored backup piece 1
channel ch1: restore complete, elapsed time: 00:00:15
channel ch1: starting datafile backup set restore
channel ch1: specifying datafile(s) to restore from backup set
channel ch1: restoring datafile 00011 to D:\ORACLE19C\DB\ORADATA\SCTCDB\SCT\UNDOTBS01.DBF
channel ch1: reading from backup piece D:\RMAN\SCT_SCTCDB_ LVL0_080O6TH9_1_1
channel ch1: piece handle=D:\RMAN\SCT_SCTCDB_ LVL0_080O6TH9_1_1 tag=DAILYFULL_DB_LVL0_BKP
channel ch1: restored backup piece 1
channel ch1: restore complete, elapsed time: 00:00:01
channel ch1: starting datafile backup set restore
channel ch1: specifying datafile(s) to restore from backup set
channel ch1: restoring datafile 00010 to D:\ORACLE19C\DB\ORADATA\SCTCDB\SCT\SYSAUX01.DBF
channel ch1: reading from backup piece D:\RMAN\SCT_SCTCDB_ LVL0_060O6TH2_1_1
channel ch1: piece handle=D:\RMAN\SCT_SCTCDB_ LVL0_060O6TH2_1_1 tag=DAILYFULL_DB_LVL0_BKP
channel ch1: restored backup piece 1
channel ch1: restore complete, elapsed time: 00:00:07
channel ch1: starting datafile backup set restore
channel ch1: specifying datafile(s) to restore from backup set
channel ch1: restoring datafile 00007 to D:\ORACLE19C\DB\ORADATA\SCTCDB\USERS01.DBF
channel ch1: reading from backup piece D:\RMAN\SCT_SCTCDB_ LVL0_0B0O6THG_1_1
channel ch1: piece handle=D:\RMAN\SCT_SCTCDB_ LVL0_0B0O6THG_1_1 tag=DAILYFULL_DB_LVL0_BKP
channel ch1: restored backup piece 1
channel ch1: restore complete, elapsed time: 00:00:01
channel ch1: starting datafile backup set restore
channel ch1: specifying datafile(s) to restore from backup set
channel ch1: restoring datafile 00008 to D:\ORACLE19C\DB\ORADATA\SCTCDB\PDBSEED\UNDOTBS01.DBF
channel ch1: reading from backup piece D:\RMAN\SCT_SCTCDB_ LVL0_090O6THA_1_1
channel ch1: piece handle=D:\RMAN\SCT_SCTCDB_ LVL0_090O6THA_1_1 tag=DAILYFULL_DB_LVL0_BKP
channel ch1: restored backup piece 1
channel ch1: restore complete, elapsed time: 00:00:07
channel ch1: starting datafile backup set restore
channel ch1: specifying datafile(s) to restore from backup set
channel ch1: restoring datafile 00012 to D:\ORACLE19C\DB\ORADATA\SCTCDB\SCT\USERS01.DBF
channel ch1: reading from backup piece D:\RMAN\SCT_SCTCDB_ LVL0_0C0O6THH_1_1
channel ch1: piece handle=D:\RMAN\SCT_SCTCDB_ LVL0_0C0O6THH_1_1 tag=DAILYFULL_DB_LVL0_BKP
channel ch1: restored backup piece 1
channel ch1: restore complete, elapsed time: 00:00:02
channel ch1: starting datafile backup set restore
channel ch1: specifying datafile(s) to restore from backup set
channel ch1: restoring datafile 00006 to D:\ORACLE19C\DB\ORADATA\SCTCDB\PDBSEED\SYSAUX01.DBF
channel ch1: reading from backup piece D:\RMAN\SCT_SCTCDB_ LVL0_070O6TH9_1_1
channel ch1: piece handle=D:\RMAN\SCT_SCTCDB_ LVL0_070O6TH9_1_1 tag=DAILYFULL_DB_LVL0_BKP
channel ch1: restored backup piece 1
channel ch1: restore complete, elapsed time: 00:00:07
channel ch1: starting datafile backup set restore
channel ch1: specifying datafile(s) to restore from backup set
channel ch1: restoring datafile 00001 to D:\ORACLE19C\DB\ORADATA\SCTCDB\SYSTEM01.DBF
channel ch1: reading from backup piece D:\RMAN\SCT_SCTCDB_ LVL0_010O6TG5_1_1
channel ch1: piece handle=D:\RMAN\SCT_SCTCDB_ LVL0_010O6TG5_1_1 tag=DAILYFULL_DB_LVL0_BKP
channel ch1: restored backup piece 1
channel ch1: restore complete, elapsed time: 00:00:35
Finished restore at 12-MAR-22


released channel: ch1
With the above restore, I used only one channel, please adjust based on available hardware resources. Once the backup completes, we can recover the database using the available archive logs. For that you need to know what is the latest available sequence number.
RMAN> list backup of archivelog all;
From the image above, you could see that the latest Sequence number for the SCN is 20, however the listing is kind of confusing (remember I am not a DBA, however eventually I will figure out why the listing is messed up). Once the latest sequence number identified, we can try to recover until last sequence + 1
RMAN> run {
2> allocate channel ch1 device type disk;
3> allocate channel ch2 device type disk;
4> allocate channel ch3 device type disk;
5> allocate channel ch4 device type disk;
6> recover database until sequence 21;
7> release channel ch1;
8> release channel ch2;
9> release channel ch3;
10> release channel ch4;
11> }

allocated channel: ch1
channel ch1: SID=252 device type=DISK

allocated channel: ch2
channel ch2: SID=128 device type=DISK

allocated channel: ch3
channel ch3: SID=375 device type=DISK

allocated channel: ch4
channel ch4: SID=499 device type=DISK

Starting recover at 12-MAR-22

starting media recovery

archived log for thread 1 with sequence 19 is already on disk as file D:\ORA\ARCH\SCT0000000019_1096219042_0001.ARC
archived log for thread 1 with sequence 20 is already on disk as file D:\ORA\ARCH\SCT0000000020_1096219042_0001.ARC
archived log file name=D:\ORA\ARCH\SCT0000000019_1096219042_0001.ARC thread=1 sequence=19
archived log file name=D:\ORA\ARCH\SCT0000000020_1096219042_0001.ARC thread=1 sequence=20
media recovery complete, elapsed time: 00:00:01
Finished recover at 12-MAR-22

released channel: ch1

released channel: ch2

released channel: ch3

released channel: ch4
Finally, we can open the database resetting online redo log files
RMAN> alter database open resetlogs;
Database MUST open without creating any issues at this stage. Continue checking for the database vitals.
Today while running automatic configuration on the Application Tier, I entered the “apps” user password wrong! After the automatic configuration completed, having errors, I couldn’t start the Application tier.
It just said invalid password or database is not open.
Later after going through adautoconfig log files, I could see a number of failed connection attempts stating the account was locked, however I least expected this account to be “apps” (issues that one runs into when not properly exposed to the stack)
I opened SQL from application user and tried to login as apps/apps & was told the account was locked. I unlocked the apps account and ran the autoconfig once again, this time supplying the correct password. Everything went smooth and I was able to start the Application Tier.
So this is what happened. I supplied a wrong password for autoconfig & consecutive attempts to connect database from different scripts used the same credentials & after 10 failed attempts the account got locked up! causing rest of the issues.
So, be very careful when you are supplying apps password to scripts. As I am not an APPS DBA, it took me a while to figure this one out!
Optionally you may apply a better solution as mentioned here. Regardless, just be careful when you are supplying “apps” user password
11g R2? too late to post anything for 11g? Wait, there are thousands of Businesses still using Oracle database 10g. So let us see how RMAN could be simplified on Windows. I hardly see many articles explaining such for Windows platform in general.
Considering you have 11g database already installed & setup for Archive logging, we’ll start by setting up RMAN backup first, then try a restore routine on a different sever.
Like cron jobs on Linux environment, for Windows we will use Task Scheduler for RMAN backups. Here are couple of batch files we will be using for making RMAN backup on Windows.
run
{
ALLOCATE CHANNEL c1 DEVICE TYPE disk;
ALLOCATE CHANNEL c2 DEVICE TYPE disk;
ALLOCATE CHANNEL c3 DEVICE TYPE disk;
ALLOCATE CHANNEL c4 DEVICE TYPE disk;
crosscheck archivelog all;
crosscheck backup;
BACKUP AS COMPRESSED BACKUPSET DATABASE FORMAT 'D:\RMAN_BACKUP\PROD_comp_%d_ lvl0_%U' TAG "dailyfull_db_lvl0_bkp" INCLUDE CURRENT CONTROLFILE;
sql 'ALTER SYSTEM ARCHIVE LOG CURRENT';
BACKUP AS COMPRESSED BACKUPSET ARCHIVELOG ALL FORMAT 'D:\RMAN_BACKUP\archive_%d_lvl0_%U';
DELETE NOPROMPT archivelog all completed before 'sysdate-7';
backup current controlfile format 'D:\RMAN_BACKUP\bkpcontrol_file.ctl_%d_%T'               ;
DELETE NOPROMPT OBSOLETE RECOVERY WINDOW OF 7 DAYS;
RELEASE CHANNEL c1;
RELEASE CHANNEL c2;
RELEASE CHANNEL c3;
RELEASE CHANNEL c4;
}
Save this script as “rman_backup.cmd”. You can save it with any other name ending with .cmd or .bat extension. Make sure you change the name in the next script incase if you choose a name other than “rman_backup.cmd”. Please note, I am taking backup on “D:\RMAN_BACKUP” folder, you should change “D:\RMAN_BACKUP” with the exact location that is used for the backup!
Now, we will create another cmd file that will call the above script.
@echo off
For /f "tokens=2-4 delims=/ " %%a in ('date /t') do (set mydate=%%c-%%a-%%b)
For /f "tokens=1-2 delims=/:" %%a in ('time /t') do (set mytime=%%a%%b)
:: echo %mydate%_%mytime%

set filename="D:\RMAN_BACKUP\logs\%mydate%_%mytime%_rman_backup.log"
:: echo %filename%

rman target / nocatalog cmdfile='D:\scripts\rman_backup.cmd' log='%filename%'
Once again you can save this file with any name, provided the extension is either .cmd or .bat. I saved this cmd file as “callrman.cmd”
Make sure the path ” D:\RMAN_BACKUP\logs” or equivalent exists prior running the scripts.
Now fire up Windows Task scheduler and create a basic job
That’s all. Everyday, at a said time, RMAN backups will be created and kept in the destination folder. We are using 7 days retention policy with the script file, so on the 8th day obsolete backups will be purged. Depending upon the disk space available, you should adjust the retention policy for your backups. Don’t forget to copy those backup pieces to an external medium to insure maximum availability during a crisis.
That completes the simplest form of Oracle RMAN backups on Windows platform.
RMAN Restore
Currently we are discussing about restoring the RMAN backup to same version of Oracle database. If you want to restore RMAN backup to a higher version of Oracle database, it will be an entirely different exercise.
RMAN backups are the fastest, easiest incase if you are doing it right. No hassles like creating tablespaces, schemas and then waiting hours for the import process to complete! The biggest size of the database I ever dealt with is 550GB and a server with 2×4 core processors, 16GB total memory restores the 140GB backup in less than 1.5 hours. I suggest you to start using RMAN backups the soonest possible regardless whether your database is just few megabytes in size.
Today we will see how to restore RMAN backup from Server A to Server B, ie, to a different physical server with a different database name.
It might sound bit unethical to ask you to create a new database using Oracle database creation wizard for this purpose, however this is what we will do for this exercise. This will save us some time figuring out setting up many other parameters for the new database at later stages.
So let us start.
Start DBCA and create a database with a database name that you prefer for the purpose, for eg: “ORCL”
Once the database created, shut it down & delete all the datafiles from the data store. For example, I had all my data files in the folder C:\oracle\oradata\orcl, where orcl is the database name!
Now copy the RMAN backups from Server A to Server B. I’ve copied only one day backups from Server A to Server B and make a note of the exact location where you copied the backup files. In my case, I copied the files to “C:\RMAN”
From an elevated command prompt start SQLPLUS as sysdba & start the database in non mounted mode.
Now, start another elevated command prompt and connect to RMAN in Auxiliary mode, for duplication of the database.
We are all set to restore the RMAN backup to Server B now. However, there are few things we have to insure to make a successful restoration. For example renaming the datafiles. Based on the new datastore location where you are restoring the database files, each data file should be renamed. Please refer the below sample script for the same.
run
{
ALLOCATE AUXILIARY CHANNEL c1 DEVICE TYPE disk;
ALLOCATE AUXILIARY CHANNEL c2 DEVICE TYPE disk;
ALLOCATE AUXILIARY CHANNEL c3 DEVICE TYPE disk;
ALLOCATE AUXILIARY CHANNEL c4 DEVICE TYPE disk;
duplicate database to "ORCL" backup location 'C:\RMAN' nofilenamecheck
db_file_name_convert=('D:\Oracle\oradata\PROD','C:\Oracle\oradata\orcl')
LOGFILE
GROUP 1 (
'C:\Oracle\oradata\orcl\redo01a.log',
'C:\Oracle\oradata\orcl\redo01b.log'
) SIZE 1000M ,
GROUP 2 (
'C:\Oracle\oradata\orcl\redo02a.log',
'C:\Oracle\oradata\orcl\redo02b.log'
) SIZE 1000M ,
GROUP 3 (
'C:\Oracle\oradata\orcl\redo03a.log',
'C:\Oracle\oradata\orcl\redo03b.log'
) SIZE 1000M ,
GROUP 4 (
'C:\Oracle\oradata\orcl\redo04a.log',
'C:\Oracle\oradata\orcl\redo04b.log'
) SIZE 1000M ;
RELEASE CHANNEL c1;
RELEASE CHANNEL c2;
RELEASE CHANNEL c3;
RELEASE CHANNEL c4;
}
As I am duplicating the database to existing one, I don’t have to go through the tedious process of changing the dbid or database name etc. Once the restore is done, all I need is to disable the archive logging and go online! We will see those in next few steps.
Please give attention to “db_file_name_convert“, Server A had the datafiles in the path “D:\oracle\oradata\PROD” and the Server B, we will be restoring the datafile to C:\oracle\ordata\orcl folder. So we must mention those changes here in the script. The same way we need to rename the logfiles and locations also. I hope the above script is self explanatory on that regard.
You may not need all those channel allocation for a small database, please adjust the number of cannels allocated as per your requirements. Give a try with less or more number of channels incase if you want to learn what happens :)
Execute the above script from the RMAN prompt.
If there are no errors, based on the size of the database & hardware resources RMAN will return to the prompt once the activities are finished.
Before doing anything else, we need to insure that the Archive logging is disabled for the newly restored database. Rush to the previous SQLPlus session that you started with nomount. This session is already disconnected, hence reconnect and shutdown immediate.
Now start the database in mount state and disable the archive logging.
Shutdown the database and restart normally.
That’s all, your Server B “orcl” has all the data from Server A “PROD” database now. If this is a production recovery, you can change the database name using “NID” utility, that is supported from Oracle database 9i onwards. Hope this helps few Oracle database beginners out there.
As we have restored full database with archive logs, there is no need to restore logs. Cross verify the database details
Updated on 8th October 2021 for Microsoft Edge Version 94.0.x.x & for Windows 11 that comes without Internet Explorer (or it doesn’t allow you to start Internet Explorer)
A much easier method is available with versions later than the one I used earlier.
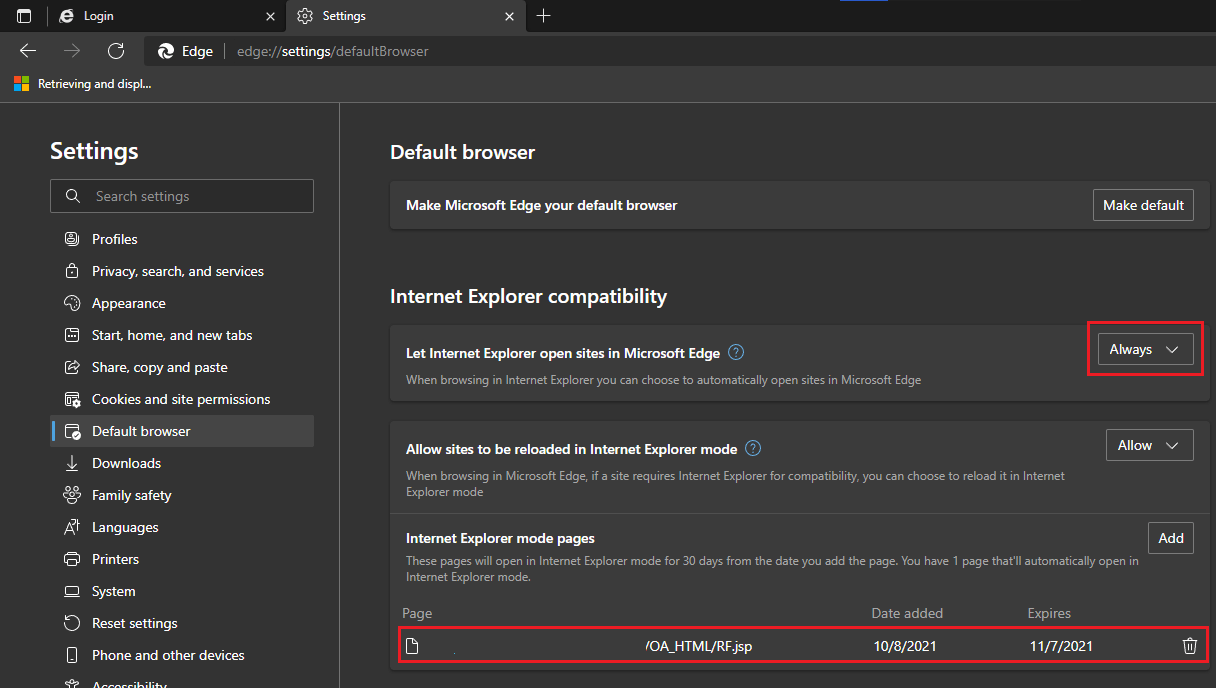
Step# 1. Go to Edge settings (type edge://settings in the address bar and select “Default Browser”
Change “Allow sites to be reloaded in the Internet Explorer mode” to “Allow”, that will require you to restart the browser. Please restart
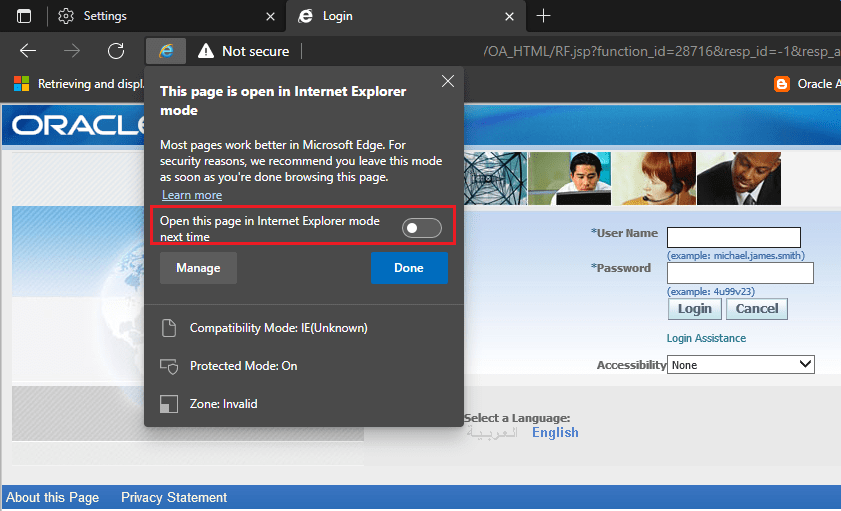
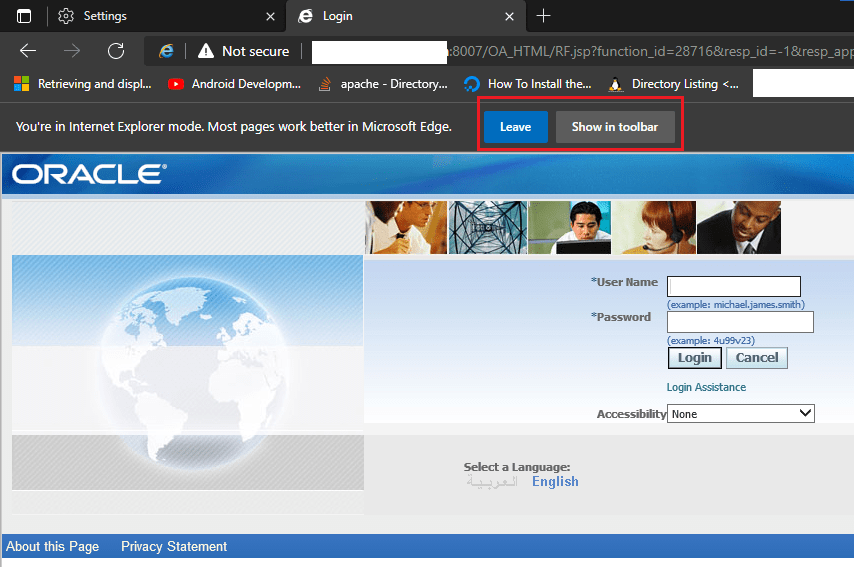
Step# 2. Now enter the address of your Oracle Application in the address bar and wait for the login page to load. Once loaded, click on the “three dots” menu by the extreme right of the browser and select “Reload in Internet Explorer mode”
This will open another dialog box as seen with the above image. Toggle “Open this page in Internet Explorer mode next time” and click “Done” button, that will produce more notifications like the one you could see with the below image.
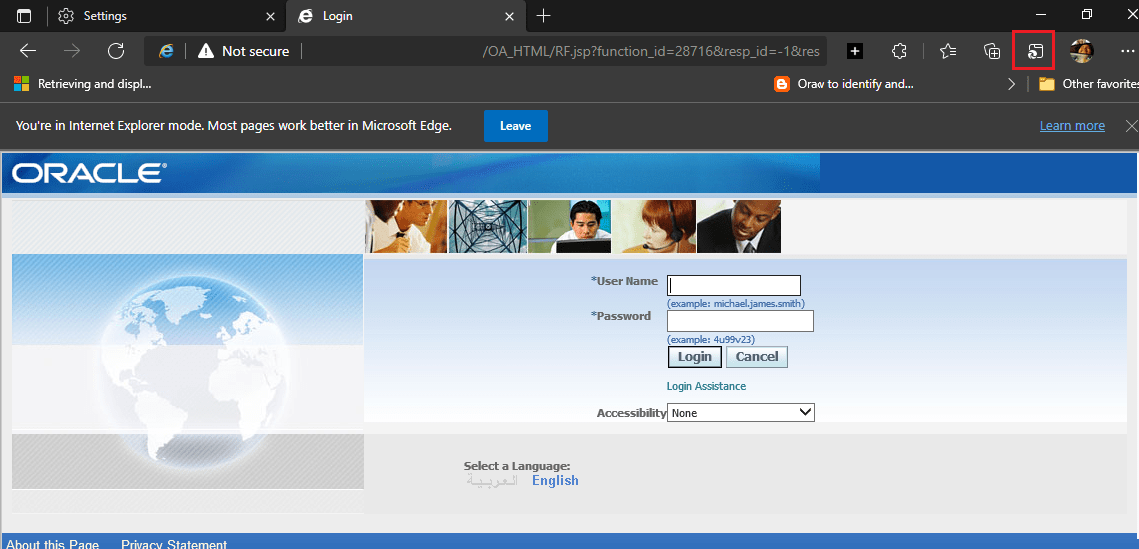
It asks you to leave the Internet Explorer mode and another button “Show in toolbar”. This is an interesting button, clicking that starts showing a small tool button in the tools area and the button will reload the current page in “Internet Explorer mode”.
That’s all. Just click the toolbar button and your Oracle Application login page will be loaded in “Internet Explorer mode” immediately.
Toggling the switch to “Open this page in Internet Explorer mode next time” in the “Step# 2” adds an entry to “Internet Explorer mode pages” area for your current page and the entry is valid for next 30 days. Microsoft is expecting you to modernize your “page” within those next 30 days ;). Once this entry expires, you must get the “Open this page in Internet Explorer mode next time” dialog box once again.
October 8, 2021 update ends here.
After 25 years ever since it was launched, Windows 11 will be the first OS that is not shipping with Internet Explorer.
How does this matter to Businesses those use Oracle Application versions 11 & 12.0.xx? Well, currently Internet Explorer is the only one browser that allows to load Oracle JRE (NPAPI client) for Oracle Forms, on which much of the Oracle module rely.
Oracle Applications has patched the latest releases with a technology called JWS (Java Web Start), that let’s the users to download a jnlp file from the application and Oracle Java Run Time to start in desktop mode (without being loaded in a browser session) loading Oracle Forms. Well, this enhancement is not available for Application versions 11 & 12.0.xx
Microsoft was expecting a huge cry from the Businesses that use Oracle Applications/legacy implementations those cost millions of dollars and fine tuned for Internet Explorer. Cutting these businesses could mean loads for Microsoft, So they have integrated “IE Mode” into their chromium based “Edge browser”, which is the default browser on Windows 11. IE Mode makes Edge Chrome to “act” as if it were Internet Explorer for legacy Web based applications & loads NPAPI clients like JRE.
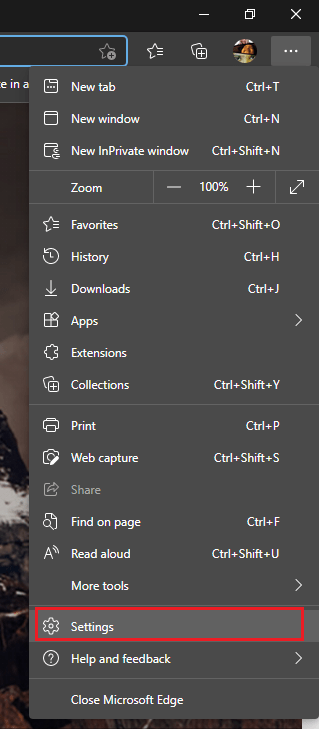
Today let us see how to configure Microsoft Edge Chrome for Oracle Applications.
Start Microsoft Edge Chrome & open “Settings”
Click on Default Browser & spend a moment to check currently set options.
Let us change few of those settings like shown below.
Let Internet Explorer open sites in Microsoft Edge -> Change to Allow
Allow sites to be reloaded in Internet Explorer mode ->Change to “Allow”. This will require you to restart the browser.
You must add the sites those you want to open in IE mode by clicking “Internet Explorer mode pages” Add button. Such pages will have maximum 30 days validity. Without, JRE will not load and will prompt you to download it from the default location.
Now, let us click the restart button & give it a try.
I apologize for not including the datapatch part with the post. I don’t know how did I miss it entirely, which is not me usually. Amending the datapatch part by the bottom of the article.
Much of the times I use latest Oracle technologies for learning & they hardly make to any of the PRODUCTION environments those I support at work. Recently I wanted to see how to patch Oracle 19c installation on Windows and to be frank, it was buttery smooth.
Let us quickly see how to apply a patch to a Windows installation of Oracle 19c database.
Shutdown all instances & Windows services for Oracle. Make sure you have taken adequate number of backups for the database(s).
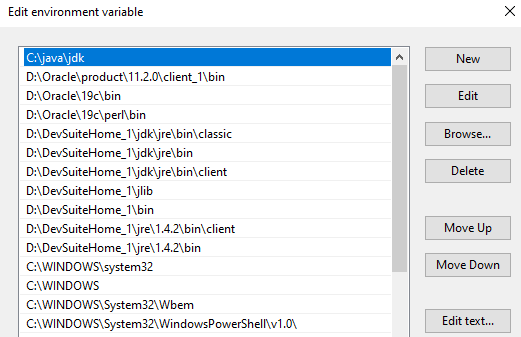
Check you computer’s PATH variable. Insure you have %ORACLE_HOME%\perl\bin, in my case “D:\Oracle\19c\perl\bin” as the first entry for PERL.
This is how the PATH information before I make the above changes to it.
Here 11g 32Bit client is the first Oracle software in the PATH, we will modify it like below
Once the patching done, you can rollback the PATH variable according to your requirements.
Visit Oracle support and download the patch, the latest patch for Oracle Database 19c is “32409154”. Patch is only available to customers with a valid support contract.
Extract the archive.
I’ve extracted the archive within the Download folder and the path is
As usual, based on your computer’s hardware capabilities, the patch would finish sooner or later. There will be 2 prompts those you need to say Yes in order to progress the patching.
Once OPatch completes, it is time for us to execute datapatch for the databases that are going to get upgraded to the latest version that you just patched.
Make sure that you have restarted the Windows Services for Oracle. Patching restarts the database, regardless I would suggest you to shutdown and restart the database once after Oracle services are restarted. Ensure the PDBs are opened.
Move to $ORACLE_HOME/OPatch folder & execure “datapatch.bat -verbose”
PS D:\Oracle19c\OPatch> .\datapatch.bat -verbose
SQL Patching tool version 19.3.0.0.0 Production on Wed Mar  9 18:32:28 2022
Copyright (c) 2012, 2019, Oracle.  All rights reserved.

Log file for this invocation: D:\Oracle19c\cfgtoollogs\sqlpatch\sqlpatch_12584_2022_03_09_18_32_28\sqlpatch_invocation.log

Connecting to database...OK
Gathering database info...done

Note:  Datapatch will only apply or rollback SQL fixes for PDBs
       that are in an open state, no patches will be applied to closed PDBs.
       Please refer to Note: Datapatch: Database 12c Post Patch SQL Automation
       (Doc ID 1585822.1)

Bootstrapping registry and package to current versions...done
Determining current state...done

Current state of interim SQL patches:
  No interim patches found

Current state of release update SQL patches:
  Binary registry:
    19.11.0.0.0 Release_Update 210417094636: Installed
  PDB CDB$ROOT:
    No release update patches installed
  PDB PDB$SEED:
    No release update patches installed
  PDB SCT:
    No release update patches installed

Adding patches to installation queue and performing prereq checks...done
Installation queue:
  For the following PDBs: CDB$ROOT PDB$SEED SCT
    No interim patches need to be rolled back
    Patch 32409154 (Windows Database Bundle Patch : 19.11.0.0.210420 (32409154)):
      Apply from 19.1.0.0.0 Feature Release to 19.11.0.0.0 Release_Update 210417094636
    No interim patches need to be applied

Installing patches...
Patch installation complete.  Total patches installed: 3

Validating logfiles...done
Patch 32409154 apply (pdb CDB$ROOT): SUCCESS
  logfile: D:\Oracle19c\cfgtoollogs\sqlpatch\32409154\24073904/32409154_apply_SCTCDB_CDBROOT_2022Mar09_18_33_46.log (no errors)
Patch 32409154 apply (pdb PDB$SEED): SUCCESS
  logfile: D:\Oracle19c\cfgtoollogs\sqlpatch\32409154\24073904/32409154_apply_SCTCDB_PDBSEED_2022Mar09_18_39_19.log (no errors)
Patch 32409154 apply (pdb SCT): SUCCESS
  logfile: D:\Oracle19c\cfgtoollogs\sqlpatch\32409154\24073904/32409154_apply_SCTCDB_SCT_2022Mar09_18_39_19.log (no errors)
SQL Patching tool complete on Wed Mar  9 18:45:01 2022
PS D:\Oracle19c\OPatch>
Now we have to check for invalid objects. My database didn’t have any objects, it was a default installation with 0 custom objects in the SCT. However, if you were having a PRODUCTION database, you must confirm that there are no invalid objects post patching. We will see how to accomplish this at next step.
C:\Windows\system32>SET ORACLE_HOME=D:\Oracle19c

C:\Windows\system32>sqlplus / as sysdba

SQL*Plus: Release 19.0.0.0.0 - Production on Wed Mar 9 18:54:54 2022
Version 19.11.0.0.0

Copyright (c) 1982, 2020, Oracle.  All rights reserved.


Connected to:
Oracle Database 19c Enterprise Edition Release 19.0.0.0.0 - Production
Version 19.11.0.0.0

SQL> @?/rdbms/admin/utlrp.sql

Session altered.


TIMESTAMP
--------------------------------------------------------------------------------
COMP_TIMESTAMP UTLRP_BGN              2022-03-09 18:55:49

DOC>   The following PL/SQL block invokes UTL_RECOMP to recompile invalid
DOC>   objects in the database. Recompilation time is proportional to the
DOC>   number of invalid objects in the database, so this command may take
DOC>   a long time to execute on a database with a large number of invalid
DOC>   objects.
DOC>
DOC>   Use the following queries to track recompilation progress:
DOC>
DOC>   1. Query returning the number of invalid objects remaining. This
DOC>      number should decrease with time.
DOC>         SELECT COUNT(*) FROM obj$ WHERE status IN (4, 5, 6);
DOC>
DOC>   2. Query returning the number of objects compiled so far. This number
DOC>      should increase with time.
DOC>         SELECT COUNT(*) FROM UTL_RECOMP_COMPILED;
DOC>
DOC>   This script automatically chooses serial or parallel recompilation
DOC>   based on the number of CPUs available (parameter cpu_count) multiplied
DOC>   by the number of threads per CPU (parameter parallel_threads_per_cpu).
DOC>   On RAC, this number is added across all RAC nodes.
DOC>
DOC>   UTL_RECOMP uses DBMS_SCHEDULER to create jobs for parallel
DOC>   recompilation. Jobs are created without instance affinity so that they
DOC>   can migrate across RAC nodes. Use the following queries to verify
DOC>   whether UTL_RECOMP jobs are being created and run correctly:
DOC>
DOC>   1. Query showing jobs created by UTL_RECOMP
DOC>         SELECT job_name FROM dba_scheduler_jobs
DOC>            WHERE job_name like 'UTL_RECOMP_SLAVE_%';
DOC>
DOC>   2. Query showing UTL_RECOMP jobs that are running
DOC>         SELECT job_name FROM dba_scheduler_running_jobs
DOC>            WHERE job_name like 'UTL_RECOMP_SLAVE_%';
DOC>#

PL/SQL procedure successfully completed.


TIMESTAMP
--------------------------------------------------------------------------------
COMP_TIMESTAMP UTLRP_END              2022-03-09 18:55:50

DOC> The following query reports the number of invalid objects.
DOC>
DOC> If the number is higher than expected, please examine the error
DOC> messages reported with each object (using SHOW ERRORS) to see if they
DOC> point to system misconfiguration or resource constraints that must be
DOC> fixed before attempting to recompile these objects.
DOC>#

OBJECTS WITH ERRORS
-------------------
                  0

DOC> The following query reports the number of exceptions caught during
DOC> recompilation. If this number is non-zero, please query the error
DOC> messages in the table UTL_RECOMP_ERRORS to see if any of these errors
DOC> are due to misconfiguration or resource constraints that must be
DOC> fixed before objects can compile successfully.
DOC> Note: Typical compilation errors (due to coding errors) are not
DOC>       logged into this table: they go into DBA_ERRORS instead.
DOC>#

ERRORS DURING RECOMPILATION
---------------------------
                          0


Function created.


PL/SQL procedure successfully completed.


Function dropped.


PL/SQL procedure successfully completed.

SQL> alter session set container=PDB$SEED;

Session altered.

SQL> alter session set "_oracle_script"=TRUE;

Session altered.

SQL> alter pluggable database pdb$seed close immediate instances=all;

Pluggable database altered.

SQL> alter pluggable database pdb$seed OPEN READ WRITE;

Pluggable database altered.

SQL> @?/rdbms/admin/utlrp.sql

Session altered.


TIMESTAMP
--------------------------------------------------------------------------------
COMP_TIMESTAMP UTLRP_BGN              2022-03-09 19:06:20

DOC>   The following PL/SQL block invokes UTL_RECOMP to recompile invalid
DOC>   objects in the database. Recompilation time is proportional to the
DOC>   number of invalid objects in the database, so this command may take
DOC>   a long time to execute on a database with a large number of invalid
DOC>   objects.
DOC>
DOC>   Use the following queries to track recompilation progress:
DOC>
DOC>   1. Query returning the number of invalid objects remaining. This
DOC>      number should decrease with time.
DOC>         SELECT COUNT(*) FROM obj$ WHERE status IN (4, 5, 6);
DOC>
DOC>   2. Query returning the number of objects compiled so far. This number
DOC>      should increase with time.
DOC>         SELECT COUNT(*) FROM UTL_RECOMP_COMPILED;
DOC>
DOC>   This script automatically chooses serial or parallel recompilation
DOC>   based on the number of CPUs available (parameter cpu_count) multiplied
DOC>   by the number of threads per CPU (parameter parallel_threads_per_cpu).
DOC>   On RAC, this number is added across all RAC nodes.
DOC>
DOC>   UTL_RECOMP uses DBMS_SCHEDULER to create jobs for parallel
DOC>   recompilation. Jobs are created without instance affinity so that they
DOC>   can migrate across RAC nodes. Use the following queries to verify
DOC>   whether UTL_RECOMP jobs are being created and run correctly:
DOC>
DOC>   1. Query showing jobs created by UTL_RECOMP
DOC>         SELECT job_name FROM dba_scheduler_jobs
DOC>            WHERE job_name like 'UTL_RECOMP_SLAVE_%';
DOC>
DOC>   2. Query showing UTL_RECOMP jobs that are running
DOC>         SELECT job_name FROM dba_scheduler_running_jobs
DOC>            WHERE job_name like 'UTL_RECOMP_SLAVE_%';
DOC>#

PL/SQL procedure successfully completed.


TIMESTAMP
--------------------------------------------------------------------------------
COMP_TIMESTAMP UTLRP_END              2022-03-09 19:06:22

DOC> The following query reports the number of invalid objects.
DOC>
DOC> If the number is higher than expected, please examine the error
DOC> messages reported with each object (using SHOW ERRORS) to see if they
DOC> point to system misconfiguration or resource constraints that must be
DOC> fixed before attempting to recompile these objects.
DOC>#

OBJECTS WITH ERRORS
-------------------
                  0

DOC> The following query reports the number of exceptions caught during
DOC> recompilation. If this number is non-zero, please query the error
DOC> messages in the table UTL_RECOMP_ERRORS to see if any of these errors
DOC> are due to misconfiguration or resource constraints that must be
DOC> fixed before objects can compile successfully.
DOC> Note: Typical compilation errors (due to coding errors) are not
DOC>       logged into this table: they go into DBA_ERRORS instead.
DOC>#

ERRORS DURING RECOMPILATION
---------------------------
                          0


Function created.


PL/SQL procedure successfully completed.


Function dropped.


PL/SQL procedure successfully completed.

SQL> alter pluggable database pdb$seed close immediate instances=all;

Pluggable database altered.

SQL> alter pluggable database pdb$seed OPEN READ ONLY;

Pluggable database altered.

SQL> alter session set "_oracle_script"=FALSE;

Session altered.

SQL> alter pluggable database pdb$seed close immediate instances=all;

Pluggable database altered.

SQL> alter pluggable database pdb$seed OPEN READ ONLY;

Pluggable database altered.

SQL> alter session set container=SCT;

Session altered.

SQL> @?/rdbms/admin/utlrp.sql

Session altered.


TIMESTAMP
--------------------------------------------------------------------------------
COMP_TIMESTAMP UTLRP_BGN              2022-03-09 18:56:35

DOC>   The following PL/SQL block invokes UTL_RECOMP to recompile invalid
DOC>   objects in the database. Recompilation time is proportional to the
DOC>   number of invalid objects in the database, so this command may take
DOC>   a long time to execute on a database with a large number of invalid
DOC>   objects.
DOC>
DOC>   Use the following queries to track recompilation progress:
DOC>
DOC>   1. Query returning the number of invalid objects remaining. This
DOC>      number should decrease with time.
DOC>         SELECT COUNT(*) FROM obj$ WHERE status IN (4, 5, 6);
DOC>
DOC>   2. Query returning the number of objects compiled so far. This number
DOC>      should increase with time.
DOC>         SELECT COUNT(*) FROM UTL_RECOMP_COMPILED;
DOC>
DOC>   This script automatically chooses serial or parallel recompilation
DOC>   based on the number of CPUs available (parameter cpu_count) multiplied
DOC>   by the number of threads per CPU (parameter parallel_threads_per_cpu).
DOC>   On RAC, this number is added across all RAC nodes.
DOC>
DOC>   UTL_RECOMP uses DBMS_SCHEDULER to create jobs for parallel
DOC>   recompilation. Jobs are created without instance affinity so that they
DOC>   can migrate across RAC nodes. Use the following queries to verify
DOC>   whether UTL_RECOMP jobs are being created and run correctly:
DOC>
DOC>   1. Query showing jobs created by UTL_RECOMP
DOC>         SELECT job_name FROM dba_scheduler_jobs
DOC>            WHERE job_name like 'UTL_RECOMP_SLAVE_%';
DOC>
DOC>   2. Query showing UTL_RECOMP jobs that are running
DOC>         SELECT job_name FROM dba_scheduler_running_jobs
DOC>            WHERE job_name like 'UTL_RECOMP_SLAVE_%';
DOC>#

PL/SQL procedure successfully completed.


TIMESTAMP
--------------------------------------------------------------------------------
COMP_TIMESTAMP UTLRP_END              2022-03-09 18:56:36

DOC> The following query reports the number of invalid objects.
DOC>
DOC> If the number is higher than expected, please examine the error
DOC> messages reported with each object (using SHOW ERRORS) to see if they
DOC> point to system misconfiguration or resource constraints that must be
DOC> fixed before attempting to recompile these objects.
DOC>#

OBJECTS WITH ERRORS
-------------------
                  0

DOC> The following query reports the number of exceptions caught during
DOC> recompilation. If this number is non-zero, please query the error
DOC> messages in the table UTL_RECOMP_ERRORS to see if any of these errors
DOC> are due to misconfiguration or resource constraints that must be
DOC> fixed before objects can compile successfully.
DOC> Note: Typical compilation errors (due to coding errors) are not
DOC>       logged into this table: they go into DBA_ERRORS instead.
DOC>#

ERRORS DURING RECOMPILATION
---------------------------
                          0


Function created.


PL/SQL procedure successfully completed.


Function dropped.


PL/SQL procedure successfully completed.

SQL>
Use SQL Developer & check whether there are any invalid objects. In addition to invalid objects, you must check plugged in database violations also. We will see how to in next few steps.
You need to check PDB violations on both root and pdb containers (CDB$ROOT, SCT (my pdb name)). Warnings could be addressed later, TYPE “ERROR” should be immediately addressed before you open the PDB for read write operations.
Fix the errors following instructions available from either Oracle support or blog posts (better & less complex)
Simple & neat right? Share your experience in the comments area.
Recently I had to install Oracle 11G R2 on a computer running Windows 10 20H2. Though the software installation completed successfully, I came across a ORA-28000 while creating a new database using DBCA. I was logged in as Domain\Administrator account while creating the database. Immediately remembered our troubles with Windows 2019 server recently, that wouldn’t allow the domain administrator account “Administrator” to change any vitals while logged in! (You may note run in to this situation if you are logged in as another domain administrator, eg: your own user account that is a domain account with admin privileges)
As both Windows 10 & Windows Server OS (2016+) share much of the same code, most of these behaviors are visible on both OS and the thankfully the solutions are the same. If you were having the Oracle installation error ORA-28000 and the situations are matching the above described, please head towards making the following changes. Please note, you must take maximum precautions while changing registry, local security policies etcetera. You must remember, ORA-28000 could arise when Oracle accounts are locked up due different reasons, those you need to take care differently. This post is strictly dealing with the ORA-28000 that arises during the database creation using DBCA.
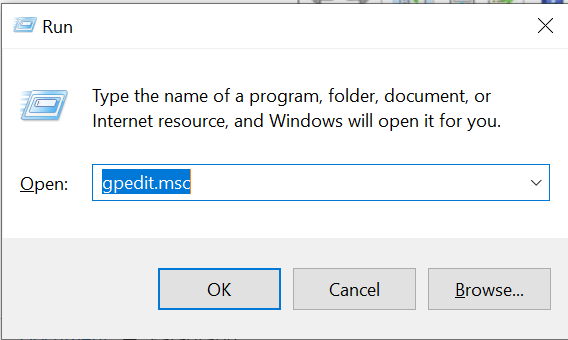
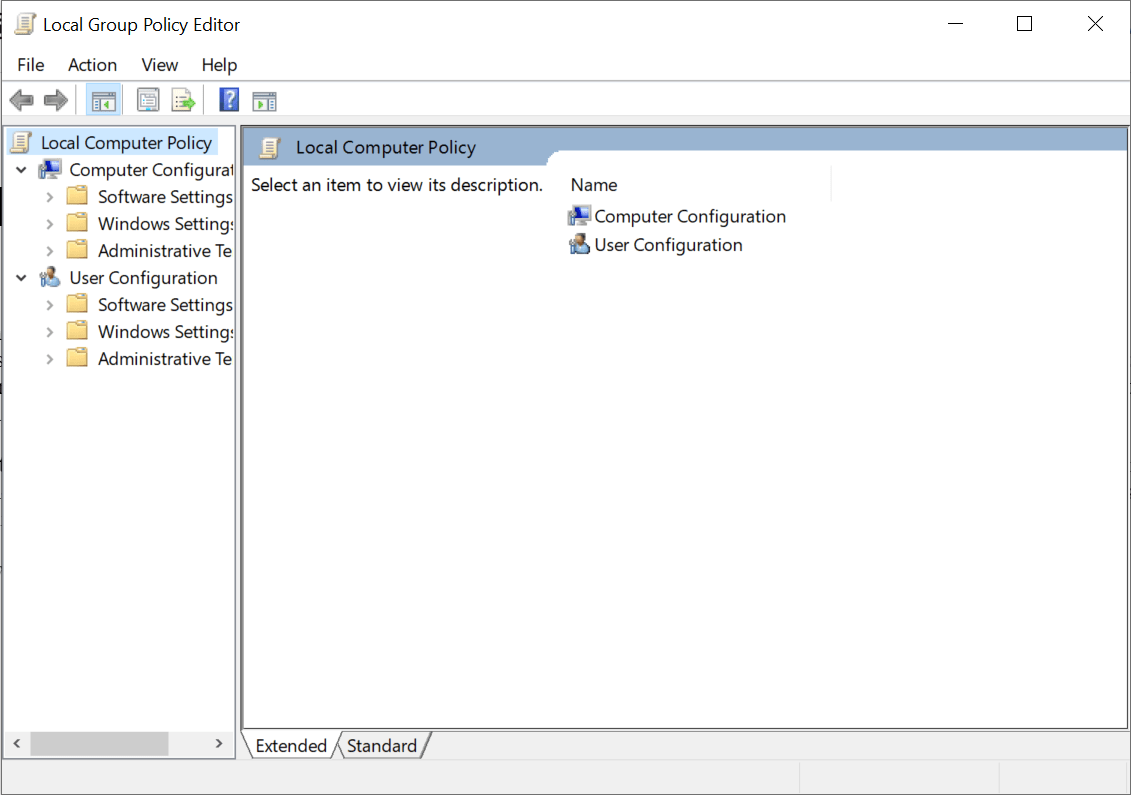
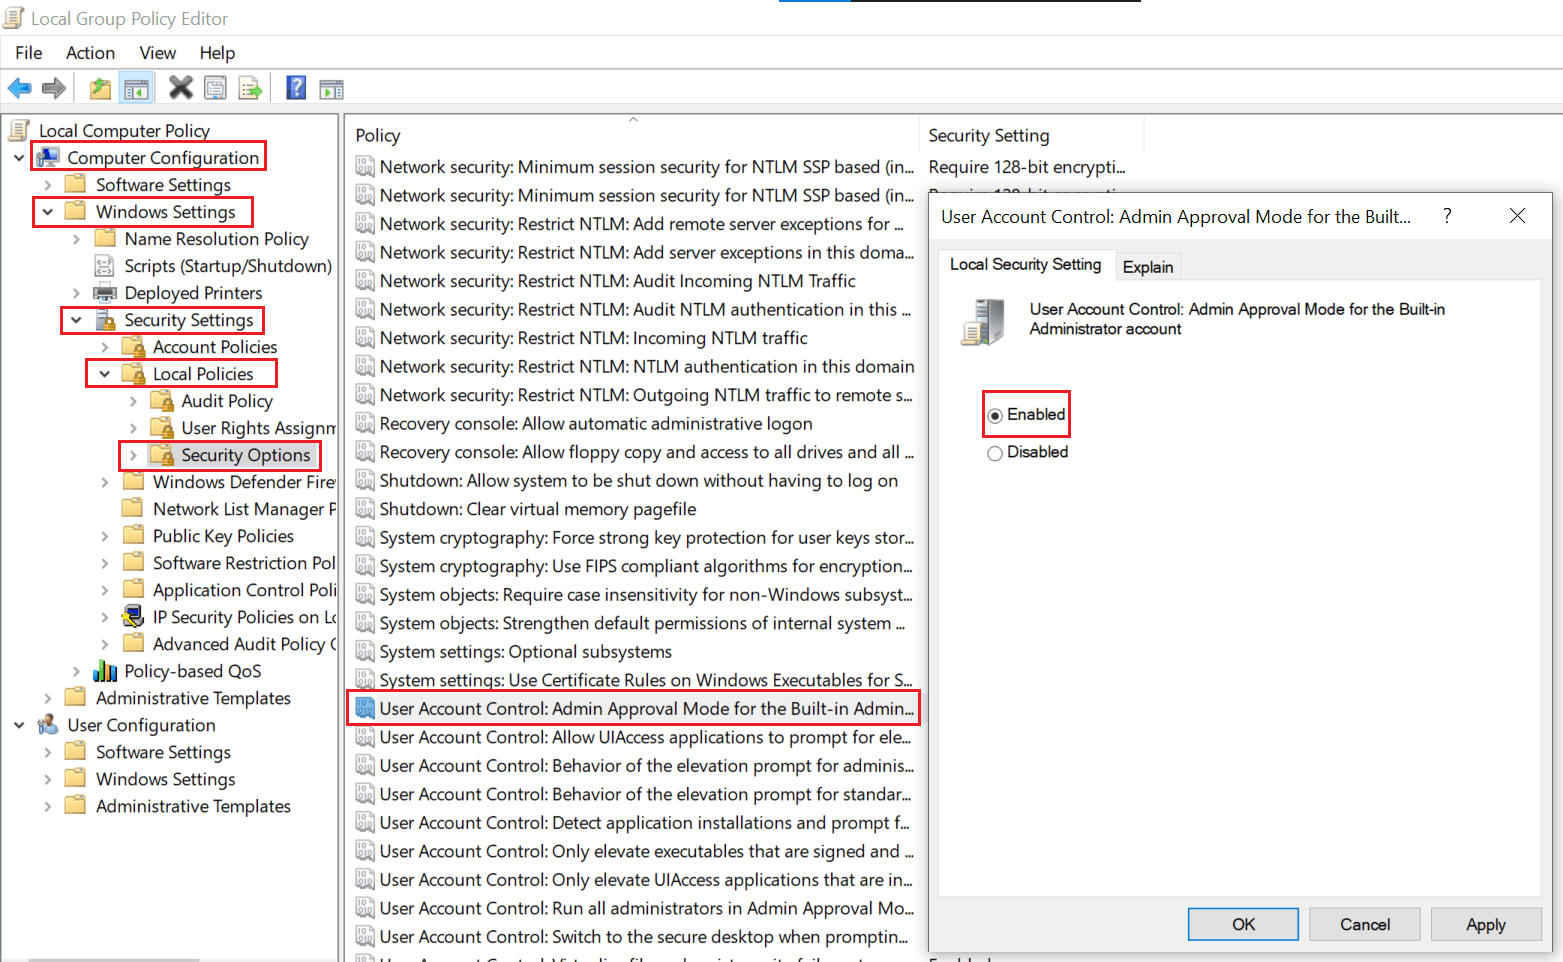
Run/Execute gpedit.msc
You have to open the node Computer Configuration->Windows Settings->Security Settings->Local Policies->Security Options and configure “User Account Control: Admin Approval Mode for the Built-in Administrator account”. Follow the below image for more details.
Once enabled, you must sign off and log in to bring this mode change in effect. Although this enablement is for the built-in local “Administrator” account, somehow due to the similarities in the account names, Domain administrator account “Administrator” also gets restricted. This could be planned or a bug from Microsoft.
You can use DBCA to delete the database that you were forced to abort during creation & continue creating a database with same name or another now.
Recently we wanted to shutdown a server for RAID rebuild and a copy of the MS SQL database was restored on my laptop machine. While checking the vitals of the database (3rd party configured), I noticed that the database was using FULL Recovery model and the Transaction logs were consuming 97.6% of the total reserved space. As I didn’t want to waste expensive SSD storage from my laptop, decided to change the recovery model to “Simple”, which doesn’t really release the free space.
MS SQL provides a functionality called shrinking, using that you can shrink both database and transaction log files. I will not recommend you to use shrinking in a production environment, however you can always try “stuffs” on a TEST environment.
Let us see how the shrinking is initiated and how does it change the disk space usage. Before shrinking, make sure that you have changed the database Recovery model to “Simple” from “Full”
Right click on the target database and select “Tasks->Shrink->Files”. Cross verify that you selected “Files”
From the Database Files and filegroups section, for File Type Select Log from the dropdown. Verify rest of the defaults and click “OK”. This will initiate shrinking the Transaction Logs and based on the size of the file(s), this may take a while to finish. You can re-run the reports to verify that disk space usage.
After the shrinking finishes, you will see that all the unused space reserved for the Transactional Logs were released by running the Disk Usage standard report.
Although I asked you not to use shrinking in a production environment, feel free to do it from your local system. Learn what breaks and what makes systems, so that you can take a better decisions while handling production instances.