
Update on 15th August 2024
It looks like one of the parties, either Intel or Microsoft (must be intel, because disabling the intel display adaptor helped earlier) has fixed the issue & screen recording works as expected even on multiple displays. Enjoy!
Updated on 20th December 2023. Yesterday, I came across Intel forum discussion, about a particular decoder issue strongly tied to Intel UHD. It was quite a discussion and I noticed that the user was able to get stuffs work when he was using “Microsoft Basic Display Adapter” instead of Intel UHD drivers. So, I wanted to see whether it is the case with Snipping tool recording also. I kept removing the display drivers until the device manager shown “Microsoft Basic Display Adapter” for me. I started the screen recording and, yes, it worked! Let us check out a small video now, that was captured using Snipping Tool. Unfortunately, as soon the drivers were reinstalled, I lost this privilege and the only solution “working” for me was as discussed below.
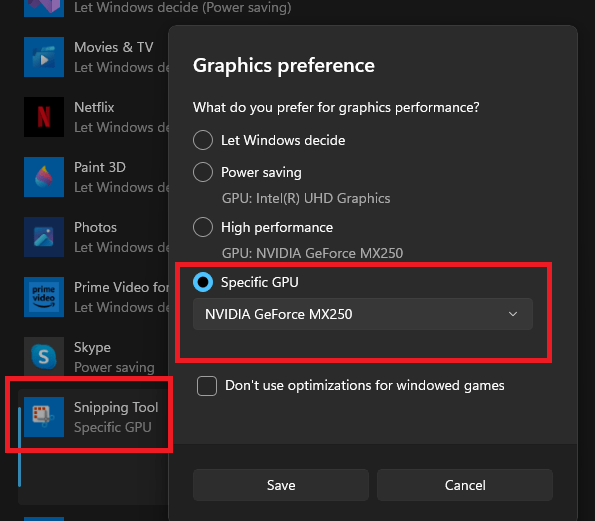
Updated on 3rd December 2023. It looks like, many people were able to get the snipping tool working finally by setting graphics to High Performance GPU. For me, the only option that works as on date is disabling the Intel UHD from devices panel. I think, it is a device specific issue & not many others are affected the way I am. Anyway, cheers guys. We have a working workaround now!


Disable the Intel Graphics. Snipping tool works, or worked for me through multiple hot and cold restarts after this hack.
If it fails, will update this thread with further information.
I will keep this as an open thread as, while the above hack works every time it has some adverse effects. Once I disable the Intel UHD graphics, my box cannot “Project” anymore! That means my multiple monitors setup goes for a toast. To get it back, I must enable the Intel UHD graphics once after the screen recording, feels awkward.
My HP laptop is more than 4 years old & the BIOS does not support selecting NVIDIA as default GPU, instead it is either the low power or hybrid mode. NVidia control panel is not of much help as Windows 11 handles such settings itself.
So for the time being, whenever you want to record screen using snipping tool, just disable the Intel UHD graphics and turn it on immediately after that in order to get back the multiple monitors support. If you are not using multiple monitors, then you can leave the changes as it is.


