It looks like, setting up the compatibility for Windows 7 solves the Reports Builder shaking, freezing behavior to a greater extend. Going on with the “Fix” as NOTHING else could be done with a product that is NOT anymore supported by Oracle.
====
I “trust” Microsoft and I do update my Work/Home/VMs regularly. Ahum! 99.9% of the times I never had to go back and fix anything, that .1% times, things went awfully bad.
I cannot confirm which update, certainly one update within last 2 months have made Oracle Reports Developer 10g/6i loads messier than earlier. Now both version of reports developer will NOT load the layout designer properly.
The interesting factor about the layout designer is:
It hangs more often when you have multiple reports opened from a single instance of the reports developer & you are switching between the layouts.
For example, if you opened Report 1’s layout & closed it, then opening the Report 2’s layout arrests the designer & all the toolbar icons and rest go astray (as you could see with above image) which will force you to end task the developer using Task Manager/or other known measures.
It is irky, shaky, yet you can do your work with multiple sessions of reports developer opened with only one report loaded. There are no guarantees that this IS the ultimate solution. I often have to terminate the report builder and restart it to do my development(s) :(
I’ve more news for you. I did a reinstall routine of Patch 3 for 10g developer & remembering Windows 7 was the last OS certified with the developer suite, changed the compatibility for the Report Developer and set it as Windows 7. I am not sure whether it acts as a mediator, my report builder is much stable as I am jolting these few lines. Keeping fingers crossed.
Almost a year back I posted about Linux Subsystem for Windows & interesting that I am revisiting the subject in the same period once again. Within an year time loads have changed with the Linux subsystem. Starting from Windows 10 version 1803, once started the Linux Subsystem is available in the background until a reboot! Sounds great?
This time we will see such an enhancement could be utilized on Windows for some extended “developments”, and I will walk you through setting up “WordPress” using WSL. Please note, I am opting “WordPress” as target ONLY for few reasons like:
“WordPress” is developed using PHP
“WordPress” mostly uses MySQL for database
“WordPress” is mostly hosted on LINUX environments
Windows SubSystem for Linux Installation
You must enable “Windows SubSystem for Linux ” through “Turn Windows Features on or off”, after which you will have to reboot your Windows box
Open “Windows Store” and search for Linux, that should bring up many results as seen with the image below
We’ll be using Ubuntu 18.04 LTS this time as I had pretty difficult issues with Pengwin & SUSE. If you are familiar with Linux, Ubuntu is a debian based Linux distribution & widely used for desktop systems. For our limited tests Ubuntu is a right choice.
Total download of Ubuntu 18.04 is around 270MBs & should be installed without giving any troubles.
Once “Ubuntu App” is installed you will be notified and you can immediately “launch” the app.
Ubuntu takes few minutes to finalize the installation & will prompt you to enter a username & password. Make sure you remember the username and password, forgetting may force you to reinstall Ubuntu.
Immediately after setting up a Linux username and password, we will make sure that the Subsystem is upgraded with all new packages.
(While apt & apt-get do almost the same thing, why “apt” is preferred? please read about it here)
Apache installation should not take more than few minutes & we will see how to configure it bit later.
MySQL installation
I faced multiple issues installing MySQL on my Ubuntu based WSL. Few were merely because I was ignoring few pre-requisites like checking for already open ports on my Windows & other were due to lack of adequate amount of experiences with installing software on Linux
After a couple of failed attempts, I landed upon this page, which neatly explains how to use MySQL PPA in the place of Ubuntu’s default repositories for MySQL
I will make some fresh screenshots, that is for recent versions of MySQL installation using the MySQL PPA, because there are few more MySQL versions are supported currently using the same PPA
Now we have a conflict to resolve. As on date, the MySQL 5.7 repository signature is invalid, for the same reason the repository will be disabled. (I don’t know what kind of issues this could produce, so not taking any risks). Next step we will get a valid signature for the disabled repository and re-enable it
Now we can start installing the MySQL 5.7 Server. Please note, if you already have an instance of MySQL running on your Windows, the port 3306 will be in use (unless custom ports are used) & you WILL never able to complete the MySQL installation on WSL. Many undocumented errors will stop the MySQL installation, apparently without giving you the least ideas of what went wrong. So, make sure that the MySQL server is stopped and the port is not listening to port 3306. I don’t know another way to address this situation.
You will be prompted for MySQL root account. I suggest using the same password across this particular setup so that you will not mess them up later stages.
Confirm the MySQL root password
That completes the MySQL 5.7 Server installation.
Now, let us try to start the MySQL 5.7 Server service.
MySQL 5.7 service is started now. So we can proceed to installing phpmyadmin, MySQL manipulation software.
As we are using Apache2 as web server, make the selection by tapping the spacebar and Ok
You will be asked whether the database for phpmyadmin should be configured, You should select Yes, unless you want to do it later.
You will be asked to provide the a password now, that is for the phpmyadmin, use the same MySQL root password here (you can use a new password, just to avoid confusion, I use the same password everywhere)
You have to confirm the password.
Now you will be asked to enter the MySQL administrator(root) password, supply it
Confirm & wait for the phpmyadkin to complete the installation
Installation will notify you about Apache not being running, you can ignore the notice.
Now we will start the Apache Server. Couple of things you should take care with Apache & I will try to list few of them below:
As the WSL runs as another software on Windows, it is bind to experience conflicts. For example, if you already have IIS server listening to port 80, without changing the port information for Apache, will not able to start the server until the ports information is corrected within the Apache configuration file.
If you already have MS SQL server installed with reporting, the reporting engine listens to port 80, so even if you would stop or disable the IIS/WWP services, there is a possibility that port conflicts will arise. This will also prompt you to alter the default port mentioned in the Apache configuration file
So let us see how we are going to address such conflicts:
Edit the Apache ports configuration file
[code language=”bash” gutter=”false”]
$sudo vi /etc/apache2
[/code]
I opted for port 8088 (You can choose a port that is NOT used by Windows. Issue netstat -aon to get a list of ports open/listening on Windows from CMD
100% sure that you are going get presented with an annoying notice “ Protocol not available: AH00076: Failed to enable APR_TCP_DEFER_ACCEPT” which is easily addressable.
We will edit the apache configuration file to address this issue
issue the command
[code language=”bash” gutter=”false”]
$sudo vi /etc/apache2/apache2.conf
[/code]
& add “AcceptFilter http none” by the end of the file.
Save the configuration file & restart the Apache service.
As we have completed all the installations and managed to start the services successfully after fixing the configuration files, it is time to reboot.
WSL unfortunately doesn’t let you use “init 0”, or “init 6” to shutdown or restart the instance, instead you must use the Windows Services MMC for the same.
This will close all open Ubuntu “app” windows. You can restart the Ubuntu from the app list.
Once Ubuntu restarted, let us start the services
[code language=”bash” gutter=”false”]
$sudo service apache2 start
$sudo service mysql start
[/code]
Once the services are started, we will try phpmyadmin. As I mentioned already, I have set the port 8088 for Apache, hence I can access the phpmyadmin from the link http://localhost:8088/phpmyadmin
You can safely ignore the warnings, as the current version of phpmyadmin we installed from Ubuntu repos have certain conflicts with PHP 7.2
Install “WordPress”
“WordPress” is one of the leading CMS (Content Management Systems) with unlimited possibilities. Recently we switched our decade long joomla based corporate website to “WordPress” & after few days of interactions with the technology, I feel I would never look anywhere else.
This will download the latest “WordPress” to your home folder
Now we have to extract the downloaded file to right htdoc root. We are talking about the default configurations available with apache configuration files. Hence the wordpress should be extracted to ‘/var/www/hmtl/’ folder, which is a protected path. We’ll change the folder permissions temporarily to facilitate the extracting
Now we have a problem, “WordPress” installation cannot write to “wp-config.php” file. This is due to linux file/folder permissions. Hence we will again change the permissions over ‘/var/www/’ folder
Now, go back to the previous page, furnish the details and “WordPress” should happily move ahead. Run the installation
That completes what we tried to achieve. “WordPress” running successfully from a WSL environment.
Now, it is time to ask the questions like “Why so much pain, when we can achieve the entire “WordPress” thing on Windows?”
Well, primarly “WordPress” performs better on Linux enviorment (personal observation), second & most important for me. I just love learning something new everyday. You are welcome!
Microsoft has added WSL with it’s Server 2016 (Version 1803) & the vision is pretty clear. Microsoft “wants” to provide a LINUX environment within Windows so that in the future, a separate LINUX Server requirement will NOT truly hurt the customers. Currently the WSL is NOT equipped with desktops/GUI & Pengwin like initiatives are sure making traction. If my guess will NOT go wrong, soon Windows Servers will be running “Linux” side by side & those Linux Servers are going to be as good as physical/Virtualized. We’ll wait eagerly, together.
After dealing with computer hardware for almost 20 years, there are times when I get totally confused about the PCI slots. I made numerous notes, saved images etc to help me whenever required. However, the below video has changed my entire “knowledge” about the PCI interfaces. You may enjoy it as well.
Recently I faced similar issues with 2 of my new monitors. Both were Samsung S2Nf350 Slim series LEDs (S22F350 & S24F350) & the issue was same.
After a long sleep/idle time the monitors will not wakeup with a mere keypress or mouse movement. I had to reach to the back of the monitors and press the power on button to awake the monitors!
I had chats with Samsung support & they asked me to take the monitors to nearest workshop as the LEGENDS at 1st level support decided that it was a hardware issue.
Then I decided to go through the user manual & came to an area where it narrated about a feature called “Off Timer”. This MUST be a new feature that is available with new generation LED monitors, helping them to turn off automatically after a pre-set period (default 4 hours)
Turning the feature to OFF state has resolved my weeks long “issues” with the monitor not awakening from a sleep.
Recently we started migrating our age old corporate website (Joomla based) to WordPress and one of the major challenges we faced was including “Arabic” text with certain pages. First of all, our theme didn’t come with a RTL option, plus, We didn’t need the entire site to be RIGHT to LEFT. Instead, just a portion of chosen pages displaying relevant Arabic text.
Here I am sharing a hack that helped us to address this requirement. As I mentioned, all we needed were few chosen blocks (Text boxes) displaying Arabic text in proper formatting, after few hours googling I landed on this page https://codex.wordpress.org/Right_to_Left_Language_Support which explains how to make a RTL CSS files from existing style.css from the theme that is used, to cater the RIGHT to LEFT requirements and making own rtl.css file following the instructions provided. As all I needed was to changed the properties of few text boxes, I continued searching and landed on this YouTube video
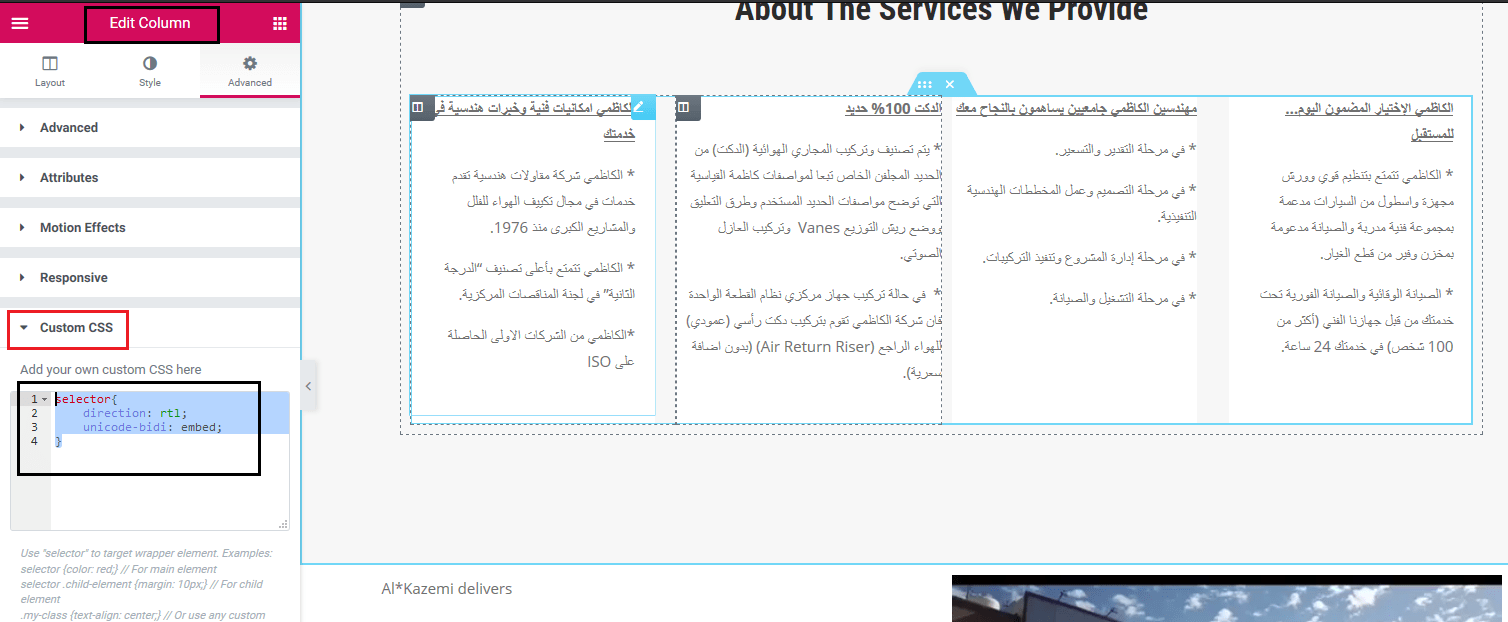
This video explains how to add custom CSS with different elements of Elementor editor & that was what I was looking for! I gave a try like following, chose a column which was having the text box, Advanced & under Custom CSS added the below code portion. That was it!
selector{ direction: rtl; unicode-bidi: embed; }
So if you ever come across such a requirement, know how to handle it without breaking your head & changing the current Theme with a RTL supported theme, which I know, will be a nightmare!
Hope this helps few WordPress enthusiasts out there!